1. Safety Information
Please read all instructions carefully before using your Bosch dishwasher. Keep this manual for future reference.
- Electrical Safety: Ensure the dishwasher is properly grounded. Do not use extension cords. Disconnect power before servicing.
- Water Safety: Connect to a potable water supply. Check for leaks after installation.
- Child Safety: Keep children away from the dishwasher, especially when it is operating or when the door is open. Use the Child Lock feature if available.
- Detergent and Rinse Aid: Use only detergents and rinse aids specifically designed for automatic dishwashers. Keep these products out of reach of children.
- Loading: Load sharp items (knives, forks) with handles up to prevent injury. Do not overload the dishwasher.
- Hot Surfaces: The interior of the dishwasher can be hot after a wash cycle. Allow time for cooling before unloading.
2. What's in the Box
Upon unpacking, ensure all components are present:
- Bosch SHE3AR75UC Dishwasher Unit
- User Manual
- Installation Guide
- Cutlery Basket
- Hoses and connectors (may be pre-attached or included separately)
3. Installation
Installation of the Bosch SHE3AR75UC dishwasher requires electrical, plumbing, and carpentry skills. It is highly recommended to have the appliance installed by a qualified professional to ensure proper function and safety.
3.1 Pre-Installation Checks
- Verify that the installation area meets the required dimensions (23.56"W x 22.56"D x 33.86"H).
- Ensure access to a dedicated 120V, 15A electrical circuit.
- Confirm hot water supply line and drain connection are accessible.
3.2 General Installation Steps (Summary)
- Prepare the cabinet opening.
- Connect the water supply line.
- Connect the drain hose to the sink drain or garbage disposal.
- Connect the electrical supply.
- Slide the dishwasher into the cabinet opening and secure it.
- Level the appliance.
- Test for leaks and proper operation.
Refer to the detailed Installation Guide provided with your appliance for complete instructions.
4. Product Overview
The Bosch SHE3AR75UC Ascenta Series Dishwasher is designed for efficient and quiet dishwashing. It features a stainless steel interior and a user-friendly control panel.
4.1 Exterior View

Figure 4.1: Front view of the Bosch SHE3AR75UC Ascenta Series Dishwasher in stainless steel.
4.2 Control Panel
The control panel is located on the top edge of the dishwasher door, providing easy access to all wash cycles and options.

Figure 4.2: Detailed view of the control panel, showing cycle selection and options.
- On/Off Button: Powers the dishwasher on or off.
- Cycle Select Buttons: Heavy Wash, Auto Wash, Normal Wash, Delicate Wash, Express Wash, Half Load.
- Option Buttons: Sanitize, Extra Shine, Delay Start.
- Display: Shows remaining time, refill indicators (Rinse Aid, Salt).
- Start/Resume Button: Initiates or resumes a wash cycle.
4.3 Interior Layout
The dishwasher features two racks and a cutlery basket for flexible loading.
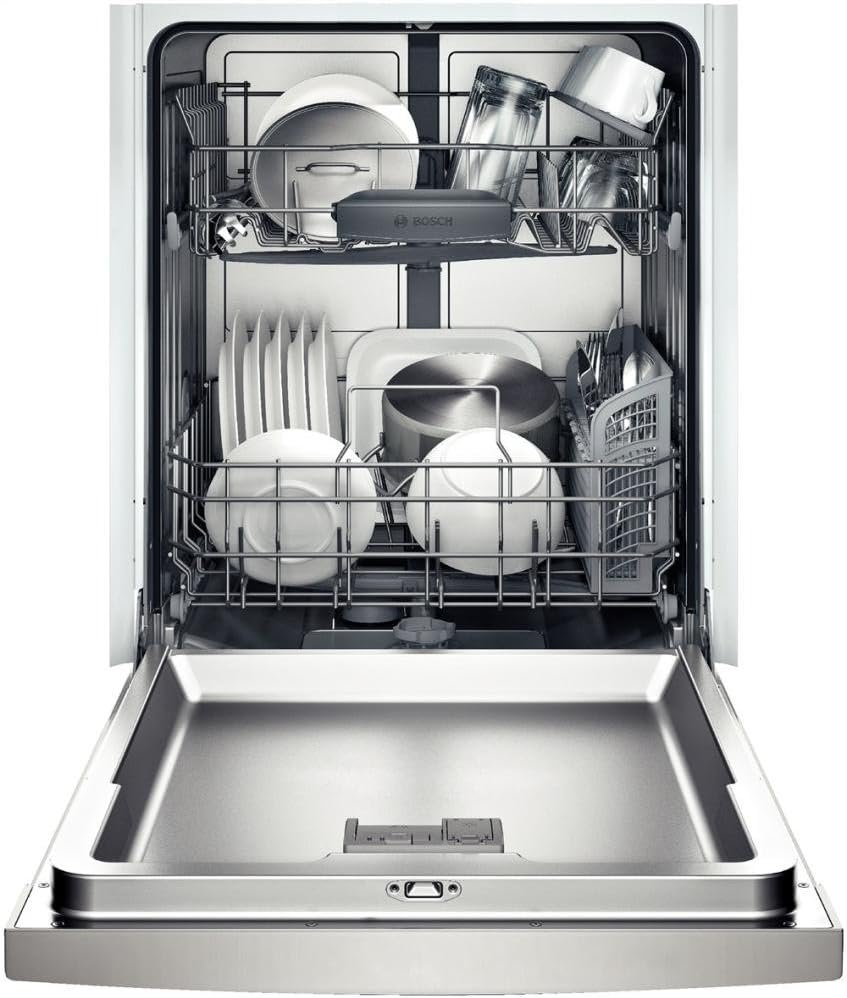
Figure 4.3: Interior view showing the upper and lower racks, and the cutlery basket.
- Upper Rack: Ideal for glasses, cups, and smaller bowls.
- Lower Rack: Designed for plates, larger bowls, pots, and pans.
- Cutlery Basket: For forks, spoons, and knives.
- Detergent Dispenser: Located on the inner door panel.
- Rinse Aid Dispenser: Located next to the detergent dispenser.
5. Initial Setup and Loading
5.1 First Use
- Ensure the dishwasher is properly installed and connected to power and water.
- Fill the rinse aid dispenser (see section 6.2).
- Run an empty wash cycle (e.g., Normal Wash) without detergent to flush the system.
5.2 Loading Dishes
Proper loading ensures optimal cleaning and drying performance.

Figure 5.1: Example of a properly loaded dishwasher with various items.
- Scrape off large food particles. Rinsing is generally not necessary.
- Place glasses, cups, and small bowls upside down in the upper rack.
- Load plates, larger bowls, pots, and pans in the lower rack, facing the center.
- Place cutlery in the cutlery basket with handles up for forks and spoons, and handles down for knives.
- Ensure spray arms can rotate freely and are not blocked by dishes.
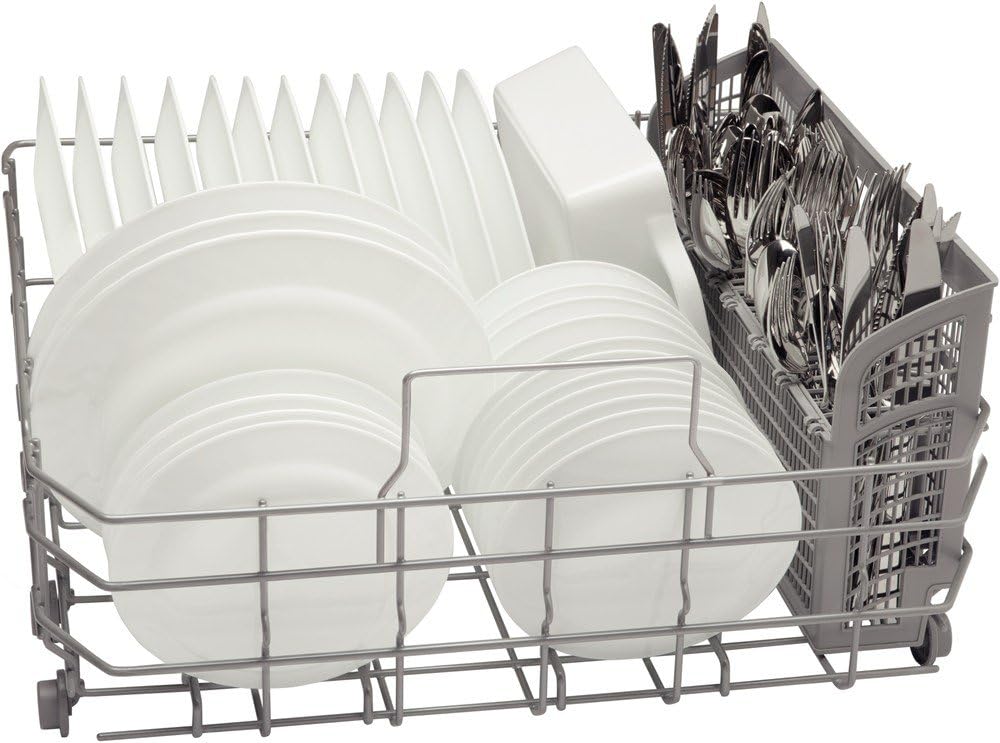
Figure 5.2: Close-up of the lower rack, demonstrating loading of plates and cutlery.
5.3 Adding Detergent and Rinse Aid
- Detergent: Open the detergent dispenser and add the recommended amount of dishwasher detergent (powder, gel, or tablet). Close the dispenser lid securely.
- Rinse Aid: Open the rinse aid dispenser cap and fill with liquid rinse aid until the indicator shows full. Close the cap tightly. This aids in drying and prevents water spots.
6. Operating Instructions
6.1 Starting a Wash Cycle
- Load the dishwasher and add detergent/rinse aid.
- Press the On/Off button to power on the appliance.
- Select the desired wash cycle (e.g., Normal Wash, Heavy Wash) by pressing the corresponding button.
- Select any desired options (e.g., Sanitize, Extra Shine, Delay Start).
- Press the Start/Resume button to begin the cycle. Close the dishwasher door firmly.
6.2 Wash Cycles and Options
| Cycle | Description |
|---|---|
| Heavy Wash | For heavily soiled pots, pans, and dishes. |
| Auto Wash | Automatically adjusts wash time and temperature based on soil level. |
| Normal Wash | For regularly soiled dishes. |
| Delicate Wash | Gentle wash for delicate items. |
| Express Wash | Quick wash for lightly soiled dishes. |
| Half Load | For smaller loads, saves water and energy. |
Options:
- Sanitize: Increases water temperature during the final rinse to sanitize dishes.
- Extra Shine: Enhances drying performance and reduces water spots.
- Delay Start: Allows you to delay the start of a wash cycle by several hours.
7. Maintenance
Regular maintenance ensures the longevity and optimal performance of your dishwasher.
7.1 Cleaning the Filters
The filter system should be checked and cleaned regularly to prevent food particles from recirculating and affecting wash performance.
- Turn off the dishwasher and disconnect power.
- Remove the lower rack.
- Twist and lift out the coarse filter and fine filter assembly.
- Rinse the filters under running water to remove any trapped food particles. Use a soft brush if necessary.
- Reassemble the filters and place them back into the dishwasher, ensuring they are securely locked in place.
7.2 Cleaning the Spray Arms
Periodically check the spray arm nozzles for blockages and clean as needed.
- Remove the spray arms by unscrewing or unclipping them.
- Clear any blocked nozzles with a thin wire or toothpick.
- Rinse thoroughly and reattach.
7.3 Exterior Cleaning
Wipe the exterior surfaces, including the control panel, with a soft, damp cloth. For stainless steel surfaces, use a specialized stainless steel cleaner.
8. Troubleshooting
Before contacting customer service, refer to the following common issues and solutions:
| Problem | Possible Cause | Solution |
|---|---|---|
| Dishwasher does not start | Power cord unplugged, door not closed properly, circuit breaker tripped. | Check power connection, ensure door is latched, reset circuit breaker. |
| Dishes not clean | Improper loading, clogged spray arms/filters, insufficient detergent. | Reload dishes correctly, clean spray arms and filters, use appropriate detergent. |
| Water spots on dishes | Low rinse aid level, hard water. | Refill rinse aid dispenser, consider a water softener if water is very hard. |
| Dishwasher is noisy | Items interfering with spray arms, foreign object in pump. | Ensure dishes do not block spray arms, inspect pump area for obstructions. |
| Error Code E24 | Drainage issue, clogged filter or drain hose. | Clean filters, check drain hose for kinks or blockages. |
9. Specifications
| Feature | Detail |
|---|---|
| Model Number | SHE3AR75UC |
| Brand | Bosch |
| Finish Type | Stainless Steel |
| Form Factor | Built-In |
| Dimensions (D x W x H) | 22.56" x 23.56" x 33.86" |
| Item Weight | 69 lbs (approx.) |
| Voltage | 120 Volts |
| Capacity | 14 Place Settings |
| Number of Cycles | 6 (Heavy, Auto, Normal, Delicate, Express, Half Load) |
| Special Features | Delay Start, Sanitize Option |
| Noise Level | 50 Decibels |
| Certification | ENERGY STAR |
10. Warranty and Support
This Bosch dishwasher comes with a limited warranty. For specific warranty details, including coverage period and terms, please refer to the warranty card included with your appliance or visit the official Bosch Home Appliances website.
For technical assistance, service requests, or to order replacement parts, please contact Bosch Customer Service. Contact information can be found in your warranty documentation or on the Bosch Home Appliances website.
When contacting support, please have your model number (SHE3AR75UC) and serial number ready.


