1. Introduction
The General Tools MMD950 is a versatile moisture meter designed for detecting moisture content in various building materials such as wood, drywall, and concrete. This device offers both pin-type and pinless measurement modes, providing flexibility for different applications. It features a large LCD display, LED visual alerts, and an audible alarm to indicate moisture levels. This manual provides essential information for the proper setup, operation, and maintenance of your MMD950 Moisture Meter.
2. Safety Information
Please read and understand all safety instructions before using the device. Failure to follow these instructions may result in injury or damage to the meter.
- Sharp Probes: The pin-type probe contains sharp tips. Handle with care to prevent injury. Keep the protective cap on when not in use.
- Battery Safety: Use only the specified battery type (9V). Do not mix old and new batteries. Dispose of batteries properly according to local regulations.
- Environmental Conditions: Do not expose the meter to extreme temperatures, high humidity, or direct sunlight for extended periods.
- Cleaning: Clean the meter with a soft, dry cloth. Do not use abrasive cleaners or solvents.
3. Package Contents
Verify that all items are present in your package:
- General Tools MMD950 Moisture Meter
- External Pin-Type Probe
- Replacement Pins
- 9V Battery
- Custom Carrying Case
4. Product Overview
Familiarize yourself with the components of your MMD950 Moisture Meter.
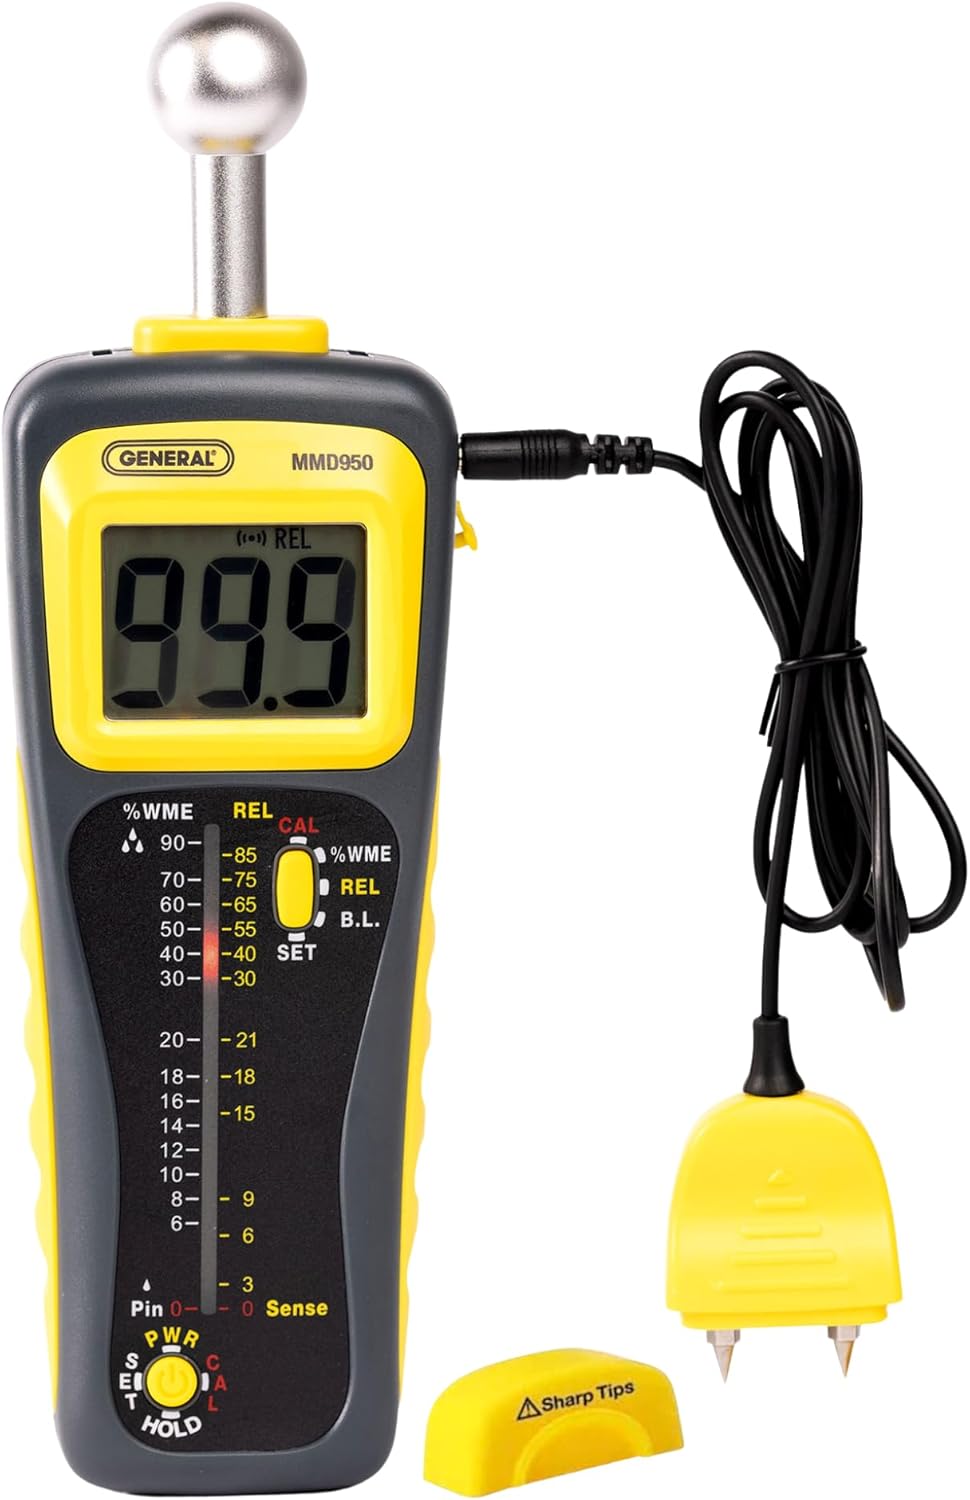
Figure 1: The General Tools MMD950 Moisture Meter, featuring a large LCD display, spherical pinless sensor, and a connected remote pin-type probe. The device is yellow and gray with clear controls.
- Spherical Pinless Sensor: Located at the top of the meter, used for non-invasive moisture detection.
- LCD Display: Shows moisture readings, battery status, and mode indicators.
- LED Bar Graph: Provides visual indication of moisture levels (Green: Low, Yellow: Medium, Red: High).
- Remote Pin-Type Probe Port: Connects the external pin-type probe for invasive measurements.
- Power/Mode Button: Turns the device on/off and switches between measurement modes.
- HOLD Button: Freezes the current reading on the display.
- Calibration Cap: Protective cover for the pin-type probe, also used for calibration.

Figure 2: The MMD950 meter displaying its dual measurement capabilities: the spherical sensor for pinless readings and the remote probe for pin-type readings, both clearly labeled.
5. Setup
5.1. Battery Installation
- Locate the battery compartment on the back of the meter.
- Open the battery compartment cover.
- Insert one 9V battery, observing the correct polarity (+/-).
- Close the battery compartment cover securely.
5.2. Initial Calibration
The protective cover for the pin-type probe doubles as a calibration checker. To ensure accurate readings, perform a quick calibration:
- Ensure the meter is powered off.
- Place the pin-type probe (either attached or remote) into the designated slots on the protective cap.
- Turn on the meter. The display should show a specific reference value, confirming calibration. Refer to the meter's display for the exact reference value.
6. Operating Modes
The MMD950 offers two primary measurement modes:
6.1. Pin-Type Measurement (%WME)
This mode uses the external pin-type probe to measure Wood Moisture Equivalent (%WME). It provides precise readings by directly inserting the pins into the material.
- Connect the remote pin-type probe to the meter's port.
- Press the Power/Mode button to select the %WME mode.
- Carefully insert the pins into the material to be tested. Ensure good contact.
- Read the moisture percentage on the LCD display and observe the LED bar graph.

Figure 3: A close-up view of the MMD950 meter with the pin-style cable connected, allowing for precise %WME readings from a distance.
6.2. Pinless Measurement (REL)
This non-invasive mode uses the spherical sensor to detect relative moisture levels up to 4 inches deep without damaging the surface. It is ideal for quick scans and detecting moisture behind walls or under flooring.
- Ensure the remote pin-type probe is disconnected or not in use.
- Press the Power/Mode button to select the REL mode.
- Place the spherical sensor flat against the surface of the material.
- Move the meter slowly across the surface. The display will show relative moisture readings.
- Observe the LED bar graph and listen for the audible alarm for high moisture indications.

Figure 4: A hand holds the MMD950 meter with its spherical sensor against a light gray wall, illustrating its capability to detect moisture up to 4 inches deep without surface penetration.
7. Taking and Interpreting Measurements
7.1. Interpreting Readings
- LCD Display: Provides a numerical value of moisture content (in %WME or relative units).
- LED Bar Graph:
- Green: Low moisture content.
- Yellow: Medium moisture content.
- Red: High moisture content, indicating potential water damage or mold risk.
- Audible Alarm: An audible alert will sound when high moisture levels are detected, particularly useful for quick scanning in pinless mode.

Figure 5: The MMD950 meter showing a high moisture reading on its display, highlighting its role in identifying moisture for mold prevention.
7.2. HOLD Function
Press the HOLD button to freeze the current reading on the LCD display. This is useful when taking measurements in hard-to-reach areas where the display cannot be easily viewed. Press the HOLD button again to release the reading.
7.3. Auto Power-Off
The MMD950 features an auto power-off function to conserve battery life. The device will automatically turn off after 3, 5, or 10 minutes of inactivity. This duration can be adjusted in the meter's settings (refer to the full manual for detailed instructions on adjusting auto power-off settings).
8. Maintenance
8.1. Cleaning
Wipe the meter with a soft, dry cloth. Do not use liquid cleaners or immerse the device in water.
8.2. Probe Care
Always keep the protective cap on the pin-type probe when not in use to prevent damage to the pins and accidental injury. Replacement pins are available if the original pins become dull or damaged.

Figure 6: The MMD950 meter with its removable pin attachment, which can be regularly calibrated using the protective cap.
8.3. Storage
Store the meter in its custom hard plastic carrying case in a cool, dry place when not in use. Remove the battery if storing for extended periods to prevent leakage.
9. Troubleshooting
If you encounter issues with your MMD950, refer to the following common problems and solutions:
| Problem | Possible Cause | Solution |
|---|---|---|
| Meter does not turn on | Dead or incorrectly installed battery | Replace the 9V battery, ensuring correct polarity. |
| Inaccurate readings | Meter needs calibration; poor probe contact; pins are dull/damaged | Perform calibration using the protective cap. Ensure firm contact with the material. Replace pins if necessary. |
| No reading in Pinless mode | Spherical sensor not flat against surface; material too dense/thick for sensor depth | Ensure the spherical sensor is flush with the surface. Consider using Pin-Type mode for very dense materials or deeper measurements. |
| Audible alarm sounds constantly | High moisture detected; sensor interference | Move the meter to a different area. Ensure no metallic objects are interfering with the sensor. |
10. Specifications
| Feature | Detail |
|---|---|
| Model | MMD950 |
| Measurement Modes | Pin Type (%WME), Pinless (Relative) |
| Pinless Sensing Depth | Up to 4 inches |
| Display | Jumbo LCD, 40-dot Tri-color LED Bar Graph |
| Power Source | 1 x 9V Battery (Alkaline) |
| Auto Power-Off | Adjustable (3, 5, or 10 minutes) |
| Included Components | Moisture meter, external probe, replacement pins, 9V battery, custom carrying case |
| Product Dimensions | 4"W x 12"H |
| Item Weight | 2 Pounds |
| Operating Temperature | Up to 122°F |
11. Warranty and Support
11.1. Warranty Information
The General Tools MMD950 Moisture Meter is covered by a 1-year parts warranty from the date of purchase. This warranty covers defects in materials and workmanship under normal use. It does not cover damage resulting from misuse, accident, alteration, neglect, or unauthorized repair.
11.2. Customer Support
For technical assistance, warranty claims, or to order replacement parts, please contact General Tools customer support. Refer to the contact information provided with your product packaging or visit the official General Tools website.


