Introduction
Thank you for purchasing the Denver CR-CD211 Radio Alarm Clock. This device combines a digital alarm clock with a radio tuner, a front-loading CD player, and a convenient time projection feature. This manual provides detailed instructions for setup, operation, and maintenance to ensure optimal performance and longevity of your product.
Important Safety Information
- Read all instructions carefully before use and retain them for future reference.
- Do not expose the unit to rain or moisture to prevent fire or electric shock.
- Ensure the power cord is not pinched or walked on.
- Do not block any ventilation openings. Install in accordance with the manufacturer's instructions.
- Only use attachments/accessories specified by the manufacturer.
- Unplug this apparatus during lightning storms or when unused for long periods.
- Refer all servicing to qualified service personnel. Servicing is required when the apparatus has been damaged in any way.
Product Overview
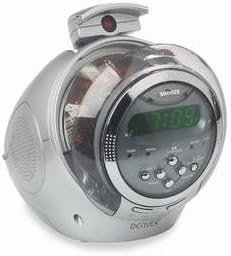
Image Description: A silver-colored Denver CR-CD211 radio alarm clock. The device has a rounded, futuristic design with a clear plastic dome covering the CD player compartment. The front features a digital display showing '7:09' in green, surrounded by control buttons for functions like 'SNOOZE', 'ALARM', 'SET', 'TUNING', and 'VOLUME'. A small projector arm extends from the top, capable of rotating to project the time. A speaker grille is visible on the left side. The overall appearance is compact and modern, designed for a bedside table or desk.
The Denver CR-CD211 is a versatile bedside companion. Its key features include:
- Digital Clock Display: Clear, easy-to-read digital time display.
- FM/AM Radio Tuner: For listening to your favorite radio stations.
- Front-Loading CD Player: Compatible with standard audio CDs.
- Dual Alarm Function: Wake up to radio or buzzer.
- Time Projection: Project the current time onto a wall or ceiling.
- Snooze Function: Temporarily pause your alarm.
Setup
1. Power Connection
- Unpack the unit and place it on a stable, flat surface.
- Connect the AC power adapter (if included) or power cord to the DC IN jack on the back of the unit.
- Plug the other end of the power cord into a standard wall outlet. The display should light up.
- Optional Backup Batteries: For maintaining time settings during power outages, locate the battery compartment (usually on the bottom or back) and insert 2 x AAA batteries (not included), observing correct polarity.
2. Setting the Time
- Press and hold the TIME SET button (or similar, refer to your unit's specific button layout). The hour digits will begin to flash.
- Use the HOUR and MINUTE buttons (or TUNING +/- buttons) to adjust the hour and minute respectively.
- Press TIME SET again to confirm the time.
Operating Instructions
1. Radio Operation
- Press the POWER button to turn on the unit.
- Press the FUNCTION/MODE button repeatedly until 'RADIO' or the radio frequency is displayed.
- Use the TUNING +/- buttons to manually tune to your desired station.
- For automatic scanning, press and hold the TUNING +/- button for a few seconds. The radio will scan and stop at the next strong station.
- Adjust the volume using the VOLUME +/- buttons.
2. CD Player Operation
- Press the POWER button to turn on the unit.
- Press the FUNCTION/MODE button repeatedly until 'CD' is displayed.
- Gently open the CD compartment cover (if applicable) or insert a CD into the front-loading slot with the label side facing up.
- The CD player will automatically start playing the first track. If not, press the PLAY/PAUSE button.
- Use the SKIP +/- buttons to navigate between tracks.
- Press PLAY/PAUSE to pause or resume playback.
- Press the STOP button to stop playback.
3. Setting the Alarm
The CR-CD211 typically features two independent alarms (Alarm 1 and Alarm 2).
- Press and hold the ALARM 1 SET button (or ALARM button and then select Alarm 1). The alarm hour digits will flash.
- Use the HOUR and MINUTE buttons to set the desired alarm time.
- Press ALARM 1 SET again to confirm the time.
- Next, select the alarm source: Press the ALARM 1 MODE button (or similar) repeatedly to cycle through options: BUZZER, RADIO, or OFF.
- Repeat for ALARM 2 if desired.
4. Snooze Function
When the alarm sounds, press the large SNOOZE button (usually located on top of the unit). The alarm will temporarily stop and sound again after approximately 9 minutes.
5. Time Projection
- Locate the projector arm on top of the unit.
- Adjust the angle of the projector arm to direct the time display onto a wall or ceiling.
- Use the FOCUS wheel (if available, usually on the projector arm) to sharpen the projected image.
- Press the PROJECTION ON/OFF button (or similar) to activate or deactivate the projection.
- Some models may have a FLIP button to rotate the projected image 180 degrees.
Maintenance
- Cleaning: Wipe the unit with a soft, dry cloth. Do not use abrasive cleaners or solvents.
- CD Player Care: Handle CDs by their edges. Keep the CD compartment clean and free of dust. Do not attempt to clean the CD lens yourself.
- Ventilation: Ensure the ventilation openings are not blocked to prevent overheating.
Troubleshooting
| Problem | Possible Cause | Solution |
|---|---|---|
| Unit does not power on. | Power cord not properly connected. | Check power cord connection to the unit and wall outlet. |
| Alarm does not sound. | Alarm not set correctly; Alarm volume too low; Alarm mode set to OFF. | Verify alarm time and mode (Buzzer/Radio). Increase alarm volume. Ensure alarm is activated. |
| Poor radio reception. | Antenna not extended or positioned correctly; Interference. | Extend and adjust the position of the FM wire antenna. Try moving the unit to a different location away from other electronic devices. |
| CD does not play or skips. | CD is dirty or scratched; CD inserted incorrectly; CD format not supported. | Clean the CD with a soft cloth. Re-insert the CD with the label side up. Ensure it is an audio CD. |
| Time projection is blurry or not visible. | Focus not adjusted; Projector angle incorrect; Room too bright. | Adjust the focus wheel on the projector. Reposition the projector arm. Ensure the room is sufficiently dark. |
Specifications
- Brand: Denver
- Model: CR-CD211
- Power Source: Electric (AC power adapter), Optional Battery Backup (AAA batteries, not included)
- Display Type: Digital
- Material: Plastic
- Dimensions (approx.): 26.8 x 20.8 x 20.2 cm
- Weight (approx.): 1.7 kg
- Special Features: Radio, CD Player, Alarm Clock, Time Projection
Warranty and Support
For warranty information and technical support, please refer to the warranty card included with your product or contact your local Denver retailer or service center. Keep your proof of purchase for warranty claims.


