Introduction
This manual provides comprehensive instructions for the installation, operation, and maintenance of your Grasslin by Intermatic GM40AV 24-Hour Electromechanical Timer. Please read this manual thoroughly before installation and use to ensure safe and efficient operation of the device. This timer is designed for reliable control of electrical loads in various applications.
Important Safety Information
WARNING: Risk of Fire or Electric Shock.
- Disconnect power at the circuit breaker or disconnect switch(es) before installing or servicing.
- Do not use the manual shut-off position of the timer for equipment servicing.
- Installation and/or wiring must be in accordance with national and local electrical code requirements.
- For 40 A loads, use #8 AWG wire rated 90°C (194°F) copper conductors ONLY.
- This enclosure does not provide grounding between conduit connections. When metallic conduit is used, you must also install grounding type bushings and jumper wires.
- For outdoor locations or wet locations (rain-tight), conduit hubs that comply with requirements of the UL514B standard for fitting conduit and outlet boxes are to be used.
- Rotate timer dial clockwise only. Moving the clock hands counter-clockwise can damage the timer.
Product Overview
The Intermatic GM40AV is a 24-hour electromechanical timer housed in a durable NEMA 3R outdoor plastic enclosure, designed for robust performance in various environments. It features a clear dial for setting schedules and indicators for power and status.

Figure 1: The GM40AV timer in its closed NEMA 3R outdoor plastic enclosure, providing protection from environmental elements.
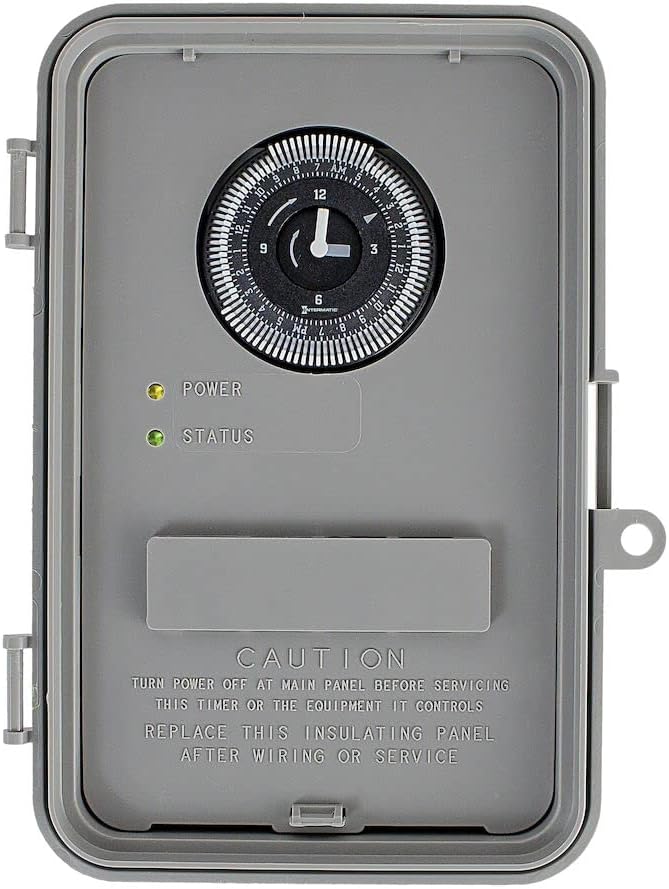
Figure 2: The timer with its enclosure door open, revealing the 24-hour dial, power (yellow) and status (green) indicator lights, and important safety labels.
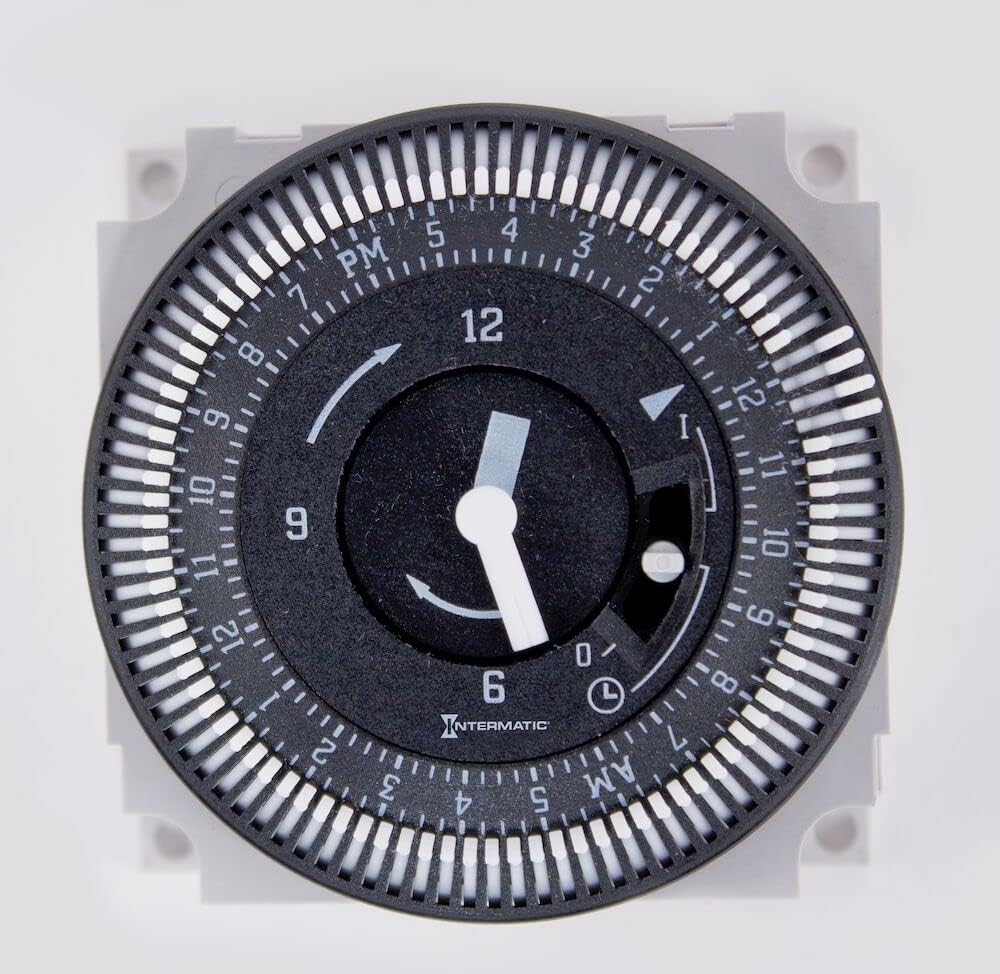
Figure 3: A detailed view of the timer's 24-hour dial, showing the minute hand, hour markings, and the small white trippers used for setting ON/OFF intervals.

Figure 4: The physical dimensions of the timer enclosure, demonstrating its compact size for installation.
Specifications
| Feature | Detail |
|---|---|
| Manufacturer | Intermatic Incorporated |
| Part Number | GM40AV |
| Item Weight | 1.65 pounds |
| Product Dimensions | 6.75 x 3.94 x 10.13 inches |
| Item Model Number | GM40AV |
| Material | Plastic |
| Installation Method | Screw-In |
| Mounting Type | Surface Mount |
| Certification | NEMA 3R |
| Max. Number of Operations | 48 Hour |
| Min. OFF Time | 15 Minutes |
| Min. ON Time | 15 Minutes |
| Approval | UL (Canada and US) |
| Date First Available | June 13, 2011 |
Setup and Installation
Installation of the GM40AV timer should only be performed by qualified personnel in accordance with all national and local electrical codes. Ensure power is disconnected at the main panel before beginning any work.
- Mounting: Securely mount the NEMA 3R outdoor plastic enclosure to a flat, stable surface using appropriate screw-in methods. The enclosure is designed for surface mounting.
- Wiring: Open the enclosure door. Refer to the wiring diagrams located inside the enclosure for correct connections. The GM40AV supports SPDT/DPDT configurations. Ensure all wire connections are tight and secure. For 40A loads, use #8 AWG 90°C copper conductors. If using metallic conduit, install grounding type bushings and jumper wires as the enclosure does not provide grounding between conduit connections.
- Conduit Connections: For outdoor or wet locations, use conduit hubs that comply with UL514B standards to maintain the rain-tight integrity of the enclosure.
- Insulating Panel: After wiring is complete, ensure the insulating panel is properly replaced before closing the enclosure door.
- Power Restoration: Once installation is complete and all connections are verified, restore power at the main circuit breaker.
Operating Instructions
The GM40AV timer is designed for straightforward operation to control your electrical loads.
- Setting the Time: Turn the minute hand clockwise until the time of day (AM or PM) on the outer dial is aligned with the triangle marker on the inner dial. Do not rotate the dial counter-clockwise as this can damage the timer mechanism.
- Programming ON/OFF Cycles: The outer dial features 1/4 hour divisions and AM/PM indicators. To program an ON period, push the white captive trippers outward for the desired duration. Each tripper represents 15 minutes. For example, to set a 1-hour ON period, push out four consecutive trippers.
- Manual Override: The timer includes a manual override switch.
- Middle Position: The timer operates in automatic mode, following the programmed ON/OFF cycles.
- Upper Position (ON): The output is permanently ON, overriding the program.
- Lower Position (OFF): The output is permanently OFF, overriding the program.
Maintenance
The Intermatic GM40AV timer is designed for minimal maintenance. Regular checks can help ensure its longevity and proper function.
- Periodic Inspection: Annually inspect the enclosure for any signs of damage, cracks, or loose connections. Ensure the door latches securely.
- Cleaning: Clean the exterior of the enclosure with a damp cloth. Do not use abrasive cleaners or solvents. Ensure the timer is dry before closing the door.
- Wiring Integrity: Periodically check wiring connections for tightness, especially if the unit is subject to vibration or extreme temperature changes. Always disconnect power before inspecting wiring.
Troubleshooting
If you encounter issues with your GM40AV timer, refer to the following common problems and solutions:
| Problem | Possible Cause | Solution |
|---|---|---|
| Timer does not turn ON/OFF at programmed times. | Incorrect time setting; Trippers not set correctly; Manual override engaged. | Verify current time is set accurately. Ensure white trippers are pushed out for desired ON periods. Check manual override switch is in the middle (automatic) position. |
| Timer dial is not moving. | No power to the unit; Internal mechanism issue. | Check circuit breaker for power. Ensure wiring connections are secure. If power is present and dial still not moving, the unit may require replacement. |
| Power indicator light (yellow) is off. | No power supply. | Check the main circuit breaker and all wiring connections to ensure the timer is receiving power. |
| Status indicator light (green) is off when it should be on. | Load not receiving power; Internal fault. | Verify the load is connected correctly and is not faulty. Check the manual override switch. If the issue persists, consult a qualified electrician. |
Warranty and Support
For detailed warranty information regarding your Intermatic GM40AV timer, please refer to the manufacturer's official documentation or visit the Intermatic Store on Amazon or their official website. Intermatic provides support for their products to ensure customer satisfaction.
For technical assistance or further inquiries, please contact Intermatic customer support directly.


