1. Introduction
This manual provides comprehensive instructions for the installation, operation, maintenance, and troubleshooting of the GIGABYTE GA-78LMT-S2P Micro ATX Motherboard. This motherboard is designed to support AMD AM3+ and AM3 Phenom II/Athlon II processors, featuring the AMD 760G + SB710 chipset. It incorporates GIGABYTE's Ultra Durable 2 Classic design for enhanced stability and longevity.
Key features include:
- Support for AMD AM3+ & AM3 Phenom II/Athlon II processors.
- Integrated ATI Radeon HD 3000 graphics (DirectX10).
- Dual channel DDR3 memory architecture.
- Hybrid EFI technology with DualBIOS for 3TB HDD support.
- GIGABYTE On/Off Charge for USB devices.
2. Setup and Installation
Before beginning installation, ensure your system is powered off and disconnected from the power outlet. Handle the motherboard by its edges to avoid static discharge.
2.1 Motherboard Layout
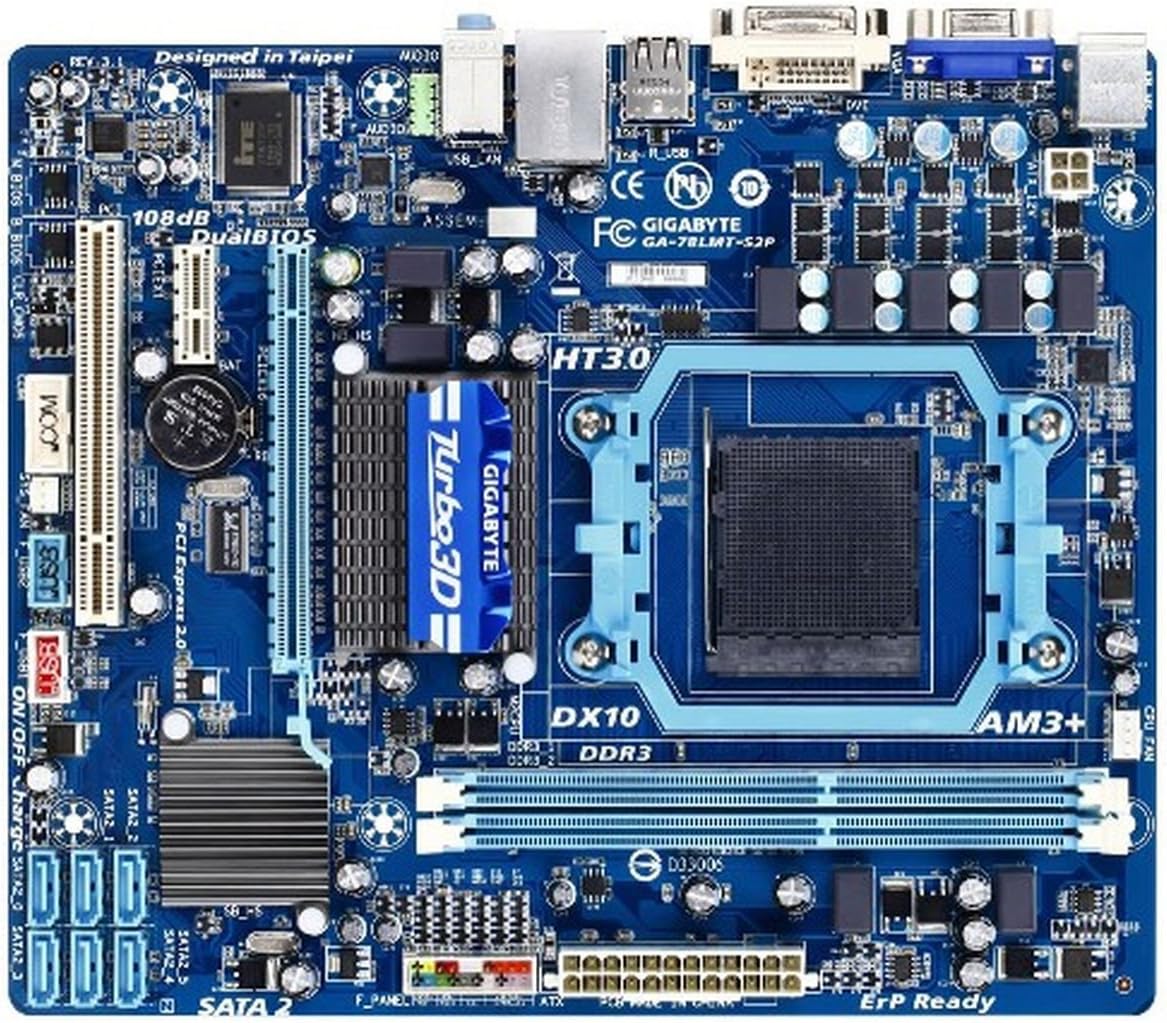
Image 1: Top-down view of the GIGABYTE GA-78LMT-S2P Micro ATX Motherboard. This image displays the overall layout, including the AM3+ CPU socket, DDR3 DIMM slots, PCI Express slots, SATA ports, and various headers and components.
2.2 CPU Installation
- Locate the AM3+ socket on the motherboard.
- Lift the CPU socket lever.
- Align the CPU with the socket, ensuring the golden triangle on the CPU matches the triangle mark on the socket. Gently place the CPU into the socket without forcing it.
- Lower the CPU socket lever to secure the CPU.
- Apply thermal paste (if not pre-applied to the cooler) and install the CPU cooler according to its manufacturer's instructions.
2.3 Memory Installation
The motherboard has two 1.5V DDR3 DIMM sockets, supporting up to 8 GB of system memory.
- Open the clips at both ends of the DIMM socket.
- Align the memory module with the socket, ensuring the notch on the module matches the key in the socket.
- Press down firmly on both ends of the memory module until the clips snap into place.
2.4 Power Connections
- Connect the 24-pin ATX main power connector from your power supply to the motherboard.
- Connect the 4-pin ATX 12V power connector to the motherboard. This is crucial for CPU power.
2.5 Storage Device Connections
The motherboard features six SATA 3Gb/s connectors.
- Connect one end of a SATA data cable to a SATA 3Gb/s connector on the motherboard.
- Connect the other end of the SATA data cable to your SATA hard drive or SSD.
- Connect a SATA power cable from your power supply to the storage device.
2.6 Expansion Card Installation
The motherboard includes one PCI Express x16 slot, one PCI Express x1 slot, and one PCI slot.
- Align your expansion card with the appropriate slot.
- Press down firmly until the card is seated correctly.
- Secure the card with a screw to the chassis.
2.7 Front Panel and Back Panel Connections
Connect your chassis' front panel connectors (power switch, reset switch, HDD LED, power LED, front panel audio, USB) to the corresponding headers on the motherboard. Refer to the motherboard diagram for exact locations.

Image 2: Rear I/O panel of the GIGABYTE GA-78LMT-S2P Micro ATX Motherboard. This image shows the various ports available for external connections, including PS/2, D-Sub, DVI-D, USB 2.0/1.1, LAN, and audio jacks.
The back panel connectors include:
- 1 x PS/2 keyboard port
- 1 x PS/2 mouse port
- 1 x D-Sub port (VGA)
- 1 x DVI-D port
- 4 x USB 2.0/1.1 ports
- 1 x RJ-45 LAN port
- 3 x audio jacks (Line In/Line Out/Microphone)
3. Operating Instructions
3.1 BIOS/UEFI Setup
The motherboard features Hybrid EFI technology with DualBIOS. To enter the BIOS setup utility, press the DEL key during system startup. The BIOS allows you to configure system settings, boot order, and monitor hardware status. DualBIOS provides a backup BIOS chip, enhancing system reliability.
3.2 Integrated Graphics
The motherboard includes integrated ATI Radeon HD 3000 graphics, supporting DirectX10. This provides basic display capabilities without the need for a discrete graphics card. Connect your monitor to the D-Sub or DVI-D port on the back panel.
3.3 Audio Configuration
The Realtek ALC889 codec provides 7.1-channel High Definition Audio. Connect your speakers or headphones to the appropriate audio jacks on the back panel. Drivers for the audio chipset can be found on the GIGABYTE support website or the included driver disc.
3.4 Network Connectivity
The integrated Realtek 8111E chip provides 10/100/1000 Mbit LAN connectivity. Connect an Ethernet cable from your router or modem to the RJ-45 port on the back panel for internet access.
3.5 USB On/Off Charge
This feature allows for faster charging of USB devices, including iPads, iPhones, and iPod Touches, even when the PC is turned off or in standby mode. Ensure the necessary drivers or utilities are installed from the GIGABYTE website.
4. Maintenance
- Cleaning: Regularly clean dust from the motherboard and components using compressed air. Ensure the system is powered off and unplugged before cleaning.
- BIOS Updates: Periodically check the GIGABYTE website for BIOS updates. BIOS updates can improve compatibility, performance, and stability. Follow the instructions provided by GIGABYTE carefully when updating the BIOS.
- Driver Updates: Keep your chipset, graphics, audio, and LAN drivers updated for optimal performance and compatibility.
5. Troubleshooting
This section addresses common issues you might encounter.
5.1 No Power / No Boot
- Verify all power cables (24-pin ATX, 4-pin ATX 12V) are securely connected to the motherboard and power supply.
- Ensure the CPU and memory modules are correctly installed.
- Check that the power supply is functioning correctly.
- Clear the CMOS by removing the CMOS battery for a few minutes or using the clear CMOS jumper (refer to the motherboard diagram).
5.2 No Display Output
- Ensure your monitor is connected to the correct video output (either integrated graphics or a discrete graphics card).
- If using a discrete graphics card, ensure it is properly seated in the PCI Express x16 slot and any necessary auxiliary power connectors are attached.
- Try connecting to a different video output port or using a different cable/monitor to isolate the issue.
5.3 No Audio
- Verify speakers/headphones are correctly plugged into the appropriate audio jacks on the back panel.
- Ensure audio drivers are installed and updated.
- Check audio settings in your operating system.
- If experiencing static or noise, consider using a dedicated sound card if the integrated audio is insufficient for your needs.
5.4 Operating System Not Booting (UEFI/MBR Issues)
- Access the BIOS/UEFI setup and verify the boot order.
- If installing a new operating system, ensure the boot mode (UEFI or Legacy/CSM) is correctly configured for your installation media and target drive.
- For issues with blank drives or EFI partitions, ensure your drives are properly partitioned and formatted for your chosen boot method.
6. Specifications
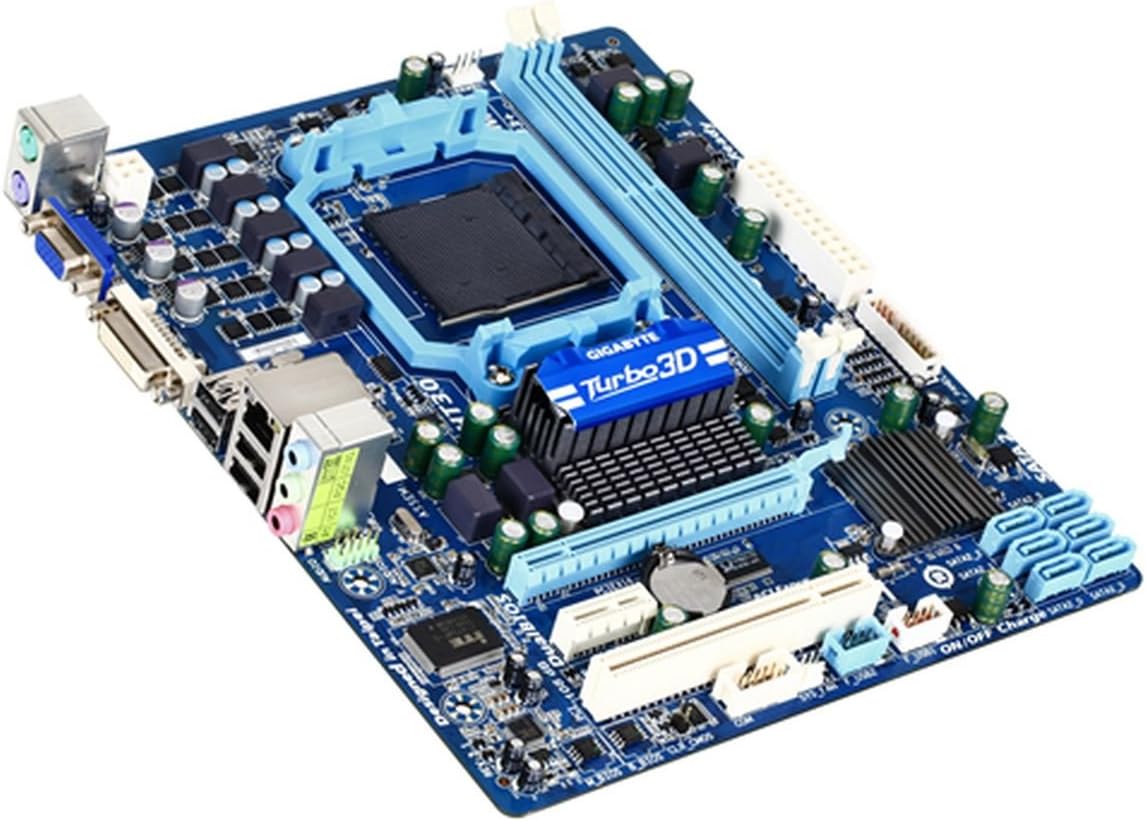
Image 3: Angled view of the GIGABYTE GA-78LMT-S2P Micro ATX Motherboard, highlighting the heatsinks and various component placements.
| Feature | Specification |
|---|---|
| CPU Socket | Socket AM3+ |
| Compatible Processors | AMD AM3+/AM3 Phenom II / AMD Athlon II processors |
| Chipset | AMD 760G / AMD SB710 |
| Hyper Transport Bus | 5200 MT/s |
| Memory | 2 x 1.5V DDR3 DIMM sockets, up to 8 GB, Dual channel, Support for DDR3 1333+ (O.C.)/1066/800 MHz |
| Audio | Realtek ALC889 codec, High Definition Audio, 7.1-channel |
| LAN | 1 x Realtek 8111E chip (10/100/1000 Mbit) |
| Expansion Slots | 1 x PCI Express x16 slot (x16), 1 x PCI Express x1 slot, 1 x PCI slot |
| Storage Interface | 6 x SATA 3Gb/s connectors, Support for SATA RAID 0, RAID 1, RAID 10, and JBOD |
| USB | Up to 8 USB 2.0/1.1 ports (4 on back panel, 4 via internal headers) |
| Back Panel Connectors | 1 x PS/2 keyboard, 1 x PS/2 mouse, 1 x D-Sub, 1 x DVI-D, 4 x USB 2.0/1.1, 1 x RJ-45, 3 x audio jacks |
| Internal I/O Connectors | 24-pin ATX main power, 4-pin ATX 12V power, 6 x SATA 3Gb/s, CPU fan header, system fan header, front panel header, front panel audio header, 2 x USB 2.0/1.1 headers, serial port header, clearing CMOS jumper |
| Integrated Graphics | ATI Radeon HD 3000 (DirectX10) |
| Dimensions | Micro ATX Form Factor; 24.4cm x 20.6cm (9.6 in x 8.1 in) (Approx. 11 x 11 x 3 inches product dimensions) |
| Weight | Approx. 2.3 pounds |
7. Warranty and Support
For detailed warranty information, please refer to the warranty card included with your product or visit the official GIGABYTE website. GIGABYTE provides technical support and resources for its products.
For further assistance, driver downloads, BIOS updates, and FAQs, please visit the official GIGABYTE support website: www.gigabyte.com


