1. Setup and Initial Preparation
This section guides you through the initial setup of your Evo Professional Series Gas Grill on Cart.
1.1 Unpacking and Assembly
Your Evo grill comes largely pre-assembled. Carefully remove all packaging materials. The unit includes a portable frame with wheels, a stainless steel lid, two spatulas, a cleaning kit, and a user manual. Ensure all components are present before proceeding.
Assembly is required for the cart and attaching the grill unit. Follow the detailed instructions provided in the included user manual for specific assembly steps. Ensure all connections are secure.

Figure 1: Evo Professional Series Gas Grill on Cart (Model 10-0002-LP) with lid and controls visible.
1.2 Placement and Fuel Connection
The Evo Professional Series Gas Grill is designed for outdoor use only. Place the grill on a stable, level surface away from combustible materials. Ensure adequate ventilation.
This grill operates on propane gas. Connect your propane tank according to the manufacturer's instructions, ensuring all connections are tight and leak-free. Perform a leak test using soapy water before first use.
1.3 Initial Seasoning of the Cooktop
The 30-inch black steel flattop cooking surface is seasoned. For optimal performance and longevity, it is recommended to perform an initial seasoning process. Refer to the included Evo Cookbook or the manufacturer's website for detailed seasoning instructions. This process helps create a non-stick surface and protects the steel.
2. Operating Instructions
Learn how to safely and effectively operate your Evo Gas Grill.
2.1 Ignition Procedure
- Ensure the propane tank valve is fully open.
- Push and turn one of the control knobs to the HIGH position.
- Press the electronic push button ignition. You should hear a clicking sound and see the burner ignite.
- If the burner does not ignite within 5 seconds, turn the control knob to OFF, wait 5 minutes, and repeat the process.
- Once ignited, adjust the flame to your desired setting. Repeat for the second burner if dual-zone cooking is desired.

Figure 2: Close-up of the Evo grill's control knobs for temperature adjustment.

Figure 3: View of the two stainless steel gas tube burners beneath the cooktop.
2.2 Temperature Control and Cooking Zones
The grill features two stainless steel gas tube burners, allowing for independent temperature control and the creation of one or two temperature zones. The variable temperature range is from 225ºF to 550ºF, providing precise heat for various cooking needs. The total heating power is 48,000 BTUs.
The outer burner controls the temperature of the outer ring of the cooktop, while the inner burner controls the center. This design enables simultaneous cooking of different items at varying temperatures.
2.3 Cooking Versatility
The 30-inch black seasoned steel flattop cooking surface offers 707 sq. in. of cooking area and provides ultimate versatility. You can:
- Grill and Sear: Achieve perfect crusts on meats and vegetables.
- Toast: Prepare sandwiches, buns, or bread.
- Stir-fry and Sauté: Cook vegetables, rice, and noodles with ease.
- Steam, Roast, Smoke, and Bake: Utilize the indirect heat capabilities, especially with the lid on, or by placing pots and pans directly on the cooktop.
A key advantage of the flattop design is the elimination of flare-ups, ensuring a safer and more consistent cooking experience.
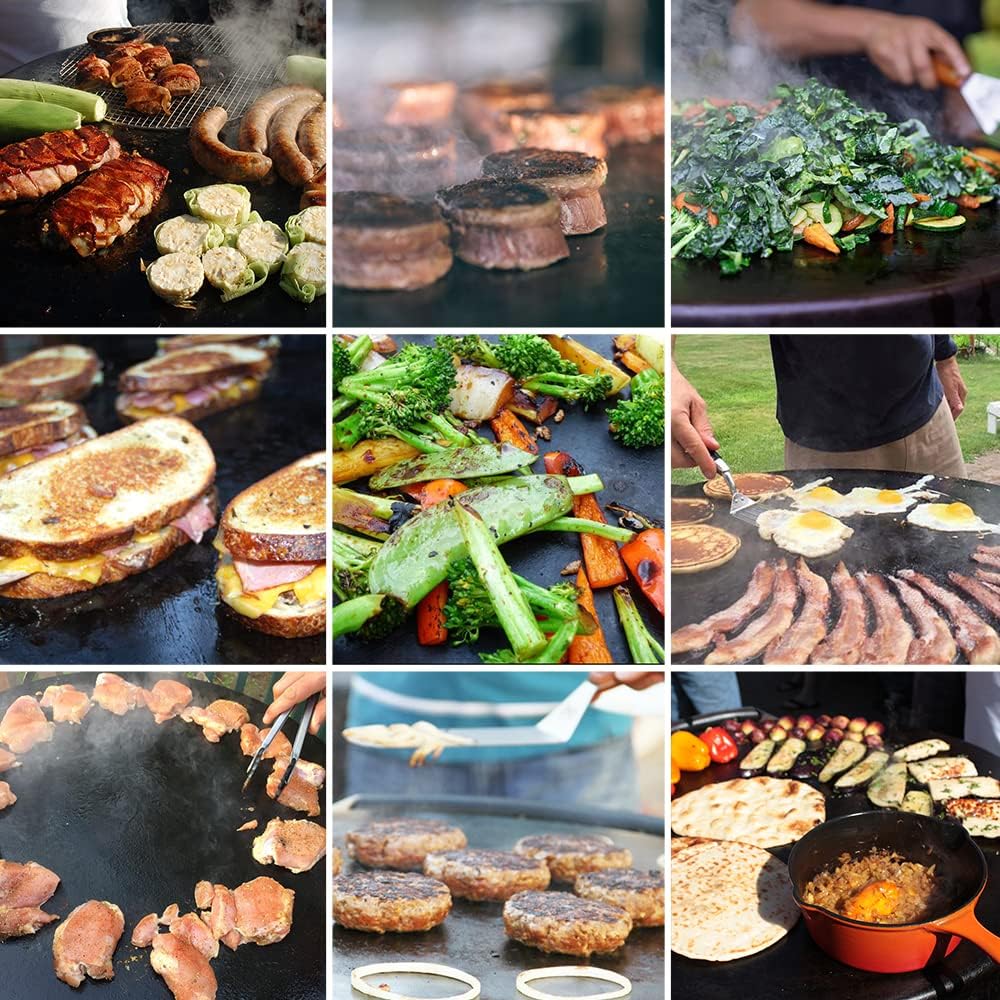
Figure 4: Examples of diverse meals prepared on the Evo flattop grill, showcasing its versatility.

Figure 5: A close-up of vegetables being stir-fried on the large flattop surface.

Figure 6: A person preparing breakfast items like bacon, eggs, and pancakes on the flattop grill.
2.4 Using the Lid
The stainless steel lid helps retain heat, steam foods, and protect the cooktop when not in use. Exercise caution when handling the lid, especially when hot, as it can be heavy.

Figure 7: Close-up of the stainless steel lid, designed to cover the cooktop.
3. Care and Maintenance
Proper care ensures the longevity and optimal performance of your Evo grill.
3.1 Cooktop Cleaning
Treat the seasoned steel cooktop similarly to a cast iron pan. After each use, while the grill is still warm, scrape food debris into the grease catch pan using the provided spatulas. Wipe the surface clean with a paper towel or cloth. For stubborn residue, a small amount of water can be used to deglaze the surface while hot, then scrape and wipe clean.
A cleaning kit is included to assist with maintaining the cooktop. Avoid harsh abrasives or detergents that can strip the seasoning.

Figure 8: An Evo branded spatula, ideal for use on the flattop cooking surface.

Figure 9: Included accessories: spatulas, cleaning kit, and the Evo Cookbook.
3.2 Grease Management
Regularly empty and clean the grease catch pan located on the side of the grill. This prevents grease buildup and potential fire hazards. Ensure the pan is properly reinstalled after cleaning.
3.3 Re-seasoning
Over time, the cooktop's seasoning may wear down. If food begins to stick or the surface appears dry, re-season the cooktop following the initial seasoning procedure. This typically involves applying a thin layer of high-smoke-point cooking oil and heating the surface until it smokes, then allowing it to cool.
4. Troubleshooting Guide
This section addresses common issues you might encounter with your Evo Gas Grill.
4.1 Burner Not Igniting
- Check Propane Supply: Ensure the propane tank valve is fully open and the tank contains sufficient fuel.
- Check Connections: Verify that the gas line connections are secure and leak-free.
- Igniter Spark: Listen for the clicking sound of the electronic igniter. If no click, check the igniter battery (if applicable) or contact support.
- Clear Burner Ports: Ensure burner ports are not clogged with debris.
4.2 Uneven Heating
- Preheat Thoroughly: Allow sufficient time for the entire cooktop to heat evenly before cooking.
- Check Burner Settings: Ensure both burners are set to the desired temperature.
- Clean Burners: Clogged burner ports can cause uneven flame. Clean as necessary.
4.3 Food Sticking to Cooktop
- Re-season Cooktop: The seasoning layer may be depleted. Follow the re-seasoning instructions in Section 3.3.
- Use Enough Oil: Ensure a thin layer of cooking oil is applied before and during cooking.
- Proper Temperature: Cooking at too low a temperature can sometimes cause sticking.
5. Product Specifications
Detailed technical specifications for the Evo Professional Series Gas Grill on Cart (Model 10-0002-LP).
| Feature | Detail |
|---|---|
| Model Number | 10-0002-LP |
| Brand | Evo |
| Product Dimensions (D x W x H) | 40"D x 40"W x 46"H |
| Item Weight | 166 Pounds |
| Fuel Type | Propane Gas |
| Cooktop Material | Seasoned Steel (Black) |
| Cooktop Diameter | 30 inches |
| Cooking Surface Area | 707 sq. in. |
| Burner Count | 2 (Stainless Steel Gas Tube Burners) |
| Total BTUs | 48,000 BTUs |
| Temperature Range | 225ºF to 550ºF |
| Ignition Type | Electronic Push Button |
| Frame Material | Stainless Steel |
| Special Features | Portable, Unique Round Grill Design, Dual Temperature Zones |
| Included Components | Portable Frame with Wheels, Stainless Steel Lid, 2 Spatulas, Cleaning Kit, Evo Cookbook, User Manual |
| Assembly Required | Yes |
| Recommended Use | Outdoor |
6. Warranty and Support
Information regarding product warranty and how to obtain customer support.
6.1 Product Warranty
Specific warranty details are typically provided with your purchase documentation. Please refer to the warranty card or the official Evo website for the most current and comprehensive warranty information.
Extended protection plans are available for purchase, including 3-Year Protection Plan and 4-Year Protection Plan, offering additional coverage beyond the standard manufacturer's warranty.
6.2 Customer Support
For technical assistance, parts, or any questions regarding your Evo Professional Series Gas Grill, please contact Evo customer support. You can often find contact information on the manufacturer's website or within the packaging materials.
Visit the official Evo Store on Amazon for more product information and support resources.