1. Introduction
Thank you for choosing the NOHrD WallBar. This high-quality, wall-mounted exercise system is crafted from durable walnut wood and designed to provide a versatile platform for a wide range of fitness activities, including strength training, stretching, and rehabilitation exercises. With its robust construction and elegant design, the WallBar integrates seamlessly into any home or professional gym environment. This manual provides essential information for the safe and effective installation, operation, and maintenance of your NOHrD WallBar.
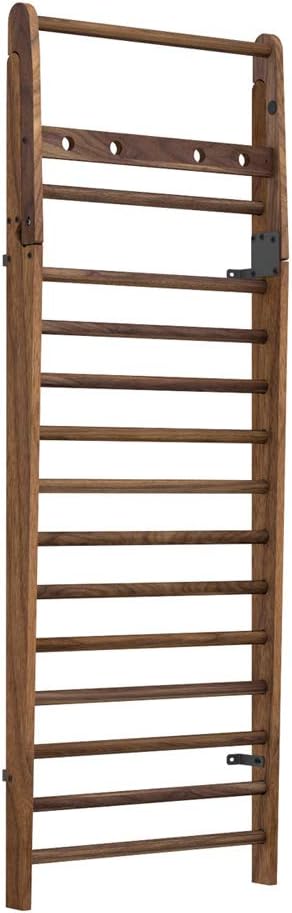
Figure 1: The NOHrD WallBar, a sturdy wooden wall-mounted exercise unit.
2. Safety Information
Please read all safety instructions carefully before assembly and use. Failure to follow these instructions may result in injury or damage to the product.
- Proper Installation: The WallBar must be securely mounted to a structurally sound wall capable of supporting the unit's weight plus the user's weight. Reinforce the wall if necessary. Consult a professional for installation if unsure.
- Weight Limit: Do not exceed the maximum recommended user weight of 120 kilograms (approximately 264 pounds).
- Regular Inspection: Before each use, inspect the WallBar for any signs of wear, damage, or loose connections. Do not use if any part is compromised.
- Children and Pets: Keep children and pets away from the WallBar during use. Adult supervision is required if children are permitted near the equipment.
- Proper Use: Use the WallBar only for its intended purpose. Avoid sudden movements or excessive force that could compromise stability.
- Medical Advice: Consult with a healthcare professional before starting any new exercise program.
3. Package Contents
Carefully unpack all components and verify that all parts are present and undamaged. If any parts are missing or damaged, contact customer support immediately.
- NOHrD WallBar main frame (pre-assembled sections)
- Horizontal bars (rungs)
- Mounting brackets and hardware (screws, anchors)
- Assembly instructions manual
- L-shaped hex wrenches (for minor adjustments)
4. Setup and Installation
The NOHrD WallBar is designed for wall mounting. Proper installation is critical for safety and stability.
- Choose Location: Select a wall that is structurally sound and free from obstructions. Ensure there is adequate space around the WallBar for exercises.
- Identify Studs/Reinforcement: Use a stud finder to locate wall studs. For optimal safety, the WallBar should be mounted directly into wall studs or a reinforced wall section. Significant wall reinforcement may be required.
- Mark Drilling Points: Hold the WallBar against the wall at the desired height and use a pencil to mark the drilling points for the mounting brackets. Ensure the WallBar is level.
- Drill Pilot Holes: Using an appropriate drill bit size for your wall type and mounting hardware, drill pilot holes at the marked points. A power drill is highly recommended for this step.
- Attach Mounting Brackets: Secure the mounting brackets to the wall using the provided screws and anchors. Ensure they are firmly attached.
- Mount WallBar: Carefully lift the WallBar and align it with the attached mounting brackets. Secure the WallBar to the brackets using the remaining hardware. Double-check all connections for tightness.
- Final Check: Gently pull and push on the installed WallBar to ensure it is stable and securely fastened to the wall before initial use.

Figure 2: The NOHrD WallBar with its top bar in the extended position, suitable for various exercises.
5. Operating Instructions and Exercises
The NOHrD WallBar offers a wide range of exercise possibilities. Always warm up before exercising and cool down afterwards.
5.1. Basic Usage
- Stretching: Use the various rungs for stretching exercises. For example, place a foot on a lower rung for hamstring stretches or hold onto a higher rung for shoulder stretches.
- Hanging Exercises: The top bar can be used for hanging exercises, such as dead hangs for spinal decompression or active hangs for grip strength.
- Pull-ups/Chin-ups: The top bar, especially when extended, provides an excellent grip for pull-ups and chin-ups.
- Core Work: Utilize the rungs for leg raises or other core strengthening exercises.
- Accessory Attachment: The WallBar is compatible with various NOHrD accessories (sold separately), such as dip bars or resistance bands, to expand your workout options.
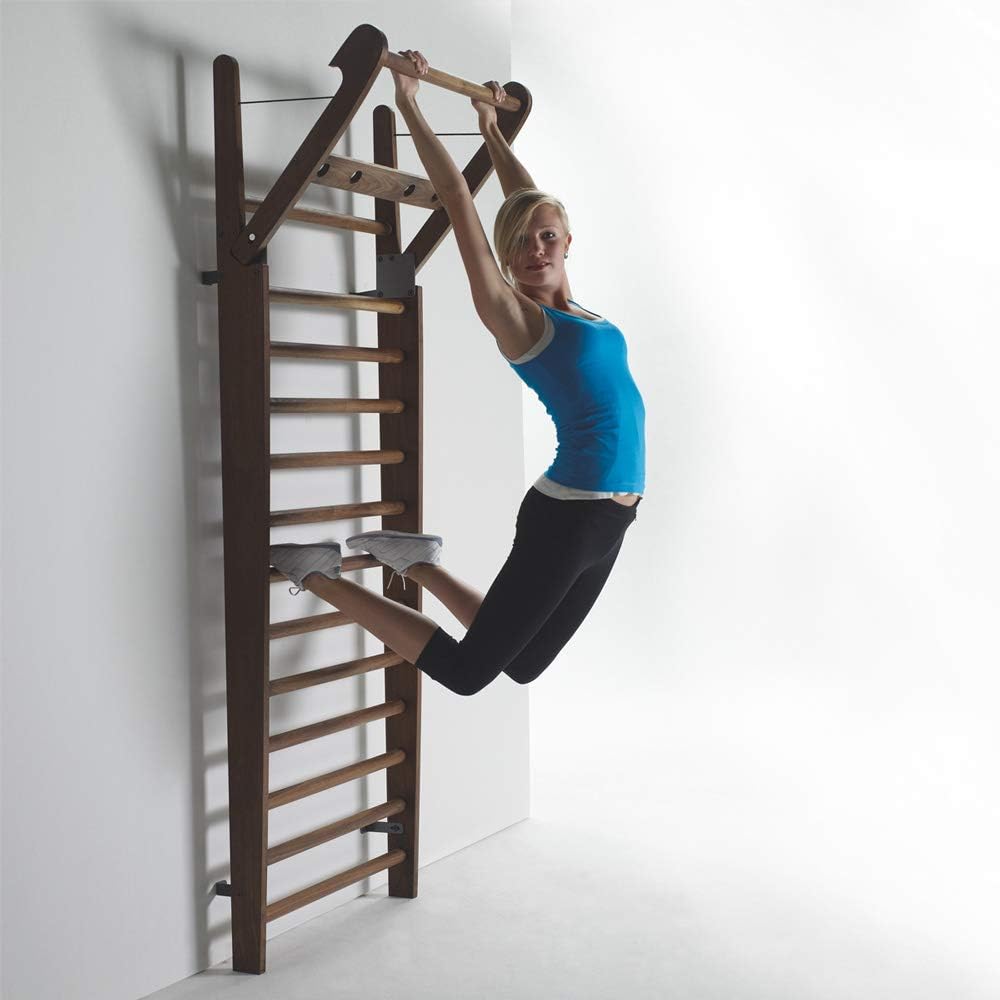
Figure 3: User performing a hanging exercise.

Figure 4: User performing a stretching exercise.

Figure 5: User performing a pull-up.
6. Maintenance
Regular maintenance will ensure the longevity and safe operation of your NOHrD WallBar.
- Cleaning: Wipe down the wooden surfaces with a soft, damp cloth. Avoid abrasive cleaners or harsh chemicals that could damage the wood finish.
- Check Connections: Periodically check all screws and bolts, especially those securing the WallBar to the wall and connecting its components. Tighten any loose fasteners.
- Wood Care: As a natural wood product, the WallBar may benefit from occasional treatment with a wood-safe oil or wax to maintain its appearance and prevent drying.
- Environmental Conditions: Avoid exposing the WallBar to extreme temperature fluctuations or high humidity, which can affect wood integrity.
7. Troubleshooting
If you encounter any issues with your NOHrD WallBar, refer to the following common problems and solutions.
| Problem | Possible Cause | Solution |
|---|---|---|
| WallBar feels wobbly or unstable. | Loose mounting screws; insufficient wall reinforcement; improper installation. | Tighten all mounting screws. Ensure the WallBar is mounted into studs or a properly reinforced wall. Re-install if necessary, consulting a professional. |
| Squeaking or creaking noises during use. | Loose connections between wooden components or metal brackets. | Identify the source of the noise and tighten the corresponding screws or bolts. |
| Wood appears dry or faded. | Lack of regular wood care; exposure to dry conditions. | Apply a suitable wood-safe oil or wax to nourish and protect the wood. |
If the problem persists or is not listed here, please contact WaterRower customer support for assistance.
8. Specifications
| Feature | Detail |
|---|---|
| Brand | WaterRower (NOHrD) |
| Model | 10 QP3300 |
| Material | Walnut Wood |
| Color | Brown |
| Mounting Type | Wall Mount |
| Maximum Weight Recommendation | 120 Kilograms (approx. 264 lbs) |
| Item Weight | 20 Kilograms (approx. 44 lbs) |
| Item Dimensions (LxWxH) | 31.5 x 5.12 x 90.55 inches |
| Number of Bars | 14 |
9. Warranty and Support
For warranty information, product support, or to purchase replacement parts, please contact WaterRower customer service.
WaterRower Customer Service:
- Website: www.waterrower.com
- Contact Information: Refer to the website for current contact details (phone, email).
Please have your model number (10 QP3300) and purchase date available when contacting support.


