
1. Introduction
The Toro Custom Command Series offers convenience and flexibility for commercial irrigation applications. The CC-P15 model is a 15-station commercial lawn irrigation controller designed for efficient and reliable management of your watering schedules. This controller features hand-held capability, a program stacking feature, and supports various station counts, providing robust control for diverse landscaping needs.
Key Features:
- Versatile Runtimes: Runtimes from one minute to ten hours in one-minute increments, suitable for standard or drip applications.
- Independent Programs: Four fully independent programs and 16 start times that can run concurrently with start time overlap protection within each program.
- High Surge Protection: Designed with high surge protection for lightning-prone areas.
- Enclosure: Wall-mount plastic cabinet for durable installation.
- Remote Compatibility: Compatible with the Toro TMR-1 Maintenance Remote for ease of use, troubleshooting, and field maintenance operation.
2. Safety Information
Please read and understand all safety instructions before installing or operating the Toro CC-P15 controller. Failure to follow these instructions could result in electric shock, fire, or property damage.
- Electrical Safety: Always disconnect power to the controller before performing any wiring or maintenance. Installation should be performed by a qualified electrician in accordance with local electrical codes.
- Water Exposure: While the plastic cabinet offers protection, avoid direct exposure to heavy rain or standing water. Ensure all wiring connections are secure and protected from moisture.
- Mounting: Mount the controller securely to a wall using appropriate hardware to prevent it from falling.
- Children: Keep the controller out of reach of children.
3. Package Contents
Verify that all components are present before beginning installation:
- Toro CC-P15 15-Station Commercial Irrigation Controller (with plastic cabinet)
- Mounting hardware (screws, anchors)
- User Manual (this document)
4. Setup and Installation
4.1 Mounting the Controller
The CC-P15 controller is designed for wall-mount installation. Choose a location that is protected from direct weather exposure, excessive heat, and is easily accessible for programming and maintenance.
- Mark the desired mounting points on the wall using the controller's mounting holes as a template.
- Drill pilot holes if necessary and insert wall anchors suitable for your wall type.
- Secure the controller to the wall using the provided mounting screws. Ensure it is level and firmly attached.
4.2 Wiring the Controller
WARNING: Ensure power is disconnected before performing any wiring. Improper wiring can cause damage to the controller or lead to electric shock.
- Power Connection: Connect the main power supply wires to the designated terminals inside the controller. Follow local electrical codes for proper grounding and wiring.
- Valve Wiring: Connect each irrigation valve's common wire to the common terminal(s) on the controller. Connect each individual valve's hot wire to its corresponding station terminal (1-15).
- Master Valve/Pump Start Relay (Optional): If using a master valve or pump start relay, connect its wires to the designated terminals.
- Sensor Connection (Optional): If using a rain sensor or other weather sensor, connect its wires to the sensor terminals as per the sensor's instructions. Ensure the sensor bypass switch (if present) is set correctly.

This image displays the Toro CC-P15 controller with its front cover open. The internal control panel features a digital display, a large rotary dial for mode selection (Run, Set Current Time/Day, Set Start Times, Set Station Runtimes, Set Program Cycle, Season Adjust/Program Stacking), and buttons for ON, OFF, NEXT, +, and -. A quick reference guide is affixed to the inside of the cabinet door, detailing programming steps for time of day, start times, station runtimes, program cycle, manual operation, rain delay, and season adjust. The controller is labeled for 15 stations.
5. Operating Instructions
The Toro CC-P15 features a user-friendly interface with a rotary dial and push buttons for easy programming. Refer to the quick reference guide inside the controller's door for a summary of programming steps.
5.1 Setting Current Time and Day
- Turn the rotary dial to SET CURRENT TIME/DAY.
- Use the + and - buttons to adjust the hour, then press NEXT to move to minutes, and then to the day of the week.
- Adjust each setting as needed.
5.2 Programming Start Times
The controller supports four independent programs (A, B, C, D) and up to 16 start times per program.
- Turn the rotary dial to SET START TIMES.
- Use the PROGRAM button to select the desired program (A, B, C, or D).
- Use the + and - buttons to set the first start time. Press NEXT to confirm and move to the next start time.
- Repeat for all desired start times for the selected program. To disable a start time, set it to OFF.
5.3 Setting Station Runtimes
Each station can have a runtime from 1 minute to 10 hours.
- Turn the rotary dial to SET STATION RUNTIMES.
- Use the PROGRAM button to select the desired program (A, B, C, or D).
- Use the NEXT button to cycle through stations (1-15).
- For each station, use the + and - buttons to set the desired runtime.
5.4 Setting Program Cycle (Watering Days)
- Turn the rotary dial to SET PROGRAM CYCLE.
- Use the PROGRAM button to select the desired program.
- Use the + and - buttons to select watering days (e.g., specific days of the week, odd/even days, or interval watering). Press NEXT to confirm.
5.5 Manual Operation
To manually operate a station or all stations:
- Turn the rotary dial to MANUAL PROGRAM or MANUAL STATION.
- Follow the on-screen prompts and use the NEXT, +, and - buttons to select the desired station(s) and runtime.
- Press ON to start manual watering. Press OFF to stop.
5.6 Rain Delay
To temporarily suspend watering for a set period:
- Turn the rotary dial to RUN.
- Press the RAIN DELAY button (if available, or use the + button when in RUN mode to access delay).
- Use the + and - buttons to set the number of delay days.
- The controller will resume its programmed schedule after the delay period expires.
5.7 Season Adjust
To globally adjust watering times without reprogramming each station:
- Turn the rotary dial to SEASON ADJUST/PROGRAM STACKING.
- Use the + and - buttons to set the percentage adjustment (e.g., 50% for half watering, 120% for more watering).
- This adjustment will apply to all programmed station runtimes.
6. Maintenance
Regular maintenance ensures optimal performance and longevity of your Toro CC-P15 controller.
- Cleaning: Periodically wipe the controller's exterior with a soft, damp cloth. Do not use abrasive cleaners or solvents.
- Inspections: Annually inspect all wiring connections for corrosion or loose terminals. Check the integrity of the cabinet and ensure it remains securely mounted.
- Battery Backup (if applicable): If your model includes a battery for timekeeping during power outages, check and replace it as recommended by the manufacturer (typically every 1-2 years).
7. Troubleshooting
This section addresses common issues you might encounter with your irrigation controller.
- Controller Display is Blank:
- Check the main power supply to the controller.
- Verify that the circuit breaker or fuse for the irrigation system is not tripped.
- Ensure all power connections inside the controller are secure.
- A Zone Does Not Water:
- Check the programming for that specific station to ensure it has a runtime and is assigned to an active program.
- Inspect the wiring connection for that station at the controller and at the valve.
- Verify that the water supply to the irrigation system is turned on.
- If a rain sensor is installed, check if it has activated and is preventing watering.
- Manually activate the valve at the solenoid to check if the valve itself is operational.
- All Zones Do Not Water:
- Check the main power supply to the controller.
- Ensure the master valve (if installed) is functioning correctly.
- Verify that the water supply to the entire irrigation system is open.
- Check if the rain sensor has activated.
- Controller is Not Following Program:
- Verify the current time and day settings are accurate.
- Check the program start times, station runtimes, and watering days for accuracy.
- Ensure Rain Delay or Season Adjust features are not active if unintended.
8. Specifications
| Manufacturer | Toro |
| Model Number | CC-P15 |
| Product Dimensions | 29.21 x 15.24 x 21.97 cm (11.5 x 6 x 8.65 inches) |
| Weight | 3.63 kg (8 lbs) |
| Station Count | 15 Stations |
| Programs | 4 Independent Programs (A, B, C, D) |
| Start Times | Up to 16 per program |
| Runtime Range | 1 minute to 10 hours (in 1-minute increments) |
| Enclosure Type | Wall-mount Plastic Cabinet |
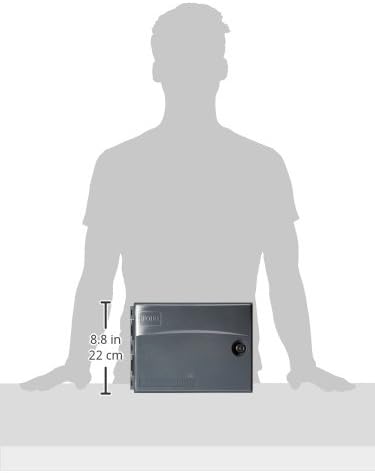
This image provides a side profile view of the Toro CC-P15 irrigation controller, illustrating its approximate height of 8.8 inches (22 cm). The unit is a compact, grey plastic enclosure.
9. Warranty and Support
For warranty information, please refer to the warranty card included with your product or visit the official Toro website. For technical support, troubleshooting assistance beyond this manual, or to inquire about replacement parts, please contact Toro Customer Service directly. Contact details can typically be found on the Toro website or on the product packaging.


