
1. Introduction
The Denon AVR2112CI is a 7.1-channel integrated network A/V surround receiver designed to manage your home theater audio and video components. It features multiple HDMI inputs and outputs, along with various analog connections, to support a wide range of entertainment sources. This receiver includes capabilities for 3D pass-through and an Audio Return Channel, enhancing its compatibility with modern display technologies. An integrated Ethernet port enables access to internet radio and other streaming services.
Key Features:
- 7.1-channel Integrated Network A/V Receiver
- HDMI 1.4a with 6 inputs and 1 output, supporting 3D content
- AirPlay Ready for wireless audio streaming
- Discrete Power Amplifiers rated at 90 watts per channel
- Enhanced Network Capability for internet radio and streaming
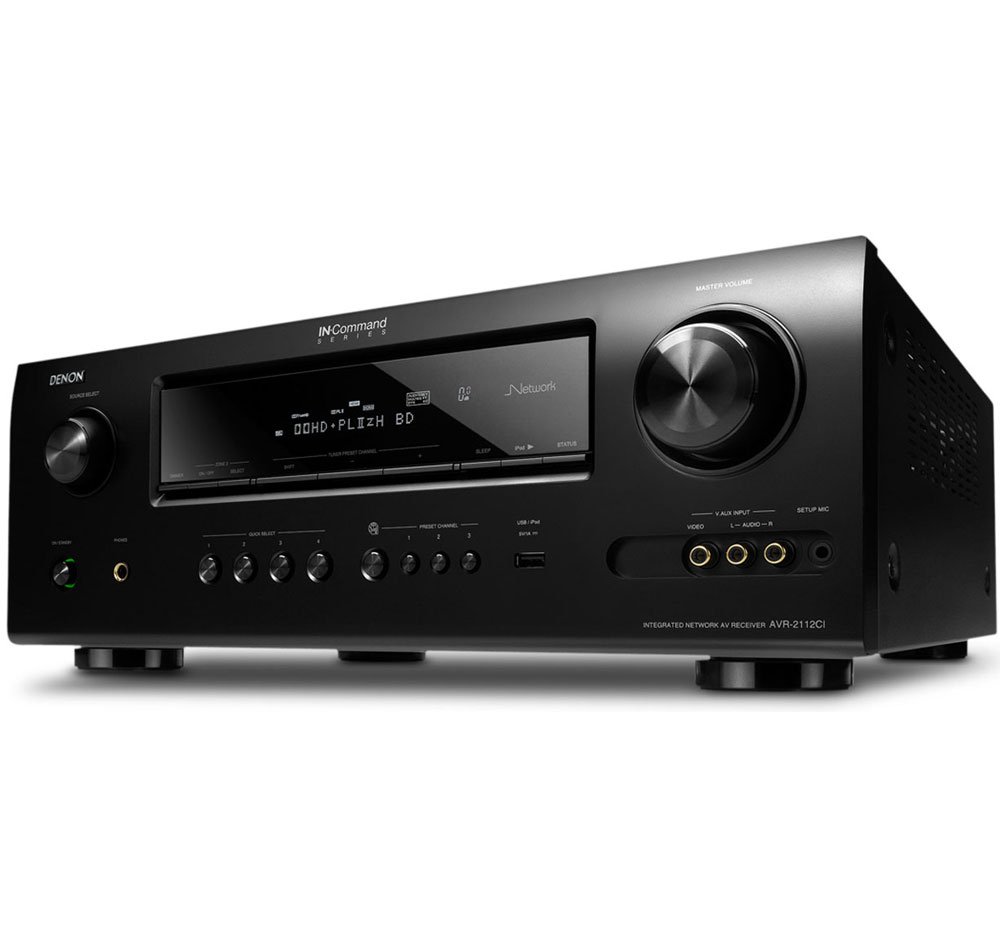
Front view of the Denon AVR2112CI Integrated Network A/V Surround Receiver, showcasing its display and control knobs.
2. Setup
Proper setup is crucial for optimal performance of your Denon AVR2112CI receiver. This section outlines the basic steps for connecting your components and initial configuration.
2.1. Connections
Connect your audio and video sources to the appropriate inputs on the rear panel of the receiver. The AVR2112CI features:
- HDMI Inputs: 6 HDMI 1.4a inputs for high-definition video and audio from devices like Blu-ray players, game consoles, and cable/satellite boxes.
- HDMI Output: 1 HDMI 1.4a output to connect to your television or projector. This output supports 3D pass-through and Audio Return Channel (ARC) if your display also supports ARC.
- Component Video Inputs: For older video sources.
- Composite Video Inputs: For standard definition video sources.
- USB Input: For connecting USB storage devices.
- Ethernet Port: Connect to your home network for internet radio and streaming services.
- Speaker Terminals: Connect your 7.1 channel speakers. Ensure correct polarity (+/-) for each speaker.
2.2. Initial Configuration
After connecting all components, power on the receiver and your display. The receiver features an on-screen display (OSD) to guide you through the initial setup process. Utilize the included Audyssey MultEQ XT setup system for automatic speaker calibration. This system measures your room acoustics and speaker characteristics to optimize sound output for your listening environment.
For network features, connect the receiver to your home network via an Ethernet cable. Follow the on-screen prompts to configure network settings, which may include DHCP or static IP address setup.
3. Operating Instructions
This section covers the basic and advanced operational aspects of your Denon AVR2112CI receiver.
3.1. Basic Operation
- Power On/Off: Use the power button on the front panel or the remote control.
- Input Selection: Select the desired input source (e.g., Blu-ray, Game, TV) using the input selector buttons on the front panel or remote.
- Volume Control: Adjust the master volume using the large knob on the front panel or the volume buttons on the remote. The on-screen display will show the current volume level.
- Sound Modes: Select various surround sound modes (e.g., Stereo, Dolby Digital, DTS) to match your content and preference.
3.2. Network Features
The AVR2112CI offers extensive network capabilities:
- Internet Radio: Access a wide variety of internet radio stations.
- Streaming Services: Supported services include Pandora and Napster.
- DLNA: Stream music files from compatible devices on your home network (e.g., PC, NAS).
- AirPlay: Stream audio wirelessly from Apple devices (iPhone, iPod touch, iPad) or iTunes on your Mac/PC. Ensure your Apple device and the receiver are on the same network. AirPlay can also be used to stream to Zone 2.
3.3. Multi-Zone Operation (Zone 2)
The receiver supports multi-zone audio, allowing you to play a different audio source in a second zone (Zone 2) while the main zone plays another. This is particularly useful for extending music playback to outdoor speakers or another room.
3.4. Control Methods
You can control the receiver using:
- The included remote control.
- The Denon remote app for Android devices.
- Front panel controls.
4. Maintenance
To ensure the longevity and optimal performance of your Denon AVR2112CI receiver, follow these maintenance guidelines:
- Ventilation: The receiver generates heat during operation. Ensure adequate air circulation around the unit. Do not place it in an enclosed cabinet without proper ventilation. Maintain at least 4 inches (10 cm) of clear space above the unit.
- Cleaning: Dust the unit regularly with a soft, dry cloth. Avoid using liquid cleaners or solvents, which can damage the finish.
- Power: Disconnect the power cord from the wall outlet during electrical storms or when the unit is left unattended for long periods.
5. Troubleshooting
This section addresses common issues you might encounter with your Denon AVR2112CI receiver.
5.1. No Sound or Distorted Audio
- Check all speaker connections for correct polarity and secure fit.
- Verify the correct input source is selected.
- Ensure the volume is not muted or set too low.
- If using a specific channel and experiencing signal loss, check the speaker wire for damage or loose connections.
5.2. AirPlay Connectivity Issues / Audio Stuttering
- Network Stability: AirPlay performance is highly dependent on your home network's stability. Ensure a strong Wi-Fi signal for your Apple device and the receiver.
- Router Placement: Moving your wireless router closer to the receiver can improve signal strength and reduce stuttering.
- Wireless Bridge: If using a wireless bridge, ensure it has a stable connection to your main router. A direct Ethernet connection to the receiver is recommended for the most reliable AirPlay experience.
- Wi-Fi Band: Newer Apple devices (e.g., iPhone 5 and later) support 5 GHz Wi-Fi, which can offer better performance than the more congested 2.4 GHz band used by older devices.
5.3. Denon App Losing Connection
- Ensure the receiver and your control device are on the same network.
- Check for network interference or router settings that might be causing devices to disconnect.
- Restart both the app and the receiver.
5.4. GUI for Net/USB Function Not Appearing on TV
- Ensure your TV is set to the correct HDMI input connected to the receiver's HDMI output.
- Try resetting the receiver to factory defaults (refer to the full user manual for specific steps, usually involving a button combination on the unit). Note that this will erase all custom settings.
5.5. Standby Passthrough Issues
- Verify the standby passthrough settings in the receiver's menu. Ensure it is configured to the desired HDMI input (e.g., HDMI 2 for TV) or to the last used input.
- If the issue persists, a receiver reset might be necessary, followed by reconfiguring the passthrough settings.
5.6. Configuration Complexity
The receiver's configuration options can be extensive. If you find the setup confusing, consult the detailed user manual (typically provided on a CD or available for download from Denon's website) for step-by-step instructions on advanced settings.
6. Specifications
| Feature | Specification |
|---|---|
| Brand | Denon |
| Model Number | AVR2112CI |
| Connectivity Technology | Wired |
| Total HDMI Ports | 7 (6 In / 1 Out) |
| Audio Output Mode | Surround |
| Surround Sound Channel Configuration | 7.1 |
| Output Power | 90 Watts per channel |
| Number of Channels | 7 |
| Supported Internet Services | Internet Radio, Napster, Pandora |
| Control Method | App, Remote, Touch |
| Wireless Technology | AirPlay, IR |
| Audio Formats | WAV, WMA |
| Item Weight | 22.7 Pounds |
| Color | Black |
7. Warranty and Support
7.1. Warranty Information
The Denon AVR2112CI receiver typically comes with a 3-year warranty from the manufacturer. Please refer to your purchase documentation or the official Denon website for specific terms and conditions, as warranty details may vary by region and retailer.
7.2. Customer Support
For further assistance, technical support, or service inquiries, please contact Denon customer service. Contact information can usually be found on the official Denon website or in the full product manual.


