
1. Introduction
Thank you for purchasing the Dual MP 301 Mini Stereo System. This versatile audio system combines modern and classic audio technologies, allowing you to enjoy music from various sources including CDs, vinyl records, cassette tapes, MP3 files via USB/SD, and radio. This manual provides essential information for the safe and efficient operation of your device. Please read it thoroughly before use and retain it for future reference.
2. Safety Instructions
- Ensure the power supply voltage matches the rating label on the unit.
- Do not expose the unit to rain or moisture to prevent fire or electric shock.
- Do not block ventilation openings. Maintain adequate space around the unit for proper airflow.
- Avoid placing the unit near heat sources or in direct sunlight.
- Do not open the casing. Refer all servicing to qualified personnel.
- Unplug the unit during lightning storms or when unused for long periods.
3. Package Contents
Verify that all items are present in the package:
- Main Unit (Dual MP 301)
- FM Antenna
- 2 x Speakers (with cables)
- Remote Control (batteries not included)
- User Manual
4. Product Overview
4.1. Front View of the System
This image displays the complete Dual MP 301 Mini Stereo System, including the central unit and two external speakers. The central unit features a control panel, display, CD changer, dual cassette deck, and front-facing USB/SD card slots. The speakers are two-way, designed to deliver balanced audio output.

4.2. Control Panel and Display
This close-up shows the main control panel of the Dual MP 301. It features an LCD display, various function buttons (e.g., CD/USB, Tape, Tuner/Band, Phono), volume knob, and navigation controls. The display provides information on the current mode, track, station, and time.

4.3. Dual Cassette Deck
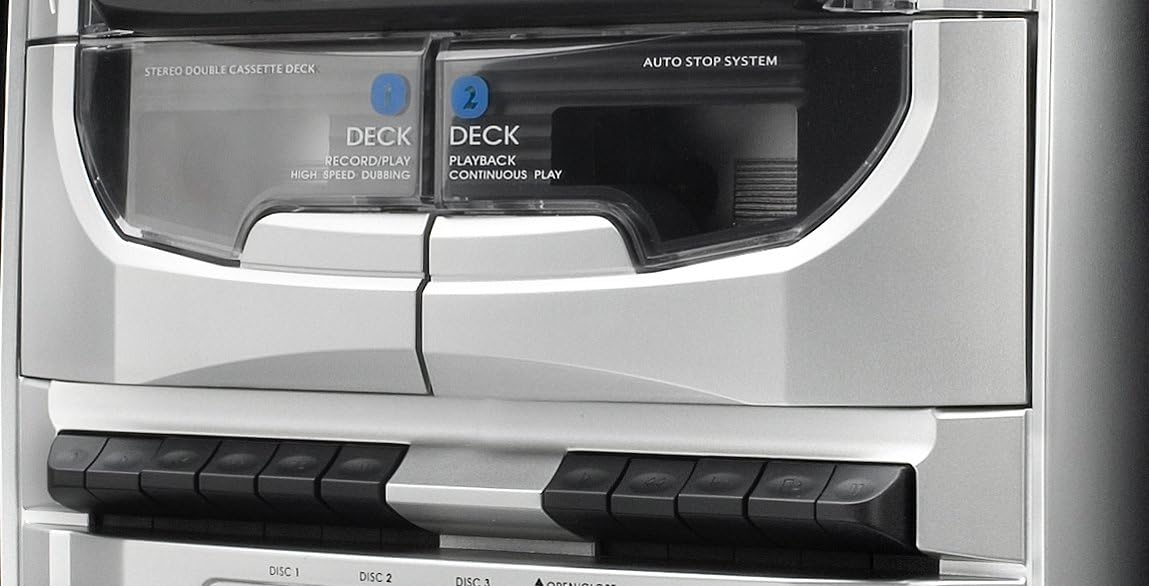
This image highlights the dual mechanical cassette deck. Deck 1 is for record/play and high-speed dubbing, while Deck 2 is for playback and continuous play. The 'Auto Stop System' ensures tape protection. Below the decks are the control buttons for cassette operations.
4.4. CD Changer and USB/SD Ports
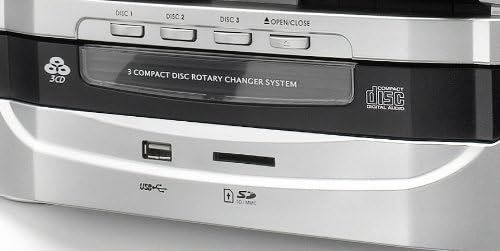
A detailed view of the 3-compact disc rotary changer system, allowing multiple CDs to be loaded. Below the CD tray, the front panel includes a USB port and an SD/MMC card slot for playing MP3 files and recording audio.
4.5. Remote Control
This image shows the remote control unit for the Dual MP 301. It provides convenient access to all major functions, including power, source selection, volume, playback controls, radio tuning, and special features like EQ and sleep timer.

5. Setup
5.1. Connecting Speakers
- Locate the speaker terminals on the rear of the main unit.
- Connect the speaker wires from the left speaker to the 'L' terminals and from the right speaker to the 'R' terminals. Ensure correct polarity (positive to positive, negative to negative).
5.2. Connecting the FM Antenna
- Connect the supplied FM antenna to the 75-ohm antenna connection port on the rear of the unit.
- Extend the antenna fully and position it for optimal reception.
5.3. Power Connection
- Ensure all connections are secure.
- Plug the power cord into a suitable wall outlet.
6. Operation
6.1. Power On/Off and Mode Selection
- Press the ON/STANDBY button on the unit or remote to power on or off.
- Use the FUNCTION or source buttons (e.g., CD/USB, TAPE, TUNER/BAND, PHONO) to select the desired audio source.
6.2. CD Player Operation
- Press the OPEN/CLOSE button to open the CD tray.
- Place up to three CDs onto the respective disc trays (DISC 1, DISC 2, DISC 3).
- Press OPEN/CLOSE again to close the tray.
- Select CD mode. The system will automatically detect and play the first CD.
- Use DISC SKIP to switch between loaded CDs.
- Use PLAY/PAUSE, STOP, SKIP UP/DOWN for playback control.
- The system supports CD, CD-R/RW, and MP3 CD formats.
6.3. Cassette Player Operation
- Press the TAPE button to select cassette mode.
- Open the cassette deck door by pressing the OPEN button.
- Insert a cassette tape into Deck 1 (Record/Play) or Deck 2 (Playback).
- Use the playback controls (Play, Stop, Fast Forward, Rewind) located below the decks.
- To record, ensure a blank tape is in Deck 1, select the desired source (Radio, CD, USB/SD, Phono), and press the RECORD button on Deck 1.
- For high-speed dubbing, insert the source tape into Deck 2 and a blank tape into Deck 1, then follow the dubbing instructions in the full manual.
6.4. Turntable Operation
- Lift the turntable cover.
- Place a vinyl record on the platter.
- Select the appropriate speed (33, 45, or 78 RPM) using the speed selector switch.
- Move the tone arm to the desired position on the record. The turntable will start automatically (auto-stop feature).
- At the end of the record, the turntable will stop automatically.
6.5. Radio Operation
- Press the TUNER/BAND button to select FM or MW radio.
- Use the TUNING +/- buttons to manually tune to a station or press and hold for automatic scanning.
- To save a station, press MEMORY, then use PRE-UP/DN to select a preset number, and press MEMORY again to confirm.
- The RDS function provides station information where available.
6.6. USB/SD Playback and Recording
- Insert a USB flash drive or SD/MMC card into the respective slot.
- Select USB or SD mode. The system will automatically play compatible MP3 files.
- To record from Vinyl, Cassette, or CD to USB/SD, select the source, then press the REC button while in USB/SD mode.
6.7. Clock and Alarm Functions
- The LCD display shows the current time. Refer to the full manual for detailed instructions on setting the clock.
- The integrated alarm and timer functions allow you to set the system to turn on at a specific time, for example, to wake up to radio or CD music.
6.8. Headphone Use
- Connect 3.5mm headphones to the headphone jack on the front panel for private listening.
- Adjust the volume to a comfortable level.
7. Maintenance
- Cleaning: Use a soft, dry cloth to clean the unit. Do not use liquid cleaners or aerosols.
- Dust: Regularly dust the turntable and cassette deck areas to prevent accumulation that could affect performance.
- CD Lens: Use a specialized CD lens cleaner if playback issues occur.
- Stylus: Handle the turntable stylus with care. Replace it if worn to prevent damage to records.
8. Troubleshooting
- No Power: Check if the power cord is securely plugged in and the wall outlet is functional.
- No Sound: Ensure speakers are correctly connected, volume is up, and the correct source is selected. Check headphone connection if applicable.
- CD/Cassette/Vinyl Not Playing: Ensure the media is inserted correctly and is clean. For vinyl, check stylus condition and tone arm placement.
- Poor Radio Reception: Adjust the FM antenna position. Check for local interference.
- Remote Control Not Working: Check battery polarity and replace batteries if necessary. Ensure no obstacles are between the remote and the unit's sensor.
9. Specifications
| Brand | Dual |
| Model Number | MP 301 |
| Color | Silver |
| Connectivity Technology | USB |
| Special Features | CD Recorder, Integrated Speaker (Note: Product description indicates external speakers, 'Integrated Speaker' might refer to the system's audio output capability) |
| Compatible Devices | Smartphone, Tablet, MP3 Player |
| Speaker Type | Stereo (2-way speakers) |
| Power Source | AC Power (Product description mentions 'Alimenté par batterie' which is 'Battery powered', but this is likely an error given the 100W output and typical mini-system design. Assumed AC power.) |
| Power Output | Up to 100 Watts (peak) |
| Supported Standards | MP3 |
| Bluetooth Compatibility | No |
| Supported Audio Formats | CD, Vinyl Records |
| Turntable Speeds | 33/45/78 RPM |
| Radio Tuner | RDS-PLL-FM/MW (30 FM, 10 MW presets) |


