1. Introduction
Thank you for choosing the MEDION Life X47023 Full HD Camcorder. This manual provides essential information for the safe and efficient operation of your device. Please read it thoroughly before use and keep it for future reference.
2. Safety Information
- Power Source: Use only the specified power adapter and battery.
- Water Exposure: Do not expose the camcorder to water or moisture.
- Temperature: Avoid extreme temperatures. Operate and store the device within recommended ranges.
- Cleaning: Disconnect power before cleaning. Use a soft, dry cloth.
- Disassembly: Do not attempt to disassemble or repair the camcorder yourself. Refer all servicing to qualified personnel.
- Battery Handling: Handle batteries carefully. Do not short-circuit, incinerate, or expose to high temperatures.
3. Package Contents
Please check that all items are present in the package:
- MEDION Life X47023 Full HD Camcorder
- 1 x Li-ion Battery
- HDMI Cable
- AV/USB Cable
- USB Power Supply
- Carrying Bag
- Software CD
- User Manual (this document)
4. Product Overview
Familiarize yourself with the components of your camcorder:
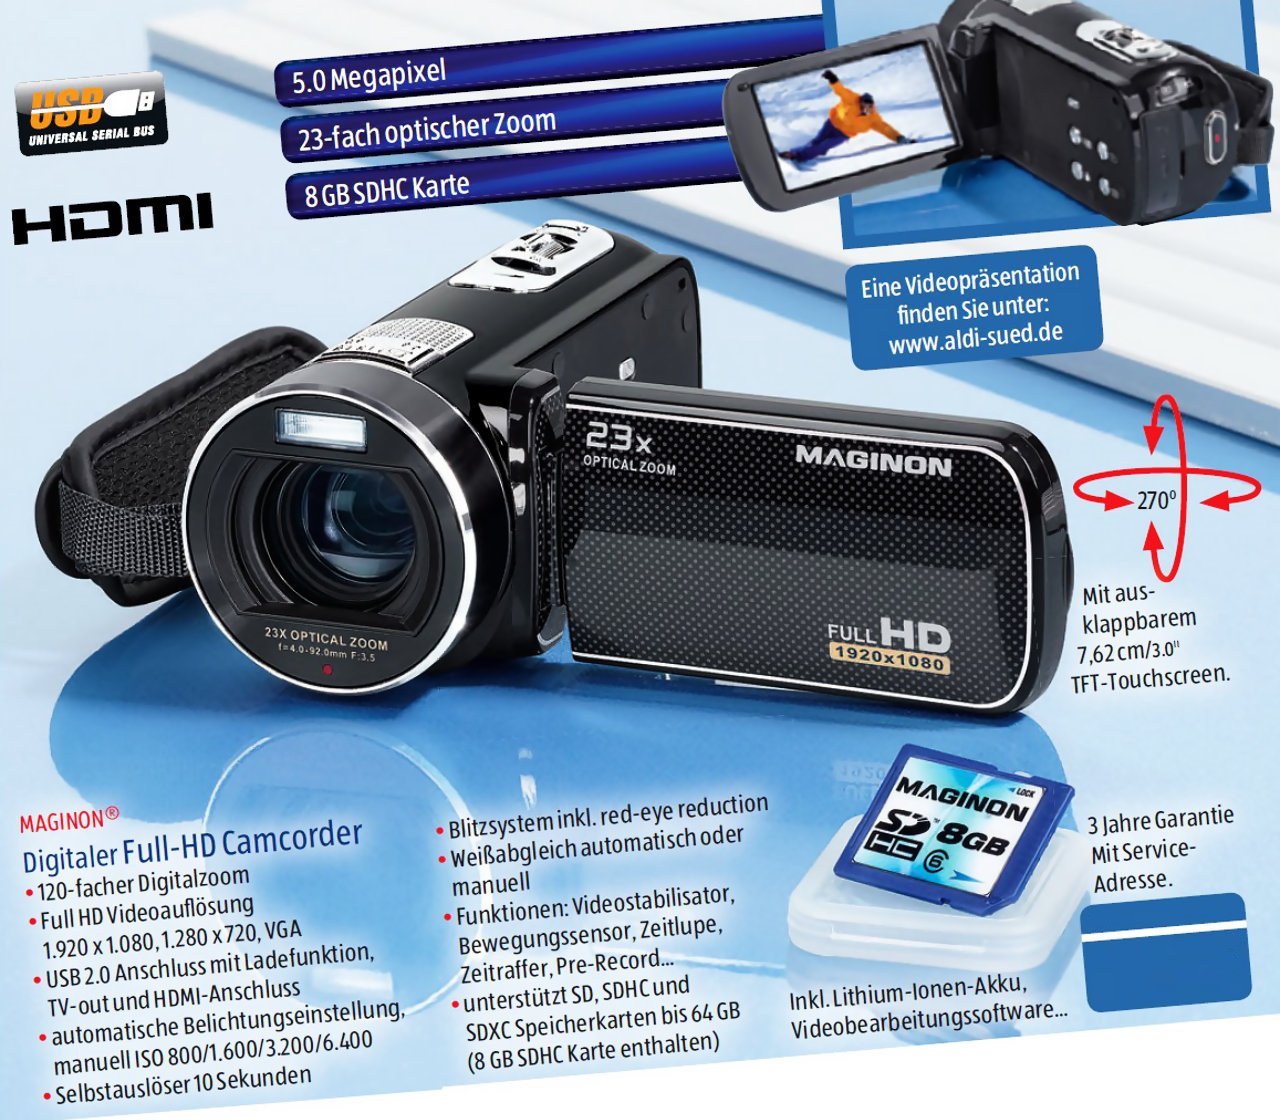
This image displays the MEDION Life X47023 Full HD Camcorder from various angles, highlighting its key features. The main view shows the camcorder with its lens, flash, and hand strap. An inset image on the left shows an 8GB SD card, indicating memory expansion. Text overlays point out "5.0 Megapixel" for photo resolution and "23x Optical Zoom" for the lens capability. Another inset on the top right shows the camcorder with its 7.62 cm (3.0 inch) TFT-Touchscreen display open and rotated, displaying a video scene. A red arrow graphic illustrates the 270-degree rotation capability of the touchscreen. The "FULL HD 1920x1080" logo is visible on the side of the camcorder's body. The "HDMI" and "USB" logos are also present, indicating connectivity options.
- Lens: Captures video and still images.
- Flash/Light: Provides illumination for photos and videos in low light.
- 3.0'' TFT-Touchscreen Display: Rotatable display for viewing and controlling camcorder functions.
- Zoom Lever: Controls optical and digital zoom.
- Record Button: Starts and stops video recording.
- Photo Button: Captures still images.
- Battery Compartment: Houses the Li-ion battery.
- Memory Card Slot: For SD/SDHC memory cards.
- HDMI Port: For connecting to an HDTV.
- AV/USB Port: For connecting to a TV (AV) or computer (USB).
5. Setup
5.1. Battery Installation
- Open the battery compartment cover on the bottom of the camcorder.
- Insert the Li-ion battery, ensuring the contacts align correctly.
- Close the battery compartment cover until it clicks into place.
5.2. Memory Card Installation
The camcorder requires an SD or SDHC memory card (not included) to store recordings.
- Locate the memory card slot, usually near the battery compartment or on the side.
- Insert the memory card with the metal contacts facing down (or as indicated by the diagram near the slot) until it clicks.
- To remove, gently push the card in until it springs out.
5.3. Charging the Battery
- Connect the USB power supply to a power outlet.
- Connect the AV/USB cable to the camcorder's USB port and the USB power supply.
- The charging indicator light will illuminate. Charging is complete when the light changes color or turns off.
- A full charge typically takes approximately 2-3 hours.
6. Operating the Camcorder
6.1. Power On/Off
- To Power On: Open the LCD touchscreen display. The camcorder will automatically power on.
- To Power Off: Close the LCD touchscreen display. The camcorder will automatically power off. Alternatively, press and hold the power button (if available) for a few seconds.
6.2. Recording Video
- Ensure a charged battery and a memory card are installed.
- Power on the camcorder. It will typically start in video recording mode.
- Frame your shot using the touchscreen display.
- Press the Record Button (usually a red circle) to start recording. A red indicator will appear on the screen.
- Press the Record Button again to stop recording.
6.3. Taking Photos
- While in video recording mode, press the Photo Button (often indicated by a camera icon) to capture a still image.
- The camcorder will briefly pause video recording to take the photo, then resume.
6.4. Zoom Function
- Use the Zoom Lever (typically located near the top or back) to zoom in or out.
- Push the lever forward to zoom in (telephoto) and pull it back to zoom out (wide-angle).
- The camcorder features 23x optical zoom and 120x digital zoom. Optical zoom maintains image quality, while digital zoom may reduce it.
6.5. Touchscreen Operation
The 3.0-inch touchscreen allows for intuitive navigation and settings adjustments.
- Tap icons to select menu options or functions.
- Swipe to scroll through menus or playback files.
- The display can rotate 270 degrees for flexible viewing angles.
6.6. Playback
- Switch the camcorder to playback mode (usually via a dedicated button or touchscreen icon).
- Browse through your recorded videos and photos using the touchscreen.
- Tap a file to view it. Use on-screen controls for play, pause, fast forward, and rewind.
6.7. Connecting to a TV (HDMI/AV)
- HDMI: Connect the camcorder to an HDTV using the provided HDMI cable. Select the correct HDMI input on your TV.
- AV: Connect the camcorder to a standard definition TV using the AV part of the AV/USB cable. Select the correct AV input on your TV.
- Once connected, you can view your recordings on the TV screen.
6.8. Connecting to a Computer (USB)
- Connect the camcorder to your computer using the provided AV/USB cable.
- The camcorder will appear as a removable disk drive on your computer.
- You can then transfer video (MP4) and photo files to your computer.
- The included software CD may contain additional tools for managing your media.
7. Maintenance
7.1. Cleaning
- Use a soft, lint-free cloth to clean the camcorder body.
- For the lens and touchscreen, use a specialized lens cleaning cloth and solution. Do not apply liquid directly to the screen or lens.
- Avoid using abrasive cleaners or solvents.
7.2. Battery Care
- Charge the battery fully before first use.
- If storing the camcorder for an extended period, remove the battery.
- Store batteries in a cool, dry place.
7.3. Storage
- Store the camcorder in its carrying bag to protect it from dust and scratches.
- Avoid storing in areas with high humidity or extreme temperature fluctuations.
8. Troubleshooting
| Problem | Possible Cause / Solution |
|---|---|
| Camcorder does not power on. | Battery is not charged or incorrectly installed. Ensure battery is charged and properly seated. |
| Cannot record video/take photos. | Memory card is full, not inserted, or corrupted. Insert a new card, format the current card (this will erase data), or check insertion. |
| Poor image/video quality. | Lens is dirty. Clean the lens with a soft cloth. Insufficient lighting. Ensure adequate lighting for recording. |
| Camcorder not recognized by computer. | USB cable is not connected properly. Try a different USB port or cable. Ensure camcorder is powered on. |
9. Specifications
| Feature | Detail |
|---|---|
| Brand | MEDION |
| Model Number | X47023 (50037683) |
| Video Resolution | Full HD 1080p |
| Photo Resolution | 5.0 Megapixel CMOS Sensor |
| Optical Zoom | 23x |
| Digital Zoom | 120x |
| Display | 3.0-inch (7.62 cm) TFT Touchscreen, 270° rotatable |
| Video Format | MP4 |
| Audio Format | AAC |
| Connectivity | HDMI, AV/USB |
| Storage Media | SD/SDHC Memory Card (not included) |
| Battery | 1 x Li-ion Battery (included) |
| Dimensions (L x W x H) | 7 x 12.7 x 6.2 cm |
| Weight | 374 g |
10. Warranty and Support
For warranty information and technical support, please refer to the documentation provided with your purchase or visit the official MEDION website. Keep your proof of purchase for warranty claims.


