Product Overview
The BREADMAN Professional Bread Maker BK1060BC is designed to simplify the home baking process, offering a wide range of features for consistent and delicious results. This appliance is equipped with advanced functionalities to cater to various bread types and user preferences.

Image: The BREADMAN Professional Bread Maker BK1060BC, showcasing its sleek silver design and user interface.
Key Features:
- 14 Cooking Functions: Provides ideal results for a variety of breads and doughs, including gluten-free, low-carb, and artisan loaves.
- Automatic Fruit & Nut Dispenser: An integrated basin automatically adds fruits or nuts to the dough at the appropriate time during the baking cycle.
- 3 Loaf Size Options: Allows selection of 1.0 lb, 1.5 lb, or 2.0 lb loaf sizes, with the machine adjusting its process accordingly.
- Collapsible Kneading Paddle: The specially designed kneading paddle collapses before baking to minimize holes at the bottom of the finished loaf.
- 15-Hour Delay Timer: Enables users to prepare ingredients in advance and set a delayed start time for fresh bread at a desired moment.
- 1-Hour Keep Warm Function: Maintains the warmth of the freshly baked loaf after the cycle completes.
Setup and First Use
Unpacking and Initial Cleaning:
- Carefully remove the bread maker and all accessories from the packaging.
- Wash the bread pan, kneading paddle, and fruit/nut dispenser with warm, soapy water. Rinse thoroughly and dry completely.
- Wipe the exterior of the bread maker with a damp cloth. Do not immerse the main unit in water.
- Ensure all parts are dry before assembly.
Component Identification:
- Bread Pan: The removable container where ingredients are mixed and baked.
- Kneading Paddle: Attaches to the shaft inside the bread pan for mixing and kneading dough.
- Automatic Fruit & Nut Dispenser: Located on the lid, it automatically releases additions into the dough.
- Control Panel: Features a digital display, menu selection buttons, loaf size/crust color buttons, and start/stop controls.
Placement:
Place the bread maker on a stable, flat, heat-resistant surface, away from direct sunlight and heat sources. Ensure adequate ventilation around the unit.
Operating Instructions
Adding Ingredients:
Always add liquid ingredients first, followed by dry ingredients. Yeast should be added last, placed in a small indentation on top of the flour, away from liquids and salt.
- Attach the kneading paddle securely onto the shaft inside the bread pan.
- Add all liquid ingredients to the bread pan.
- Add dry ingredients, ensuring the yeast is placed last and separate from liquids and salt.
- If using the automatic dispenser, add fruits, nuts, or other mix-ins to the dispenser compartment.
- Place the bread pan into the bread maker and close the lid firmly.
Program Selection:
The bread maker offers 14 pre-programmed settings for various recipes.
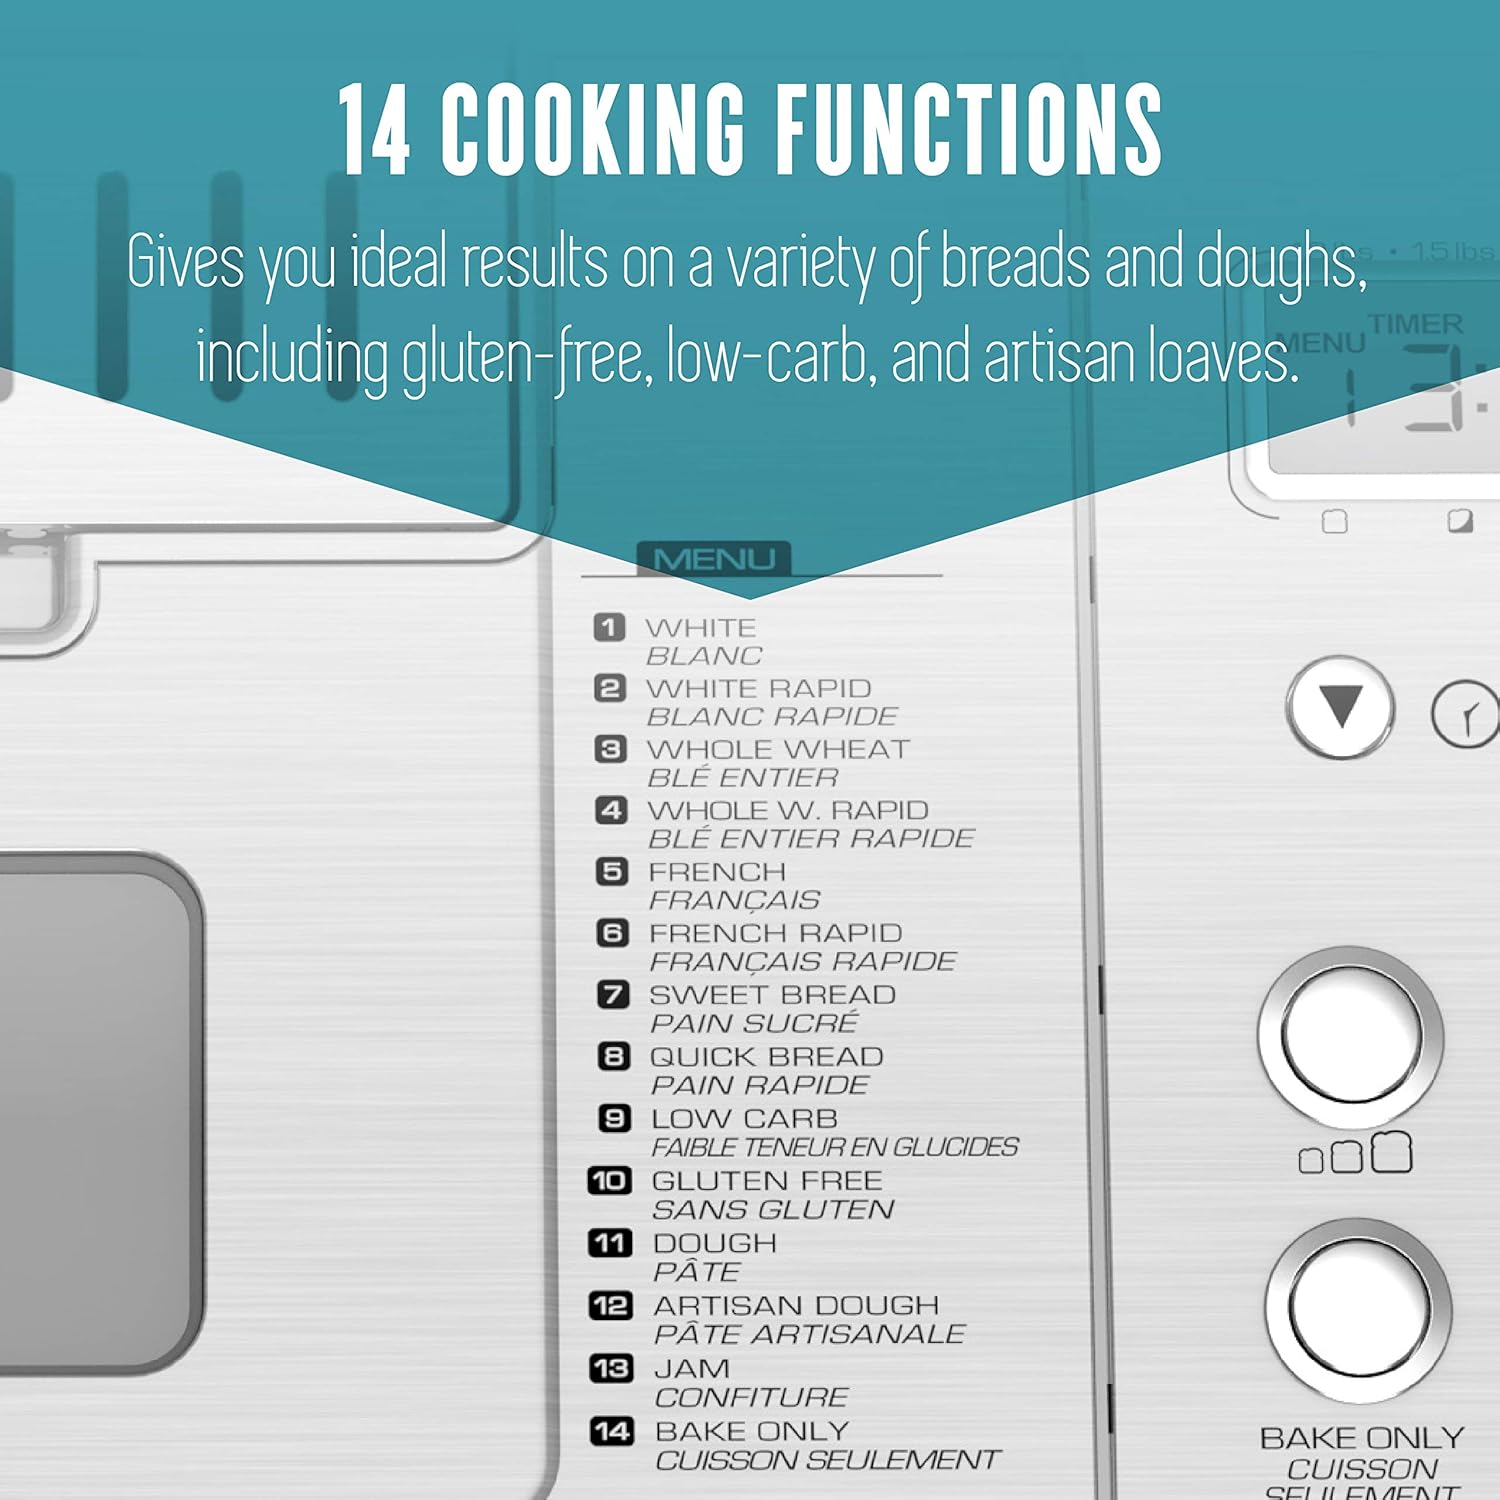
Image: Detail of the control panel displaying the 14 available cooking functions, including White, Whole Wheat, French, Sweet Bread, Quick Bread, Low Carb, Gluten Free, Dough, Artisan Dough, Jam, and Bake Only.
- Use the "MENU" button to cycle through the 14 programs displayed on the digital screen.
- Common programs include: White, Whole Wheat, French, Sweet Bread, Quick Bread, Low Carb, Gluten Free, Dough, Artisan Dough, Jam, and Bake Only.
Loaf Size and Crust Color:
Adjust the loaf size and crust darkness according to your recipe and preference.

Image: The control panel showing buttons for selecting loaf size (1.0 lb, 1.5 lb, 2.0 lb) and crust color (light, medium, dark).
- Use the "LOAF SIZE" button to select 1.0 lb, 1.5 lb, or 2.0 lb.
- Use the "CRUST COLOR" button to choose Light, Medium, or Dark.
Delay Timer:
The 15-hour delay timer allows you to set the machine to start baking at a later time.

Image: Freshly sliced bread, symbolizing the convenience of the 15-hour delay timer for morning baking.
- After selecting your program, loaf size, and crust color, press the "+" or "-" buttons to set the desired delay time in hours and minutes.
- The displayed time includes the baking cycle duration.
- Press "START/STOP" to activate the delay timer.
Automatic Fruit & Nut Dispenser:
This feature ensures mix-ins are added at the optimal time during the kneading cycle.

Image: The automatic fruit and nut dispenser, shown with dried cranberries and walnuts, ready to be dispensed into the dough.
- Open the dispenser lid and add your desired fruits, nuts, or other mix-ins before starting the cycle.
- The dispenser will automatically open and release the ingredients during the appropriate kneading phase.
Removing the Loaf:
- Once the baking cycle is complete, the machine will beep and may enter a 1-hour keep warm cycle.
- Carefully open the lid and, using oven mitts, lift the bread pan by its handle.
- Invert the bread pan onto a wire rack and shake gently until the loaf slides out.
- Allow the bread to cool on the wire rack for at least 15-20 minutes before slicing.
- The collapsible kneading paddle is designed to minimize holes. If it remains in the loaf, use the provided hook tool (if included) to carefully remove it.

Image: A baked loaf of bread alongside the collapsible kneading paddle, demonstrating how the paddle detaches to prevent large holes.
Maintenance and Cleaning
Regular cleaning ensures the longevity and optimal performance of your bread maker.
- Bread Pan and Kneading Paddle: These parts are nonstick and can be washed with warm, soapy water. They are also dishwasher safe. Avoid abrasive cleaners or scouring pads that could damage the nonstick coating.
- Automatic Fruit & Nut Dispenser: Remove and clean the dispenser after each use to prevent residue buildup. Wash with warm, soapy water and dry thoroughly.
- Exterior: Wipe the exterior of the bread maker with a soft, damp cloth. Do not use harsh chemicals or immerse the unit in water.
- Interior: Use a soft, damp cloth to wipe the interior of the baking chamber, removing any crumbs or spills.
- Always ensure the bread maker is unplugged and completely cool before cleaning.
Troubleshooting
If you encounter issues with your bread maker, refer to the following common problems and solutions:
| Problem | Possible Cause | Solution |
|---|---|---|
| Bread does not rise or rises too much. | Incorrect yeast amount, old yeast, incorrect water temperature, wrong flour type, incorrect ingredient measurements. | Ensure yeast is fresh and active. Use precise measurements. Water temperature should be lukewarm (105-115°F / 40-46°C). Use bread flour for best results. |
| Loaf is dense or heavy. | Too much flour, not enough liquid, insufficient kneading, low room temperature. | Verify ingredient measurements. Ensure proper kneading cycle completion. Avoid baking in very cold environments. |
| Kneading paddle remains in the loaf. | Paddle did not collapse or detach properly. | Use the provided hook tool to carefully remove the paddle after the loaf has cooled slightly. Ensure the paddle is clean and moves freely before use. |
| Bread pan sticks or is difficult to remove. | Residue buildup on the pan exterior or inside the machine. | Ensure the bread pan exterior and the machine's interior are clean and free of debris. |
| Machine emits unusual noises. | Normal operation sounds, or an issue with internal components. | Some sounds (like motor operation or dispenser activation) are normal. If the noise is persistent, loud, or grinding, discontinue use and contact customer support. |
Specifications

Image: The Breadman bread maker with its approximate dimensions of 12.2 inches in height and 13.6 inches in width.
| Attribute | Detail |
|---|---|
| Brand | Breadman |
| Model Number | BK1060BC |
| Colour | Silver |
| Product Dimensions (L x W x H) | 42.09 x 31.8 x 42.14 cm (approximately 16.57 x 12.52 x 16.59 inches) |
| Capacity | 907 g (2.0 lb) |
| Material | Steel |
| Item Weight | 7.96 kg (17.55 lbs) |
| Number of Programs | 14 |
| UPC | 740057003202 |
| Product Care Instructions | Dishwasher Safe (for pan/paddle), Wipe with Dry Cloth (for unit) |
Warranty and Support
For warranty information or technical assistance, please contact Breadman customer support. Keep your purchase receipt as proof of purchase.
For further assistance, visit the official Breadman website or contact their customer service department. Contact details are typically found in the product packaging or on the manufacturer's website.


