1. Introduction
This instruction manual provides essential information for the proper installation, operation, and maintenance of your Nordyne 903110A Furnace Igniter Kit with Plug. Please read this manual thoroughly before attempting any installation or service to ensure safe and efficient use of the product.
Safety Warning: The igniter element is extremely fragile. Handle with care. Do not touch the igniter element directly with bare hands as oils can shorten its lifespan. Always disconnect power to the furnace before installation or maintenance.
2. Product Overview
The Nordyne 903110A Igniter Kit is a replacement igniter designed for various furnace models, including those starting with M1M from Nordyne, Miller, Intertherm, and Broan. It replaces older style spiral igniters and is compatible with part numbers 632313, 632313C, 903110, 903110A, FC047, and F-1022-21.
- Product Type: Auto Part (Furnace Igniter)
- Material: Heat-Resistant Silicon Nitride for durability and anti-aging properties.
- Bracket: Aluminum Alloy bracket for higher heat resistance and improved power connection.
- Plug: Highly engineered plug, tested to OEM standards.

Figure 2.1: The Nordyne 903110A Furnace Igniter Kit, showing the igniter element, wiring, and connector.
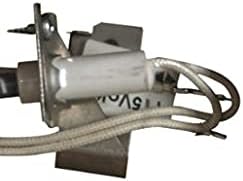
Figure 2.2: A closer view of the igniter element and its mounting bracket.

Figure 2.3: The igniter kit showing the full length of the igniter and its attached wiring.
Product Video Overview
Video 2.1: An overview of the 903110A Furnace Hot Surface Ignitor, detailing its features and applications. This video is provided by the seller to demonstrate the product.
3. Compatibility
This igniter kit is designed as a direct replacement for the following part numbers and is compatible with furnace models from various brands:
- Replaces Part Numbers: 632313, 632313C, 903110, 903110A, FC047, F-1022-21, 632666.
- Compatible Brands: Nordyne, Miller, Intertherm, Broan, Frigidaire, Maytag, Gibson.
- Specifically designed for furnace models starting with M1M.
4. Safety Information
Adhering to safety precautions is crucial when working with furnace components. Failure to follow these instructions could result in property damage, personal injury, or death.
- Disconnect Power: Always turn off the electrical power to the furnace at the main service panel before beginning any installation, maintenance, or troubleshooting.
- Gas Supply: Ensure the gas supply to the furnace is turned off before working on the igniter.
- Fragile Component: The igniter element is ceramic and very fragile. Avoid dropping or striking it.
- Avoid Contamination: Do not touch the igniter element with bare hands. Oils from your skin can create hot spots and shorten the igniter's lifespan. Use clean gloves or handle by the ceramic base.
- Professional Installation: If you are not comfortable performing this installation, it is recommended to contact a qualified HVAC technician.
- Proper Tools: Use appropriate tools for the job to prevent damage to the igniter or furnace components.
5. Setup and Installation
Follow these steps carefully to replace your furnace igniter. Refer to your furnace's specific service manual for detailed instructions if available.
- Prepare for Installation:
- Turn off all electrical power to the furnace at the main breaker.
- Turn off the gas supply to the furnace.
- Locate the igniter within your furnace. It is typically found near the burners.
- Remove Old Igniter:
- Carefully disconnect the electrical connector from the old igniter.
- Unscrew any mounting screws or clips holding the old igniter in place.
- Gently remove the old igniter, being careful not to damage other components.
- Install New Igniter:
- Handle the new igniter by its ceramic base or with clean gloves to avoid touching the silicon nitride element.
- Position the new igniter in the same location and orientation as the old one.
- Secure the igniter with the mounting screws or clips. Ensure it is firmly in place but do not overtighten.
- Connect the electrical plug of the new igniter to the furnace wiring harness. Ensure a secure connection.
- Restore Power and Test:
- Turn the gas supply back on.
- Restore electrical power to the furnace at the main breaker.
- Initiate a heating cycle on your thermostat to test the new igniter. Observe for proper ignition.
- If the furnace does not ignite or operates abnormally, refer to the Troubleshooting section.
6. Operating Instructions
The igniter operates automatically as part of your furnace's ignition sequence. When the thermostat calls for heat, the igniter will glow hot to ignite the gas burners. No direct user interaction is required for the igniter's operation once installed correctly.
- Ensure your thermostat is set to "Heat" mode and the desired temperature is above the current room temperature.
- The furnace control board will initiate the igniter, which will heat up to a high temperature.
- Once sufficiently hot, the gas valve will open, and the gas will ignite from the hot surface of the igniter.
- The igniter will then turn off as the flame sensor confirms successful ignition.
7. Maintenance
Regular maintenance helps ensure the longevity and efficient operation of your furnace and its components, including the igniter.
- Annual Inspection: It is recommended to have your furnace inspected annually by a qualified HVAC technician. They can check the igniter for signs of wear or damage.
- Cleaning: If the igniter appears dirty or coated with residue, it can be gently cleaned with a soft brush. Ensure the furnace is powered off and cooled down before attempting any cleaning. Avoid using abrasive materials or chemicals.
- Visual Check: Periodically, visually inspect the igniter for cracks, discoloration, or other signs of degradation. A healthy igniter should glow brightly and consistently.
- Avoid Physical Contact: As mentioned, avoid touching the igniter element directly to prevent contamination.
8. Troubleshooting
If your furnace is experiencing issues related to ignition, consult the table below for common problems and potential solutions. Always ensure power and gas are off before inspecting components.
| Problem | Possible Cause | Solution |
|---|---|---|
| Igniter does not glow. | No power to furnace, faulty igniter, loose wiring connection, faulty control board. | Check furnace breaker. Verify wiring connections. Test igniter for continuity (if comfortable and knowledgeable). Replace igniter if faulty. Consult HVAC technician for control board issues. |
| Igniter glows but gas does not ignite. | No gas supply, faulty gas valve, dirty burners, faulty flame sensor. | Ensure gas supply is on. Check for gas leaks. Clean burners. Inspect flame sensor for damage or dirt. Consult HVAC technician for gas valve or flame sensor replacement. |
| Igniter glows weakly or intermittently. | Aging igniter, contaminated igniter surface, low voltage. | Replace igniter. Gently clean igniter surface (see Maintenance). Check furnace wiring for proper voltage. |
| Furnace cycles on and off rapidly (short cycling). | Could be related to ignition issues, but often other furnace problems (e.g., airflow, thermostat). | Ensure igniter is functioning correctly. Check air filter. Consult HVAC technician for diagnosis. |
If you are unable to resolve the issue after following these steps, it is recommended to contact a qualified HVAC professional for further assistance.
9. Specifications
| Feature | Detail |
|---|---|
| Brand | Nordyne |
| Model Number | I903110 (Replaces 903110A) |
| Product Type | Furnace Igniter Kit |
| Igniter Material | Heat-Resistant Silicon Nitride |
| Bracket Material | Aluminum Alloy |
| Installation Type | Bolt-On |
| Connector Gender | Male |
| Item Weight | 0.1 Kilograms (approx. 3.52 ounces) |
| Package Dimensions | Approximately 5.39 x 3.15 x 2.91 inches |
| UPC | 663132151295 |
10. Warranty and Support
For specific warranty information regarding your Nordyne 903110A Furnace Igniter Kit, please refer to the documentation provided with your purchase or contact Nordyne customer support directly. Keep your proof of purchase for warranty claims.
If you require technical assistance or have questions not covered in this manual, please contact a qualified HVAC professional or the manufacturer's customer service department.


