Download PDFFree PDF. The Save button below keeps a bookmark and private notes in your account.
DB DRIVE E7 3X 3-Way Electronic Crossover
Instruction Manual
Model: E7 3X
1. Product Overview
The DB DRIVE E7 3X is a 3-Way Active Electronic Crossover designed to optimize audio signal distribution in a car audio system. It features 2 stereo inputs with parallel input options and 3 stereo outputs, providing precise control over frequency ranges for different speakers.
Key Features:
Front & Rear High-Pass Crossover: -18dB Octave, Variable Frequency 35 - 45Hz.
Sub Low Pass Crossover: -18dB Octave, Variable Frequency 45 - 250Hz.
Bass Boost: Variable to +/- 18dB @ 40 to 120Hz.
2 Stereo Inputs with Parallel Input Options.
3 Stereo Outputs.
Remote Bass Control included.
2. Setup and Installation
Before beginning installation, ensure all audio components are powered off and disconnected from the vehicle's battery. Proper installation is crucial for optimal performance and safety. It is recommended to have this unit installed by a professional car audio technician.
What's in the Box:
DB DRIVE E7 3X Crossover Unit
Bass Remote
Instruction Manual (this document)
Installation Steps:
Mounting: Choose a secure, dry location for the crossover unit, away from direct heat or moisture. Ensure adequate ventilation.
Power Connection: Connect the unit to a stable 12V DC power source (typically the vehicle's battery) with an inline fuse. Ensure proper grounding to the vehicle chassis.
Remote Turn-On: Connect the remote turn-on wire from your head unit or amplifier to the crossover's remote input.
Audio Input: Connect the audio output from your head unit to the crossover's stereo inputs. The unit supports parallel input options.
Audio Output: Connect the crossover's stereo outputs to the appropriate amplifiers for your front, rear, and subwoofer speakers.
Remote Bass Control: Connect the remote bass control to the designated port on the crossover unit.
Initial Power-Up: After all connections are made and verified, reconnect the vehicle's battery and power on your audio system.
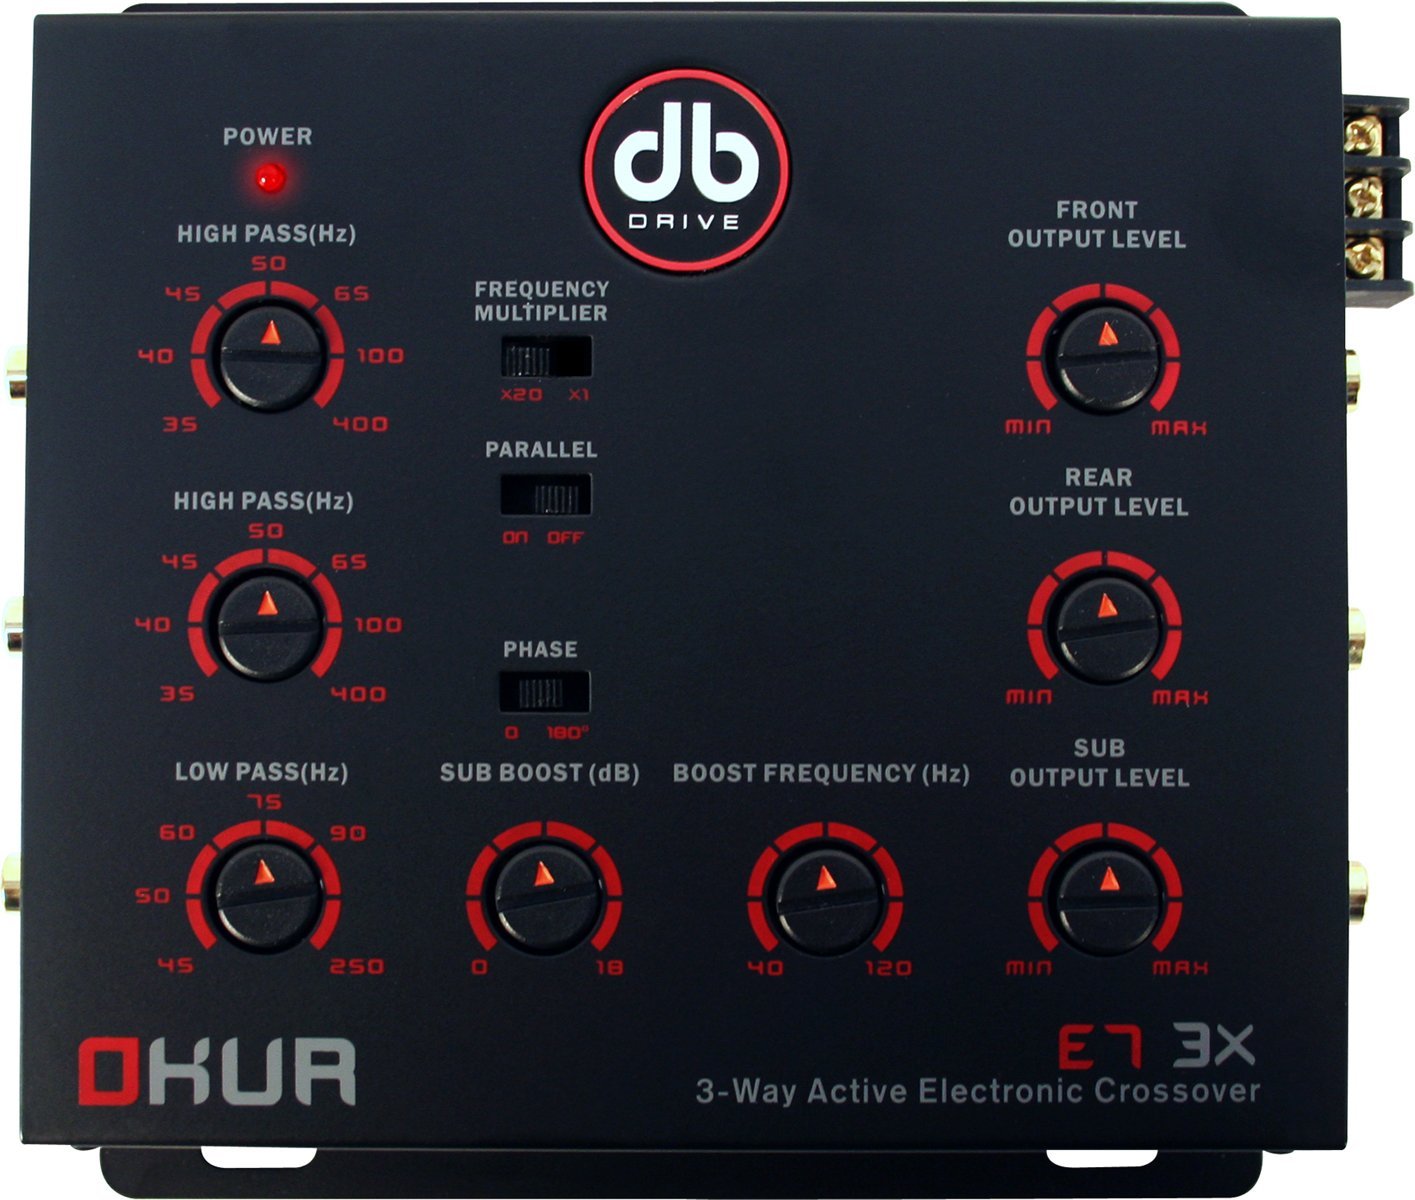
Figure 2.1: DB DRIVE E7 3X Electronic Crossover unit. This image shows the compact design and the various connection points for power, audio inputs, and audio outputs, along with control knobs.
3. Operating Instructions
The E7 3X crossover allows for precise tuning of your audio system to achieve optimal sound quality and speaker protection. Adjustments should be made incrementally and with careful listening.
Crossover Frequency Adjustment:
Front & Rear High-Pass: Use the dedicated knobs to set the high-pass frequency for your front and rear speakers. This filters out low frequencies, preventing distortion and protecting smaller speakers. The variable range is 35 - 45Hz with an -18dB/octave slope.
Sub Low Pass: Adjust the low-pass frequency for your subwoofer output. This ensures only low frequencies are sent to the subwoofer, maximizing bass performance. The variable range is 45 - 250Hz with an -18dB/octave slope.
Bass Boost Control:
The E7 3X includes a variable bass boost feature. Use the dedicated knob on the unit or the remote bass control to adjust the bass level. The bass boost is variable up to +/- 18dB at a frequency range of 40 to 120Hz. Adjust this setting to your personal preference, being mindful of potential distortion at extreme levels.
4. Maintenance
The DB DRIVE E7 3X Electronic Crossover is designed for reliable operation with minimal maintenance. Follow these guidelines to ensure its longevity:
Cleaning: Periodically wipe the unit with a soft, dry cloth to remove dust. Avoid using harsh chemicals or abrasive cleaners.
Connections: Occasionally check all wiring connections to ensure they are secure and free from corrosion. Loose connections can lead to poor performance or damage.
Environment: Ensure the unit remains in a dry, well-ventilated area. Avoid exposing it to extreme temperatures or direct sunlight.
5. Troubleshooting
If you experience issues with your E7 3X crossover, refer to the following common problems and solutions:
Problem
Possible Cause
Solution
No Power / Unit Not Turning On
Blown fuse
Loose power or ground connection
Remote turn-on wire not connected or faulty
Check and replace the inline fuse if blown.
Verify all power and ground connections are secure.
Ensure the remote turn-on wire is properly connected and receiving a signal from the head unit.
No Audio Output
Loose RCA connections
Incorrect input/output selection
Amplifier issues
Check all RCA cables for secure connection at both the crossover and amplifiers.
Ensure the correct input source is selected on your head unit.
Verify that your amplifiers are powered on and functioning correctly.
Distorted Sound
Gain levels set too high
Crossover frequencies set incorrectly
Over-boosting bass
Reduce gain levels on the crossover and/or amplifiers.
Adjust high-pass and low-pass frequencies to suit your speakers and subwoofers.
Lower the bass boost level.
6. Specifications
Below are the technical specifications for the DB DRIVE E7 3X 3-Way Electronic Crossover:
Item Model Number: E7 3X
Item Weight: 1.81 pounds
Product Dimensions: 6.62 x 5.5 x 1.75 inches
Shipping Weight: 2.7 Pounds
Front & Rear High-Pass Crossover: -18dB Octave, Variable Frequency 35 - 45Hz
Sub Low Pass Crossover: -18dB Octave, Variable Frequency 45 - 250Hz
Bass Boost: Variable to +/- 18dB @ 40 to 120Hz
ASIN: B004M4OP3S
Date First Available: February 4, 2011
7. Warranty and Support
Warranty Information:
For detailed warranty information regarding your DB DRIVE E7 3X Electronic Crossover, please refer to the warranty card included with your product or visit the official DB DRIVE website. Warranty terms and conditions may vary by region and retailer.
Customer Support:
If you require technical assistance, have questions about installation, or need further support, please contact DB DRIVE customer service. Contact information can typically be found on the manufacturer's website or on the product packaging.
Ask about setup, troubleshooting, compatibility, parts, safety, or missing instructions. Manuals+ will review the question and use this page’s manual context to help answer it.