
1. Introduction
This manual provides detailed instructions for the operation and maintenance of your Vivitar Vivicam DVR-560 Digital Video Recorder. Please read this manual thoroughly before using the device to ensure proper functionality and to maximize your user experience.
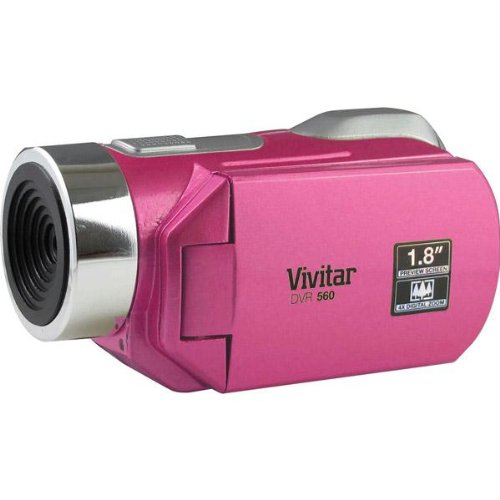
Figure 1: Vivitar Vivicam DVR-560 Digital Video Recorder. This image displays the pink digital video recorder, highlighting its lens, the 1.8-inch preview screen label, and various control elements.
2. Package Contents
Verify that all items listed below are present in your product package:
- Vivitar Vivicam DVR-560 Digital Video Recorder
- USB Cable
- User Manual (this document)
- Wrist Strap
- Software CD (if included)
Note: Specific accessories may vary.
3. Product Overview
Familiarize yourself with the main components of your DVR-560.
3.1. Front View
- Lens: Captures video and still images.
- Microphone: Records audio.
3.2. Rear View
- 1.8-inch LCD Screen: Displays live view, recorded content, and menu options.
- Control Buttons: Navigation, record, playback, and menu access.
3.3. Side/Bottom View
- Battery Compartment: Houses the Lithium Ion battery.
- SD Card Slot: For inserting a compatible SD memory card (not included).
- USB Port: For connecting to a computer.
- TV Out Port: For connecting to a television via VGA cable.
4. Setup
4.1. Installing the Battery
- Locate the battery compartment cover on the device.
- Slide or lift the cover to open it.
- Insert one Lithium Ion battery, ensuring correct polarity (+/-) as indicated inside the compartment.
- Close the battery compartment cover securely.
4.2. Inserting an SD Memory Card
An SD memory card (not included) is required to store videos and photos.
- Locate the SD card slot on the device.
- Insert the SD card with the metal contacts facing the correct direction (refer to the diagram near the slot, if available).
- Push the card gently until it clicks into place. To remove, push the card again until it springs out.
5. Operating Instructions
5.1. Powering On/Off
- To Power On: Press and hold the Power button until the LCD screen illuminates.
- To Power Off: Press and hold the Power button until the LCD screen turns off.
5.2. Recording Video
- Ensure the device is in video recording mode (check the icon on the LCD screen).
- Frame your subject using the 1.8-inch LCD screen.
- Press the Record button to start recording. A timer or indicator will appear on the screen.
- Press the Record button again to stop recording. The video file will be saved to the SD card.
The DVR-560 records video at VGA resolution (640 x 480 pixels) and features an anti-shake function to help stabilize footage.
5.3. Taking Still Photos
- Switch the device to still camera mode.
- Frame your shot using the LCD screen.
- Press the Shutter button (or designated photo button) to capture a photo. The image will be saved to the SD card.
5.4. Digital Zoom
The DVR-560 features 4x digital zoom. Use the zoom controls (usually marked with 'W' for Wide and 'T' for Telephoto) to adjust the magnification of your subject while recording or taking photos.
5.5. Playback
- Switch the device to playback mode.
- Use the navigation buttons to browse through your recorded videos and photos.
- Press the Play/OK button to view a selected file.
5.6. Infrared Night Vision / Low Light Mode
Activate the infrared night vision feature for recording in low-light conditions. Refer to the on-screen menu or a dedicated button for this function. This feature enhances visibility in dark environments.
5.7. Voice Recording
The device can also function as a voice recorder. Switch to voice recording mode and press the record button to capture audio. Saved audio files can be played back on the device.
5.8. Connecting to a TV (TV Out)
To view your content on a larger screen:
- Connect the DVR-560 to your television using a compatible VGA cable (not included) via the TV Out port.
- Select the correct input source on your television.
- The device's display will be mirrored on your TV, allowing for playback of videos and photos.
6. Maintenance
6.1. Cleaning
- Use a soft, dry cloth to clean the camera body.
- For the lens and LCD screen, use a specialized lens cleaning cloth and solution to avoid scratches.
- Do not use harsh chemicals or abrasive cleaners.
6.2. Storage
- Store the device in a cool, dry place away from direct sunlight and extreme temperatures.
- Remove the battery if the device will not be used for an extended period.
7. Troubleshooting
- Device does not power on:
- Ensure the battery is correctly installed and fully charged.
- Replace the battery if it is old or depleted.
- Cannot record video/take photos:
- Check if an SD card is inserted and has sufficient free space.
- Ensure the SD card is not locked (write-protected).
- Verify the device is in the correct mode (video or photo).
- Poor video/photo quality:
- Clean the camera lens.
- Ensure adequate lighting for recording.
- Check if the anti-shake feature is enabled for video.
- Device freezes or becomes unresponsive:
- Remove and reinsert the battery to perform a hard reset.
- If using an SD card, try formatting it (this will erase all data).
8. Specifications
| Brand | Vivitar |
| Model | DVR-560 |
| Screen Size | 1.8 Inches |
| Video Resolution | VGA (640 x 480p) |
| Digital Zoom | 4x |
| Photo Sensor Technology | CMOS |
| Flash Memory Type | SD Card (not included) |
| Battery Type | 1 Lithium Ion battery (required) |
| Connectivity | VGA (for TV Out) |
| Special Features | Infrared Night Vision, Anti-shake, Digital Still Camera Mode, Voice Recorder |
| Color | Pink |
| Item Weight | 12 ounces |
| Package Dimensions | 9.3 x 7.6 x 3 inches |
9. Warranty and Support
For warranty information and technical support, please refer to the documentation included with your purchase or visit the official Vivitar website. Keep your proof of purchase for warranty claims.