
Introduction
The Mackie MCU Pro is an 8-channel control surface designed to provide hands-on control over your music production software. It integrates seamlessly with various Digital Audio Workstation (DAW) applications, offering tactile control over mix and plug-in parameters, real-time visual feedback, and a streamlined workflow.
This manual provides essential information for setting up, operating, maintaining, and troubleshooting your MCU Pro unit, ensuring you can maximize its capabilities in your studio environment.

Figure 1: Mackie MCU Pro 8-channel Control Surface
1. Setup
This section details the steps required to connect and prepare your Mackie MCU Pro for use with your computer and Digital Audio Workstation (DAW) software.
1.1 Unpacking and Inspection
Carefully remove the MCU Pro from its packaging. Inspect the unit for any signs of damage that may have occurred during transit. Ensure all included accessories, such as the power adapter and USB cable, are present.
1.2 Connecting to Your Computer
- Power Connection: Connect the provided power adapter to the "EXTERNAL POWER" input on the rear panel of the MCU Pro and then to a suitable power outlet.
- USB Connection: Connect one end of the USB cable to the "MAIN PORT 1 - MCU" USB port on the rear of the MCU Pro and the other end to an available USB port on your Mac or PC. The MCU Pro features an onboard USB MIDI interface for direct connection.
- MIDI Connections (Optional): The MCU Pro includes additional MIDI IN/OUT ports (Port 2, 3, 4) for connecting up to three external MIDI devices. Connect your external MIDI gear as needed.
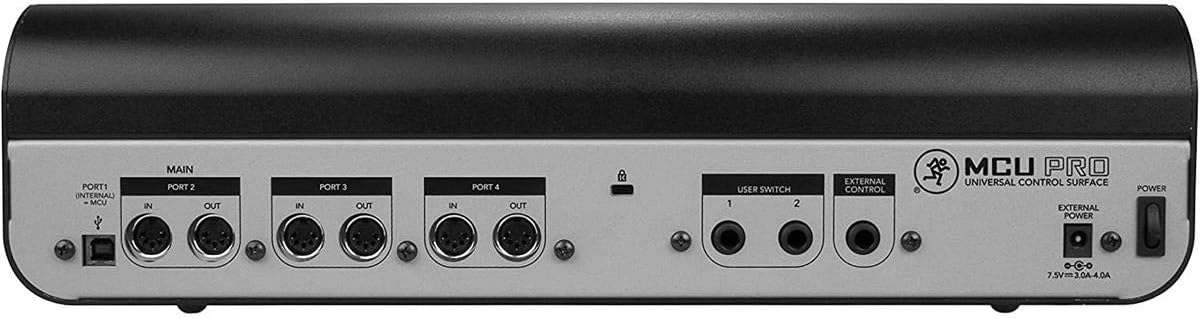
Figure 2: Rear Panel Connections
1.3 Software Configuration
The MCU Pro utilizes a proprietary Mackie communication protocol, allowing for plug-and-play setup with most major DAWs without extensive MIDI mapping. Refer to your specific DAW's documentation for instructions on enabling or selecting the Mackie Control Universal as a control surface.
Lexan Overlays: The unit comes with software-specific Lexan overlays. Place the appropriate overlay on the control surface to match the button labels to your DAW's functions.
2. Operating the MCU Pro
The Mackie MCU Pro provides comprehensive control over your DAW. This section outlines the primary functions and controls.
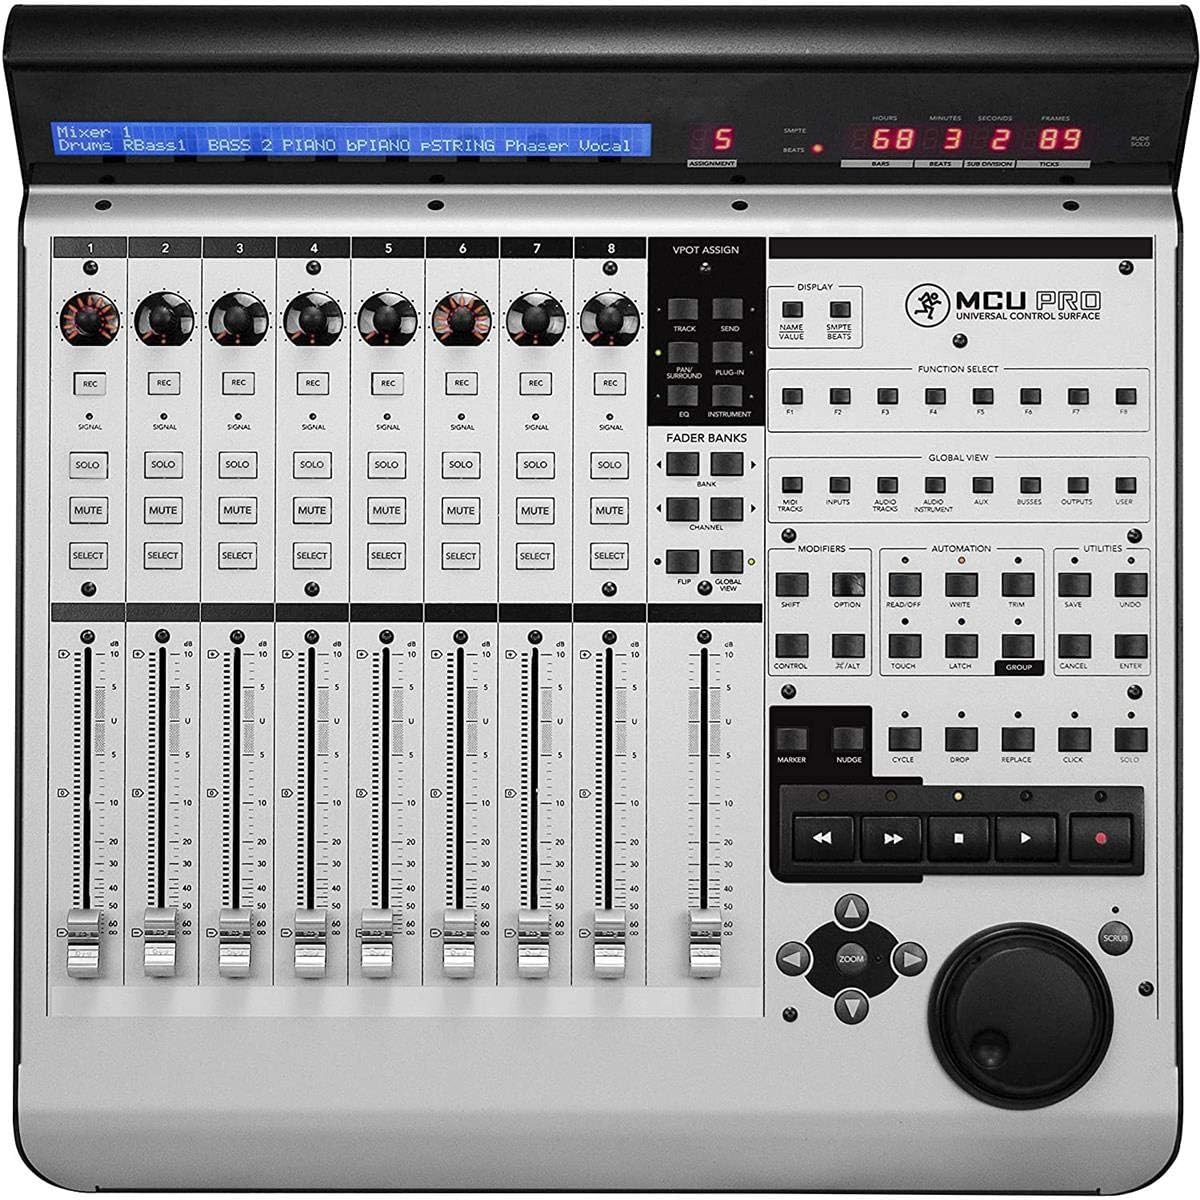
Figure 3: Top Panel Controls
2.1 Channel Strips
The MCU Pro features eight individual channel strips, each equipped with the following:
- 100mm Motorized Touch-Sensitive Faders: These Penny + Giles faders provide precise, tactile control over track volume. They are motorized to reflect changes made in your DAW.
- Rotary V-Pots with LED Collars: Each channel has a V-Pot for controlling various parameters such as pan, sends, EQ, and plug-in effects. The LED collar indicates the current value.
- Dedicated Buttons: Each channel includes buttons for Record Ready, Solo, Mute, and Channel Select, along with a Signal Present LED.
2.2 Master Section
The master section provides global controls and navigation:
- Master Fader: A dedicated 100mm motorized fader for the master output.
- Transport Controls: Standard tape-style controls including Play, Stop, Record, Fast Forward, and Rewind.
- Navigation Buttons: Buttons for navigating channels (individually or in banks of eight), and for software-specific controls like assigning I/O, sends, EQ, dynamics, and plug-ins.
- Jog Wheel: A large jog wheel for precise scrubbing and navigation within your project.
- Quick Cursor-Style Buttons: Up, Down, Left, Right, and Zoom buttons for efficient navigation.
2.3 Display and Feedback
- Backlit LCD Display: A two-line, 55-character backlit LCD shows track names, channel metering, I/O assignments, plug-in parameters, EQ, and dynamics.
- Seven-Segment LED Timecode Display: Provides clear timecode information.
2.4 Expansion
The MCU Pro can be expanded with optional modules:
- Mackie Control Extender Pro: Adds eight additional channel strips. Multiple Extender Pro units can be used.
- Mackie Control C4 Pro: A plug-in and virtual instrument controller, offering control over up to 32 parameters simultaneously.
3. Maintenance
Proper maintenance ensures the longevity and optimal performance of your Mackie MCU Pro.
3.1 Cleaning
- Exterior: Use a soft, dry, lint-free cloth to wipe down the exterior surfaces. For stubborn dirt, a slightly damp cloth with mild soap can be used, followed by a dry cloth. Avoid abrasive cleaners or solvents.
- Faders and V-Pots: Keep faders and rotary encoders free from dust and debris. Compressed air can be used carefully to dislodge particles. Avoid spraying liquids directly onto these components.
- Display: Clean the LCD display with a soft, dry microfiber cloth.
3.2 Storage
When not in use, store the MCU Pro in a clean, dry environment, away from extreme temperatures, humidity, and direct sunlight. If transporting, use appropriate protective casing.
4. Troubleshooting
This section addresses common issues you might encounter with your Mackie MCU Pro.
4.1 Power and Connectivity Issues
- Unit Not Powering On:
- Ensure the power adapter is securely connected to both the MCU Pro and a working power outlet.
- Verify the power switch on the rear panel is in the "ON" position.
- Not Recognized by DAW:
- Check the USB cable connection between the MCU Pro and your computer. Try a different USB port or cable.
- Ensure the MCU Pro is selected as a control surface within your DAW's preferences or settings.
- Restart your computer and DAW software.
- Verify that no other applications are conflicting with the USB MIDI connection.
4.2 Operational Issues
- Faders Not Responding or Calibrated:
- Ensure the MCU Pro is correctly linked to your DAW and the fader bank is set to control the desired tracks.
- Dust or debris might interfere with the optical faders. Refer to the maintenance section for cleaning.
- If calibration issues persist, consult the Mackie support website for potential firmware updates or calibration procedures.
- Display Issues (e.g., blacks out):
- This could indicate a power fluctuation or an internal component issue. Try restarting the unit.
- Ensure the unit is receiving stable power.
- If the problem persists, contact Mackie support.
- Buttons or V-Pots Not Functioning:
- Verify the correct Lexan overlay is in place and that you are pressing the intended function.
- Check your DAW's settings to ensure the MCU Pro's controls are correctly assigned.
For more detailed troubleshooting, refer to the official Mackie support resources.
5. Specifications
| Feature | Detail |
|---|---|
| Model Name | MCU Pro |
| Brand | Mackie |
| Item Weight | 21.1 pounds |
| Product Dimensions | 4.4"D x 16.5"W x 4.4"H (4.4 x 16.5 x 4.4 inches) |
| Mixer Channel Quantity | 8 |
| Faders | 9 x 100mm Motorized Touch-Sensitive (Penny + Giles) |
| Rotary Controls | 8 x V-Pots with LED collars |
| Buttons | More than 50 dedicated push-buttons |
| Display | 2-line, 55-character backlit LCD; 7-segment LED timecode display |
| Connectivity Technology | USB |
| Hardware Interface | USB, MIDI (3 x IN/OUT pairs) |
| Compatible Devices | Devices with USB connectivity and Windows or Mac operating systems |
| Supported Software | Various DAW software on Windows and Mac platforms (with Lexan overlays) |
| Expansion | Mackie Control Extender Pro, Mackie Control C4 Pro |
| Date First Available | August 11, 2007 |
6. Warranty Information
Mackie products are typically covered by a limited warranty. For specific details regarding the warranty period, coverage, and terms for your MCU Pro, please refer to the warranty card included with your product or visit the official Mackie website. Keep your proof of purchase for warranty claims.
7. Support
For technical assistance, product registration, driver downloads, or further information, please visit the official Mackie support website:
You may also find helpful resources, FAQs, and community forums on the Mackie website.
Important Note on Videos
The provided product data did not include specific URLs or metadata for official product videos. Therefore, no videos could be embedded in this manual as per the specified requirements.