Introduction
Thank you for choosing the hjh OFFICE Venus One ergonomic swivel office chair. This manual provides detailed instructions for the assembly, operation, and maintenance of your new chair, ensuring optimal comfort and longevity. The Venus One is designed with advanced technical specifications and high-quality materials to support ergonomic posture during long working hours.
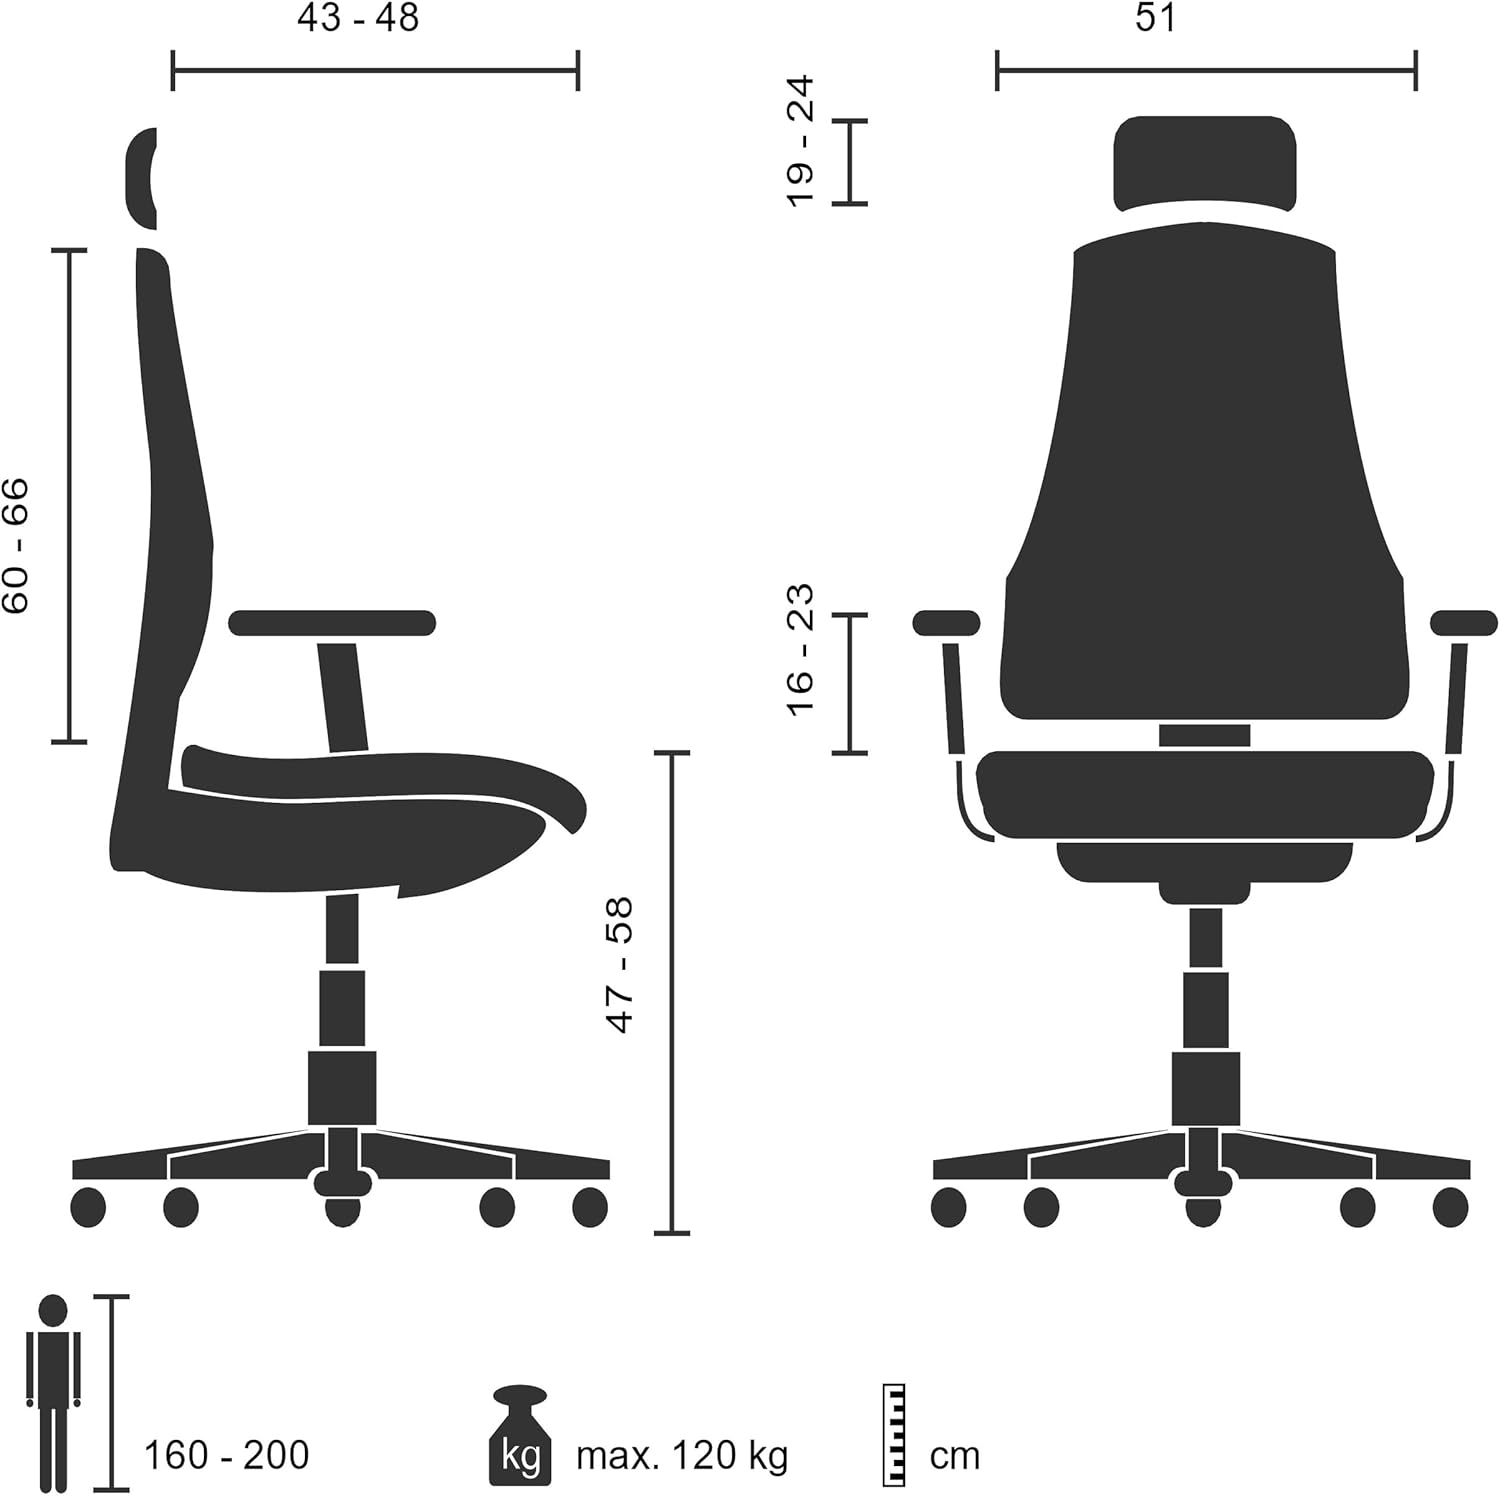
Image: The hjh OFFICE Venus One chair, showcasing its design and presence in a modern office environment.
Safety Information
Please read and follow these safety guidelines carefully to prevent injury and ensure the safe operation of your chair:
- Do not use the chair if it is damaged or if any of its parts are loose. Inspect the chair regularly for wear and tear.
- Do not overload the chair. The maximum recommended weight capacity is 120 kg (264 lbs).
- Do not use the chair on unstable or slippery surfaces. Ensure the chair is on a level, stable floor.
- Keep your hands and fingers away from moving parts, such as the adjustment levers and mechanisms, while adjusting the chair to avoid pinching.
- Follow the assembly and maintenance instructions provided in this manual to ensure the chair's safety and durability.
- Children should not play with or on the chair.
Setup and Assembly
The hjh OFFICE Venus One chair requires assembly. Please ensure all components are present before beginning. Due to the chair's weight (approximately 22.3 kg), it is recommended to have two people for assembly to prevent injury.
Assembly Steps:
- Unpack all components and lay them out on a clean, soft surface to prevent scratches.
- Attach the castors to the star base. Ensure they click securely into place.
- Insert the gas lift cylinder into the center hole of the star base.
- Attach the seat mechanism to the underside of the seat cushion using the provided screws. Ensure the front of the mechanism aligns with the front of the seat.
- Mount the backrest to the seat mechanism using the designated screws.
- Attach the armrests to the seat using the provided screws.
- Place the assembled seat and backrest onto the gas lift cylinder. Apply gentle downward pressure to secure it.
- Attach the headrest to the top of the backrest.
- Verify all screws are tightened and all parts are securely connected before use.

Image: A general illustration of office chair assembly. Refer to the included assembly guide for specific steps for the Venus One model.
Operating Instructions and Adjustments
The hjh OFFICE Venus One chair offers a range of adjustments to customize your seating experience for optimal ergonomic support. Utilize the intuitive one-finger control system for precise adjustments.
Key Adjustments:
- Seat Height Adjustment: Locate the lever under the right side of the seat. Pull the lever up to raise the seat. While seated, pull the lever up to lower the seat. Release the lever at the desired height.
- Seat Length Adjustment: A lever or button typically located under the front of the seat allows you to slide the seat forward or backward. Adjust until your feet are flat on the floor and there is a small gap between the back of your knees and the seat edge.
- Backrest Height Adjustment: The backrest can be adjusted vertically. Lift the backrest to the desired height. It may click into place. To lower, lift it to its highest point and then release it to drop to the lowest position, then readjust.
- Backrest Angle and Synchronous Mechanism: The chair features a synchronous mechanism that allows the seat and backrest to move together. A lever, usually on the left side, controls the recline and locking positions.
- To recline, unlock the mechanism and lean back.
- To lock the backrest in one of the 4 positions, engage the lever at your desired angle.
- The tension of the recline can be adjusted with a knob located under the seat, allowing you to set it according to your body weight.
- Lumbar Support: The flexible lumbar support is integrated into the backrest. Its position and depth can often be adjusted by a knob or lever on the side of the backrest, or by sliding the backrest up or down. Adjust it to comfortably support the natural curve of your lower back.
- Armrest Adjustment: The armrests are vertically and horizontally adjustable.
- To adjust height, press the button on the side of the armrest and slide it up or down. Release the button to lock.
- To adjust horizontally, slide the armrest pad forward or backward, or pivot it left or right.
- Headrest Height and Tilt Adjustment: The headrest can be adjusted for both height and tilt.
- To adjust height, slide it up or down.
- To adjust tilt, pivot it to the desired angle.

Image: Visual guide to the multiple adjustment points on the Venus One chair, including seat depth, armrest height, and backrest tension.
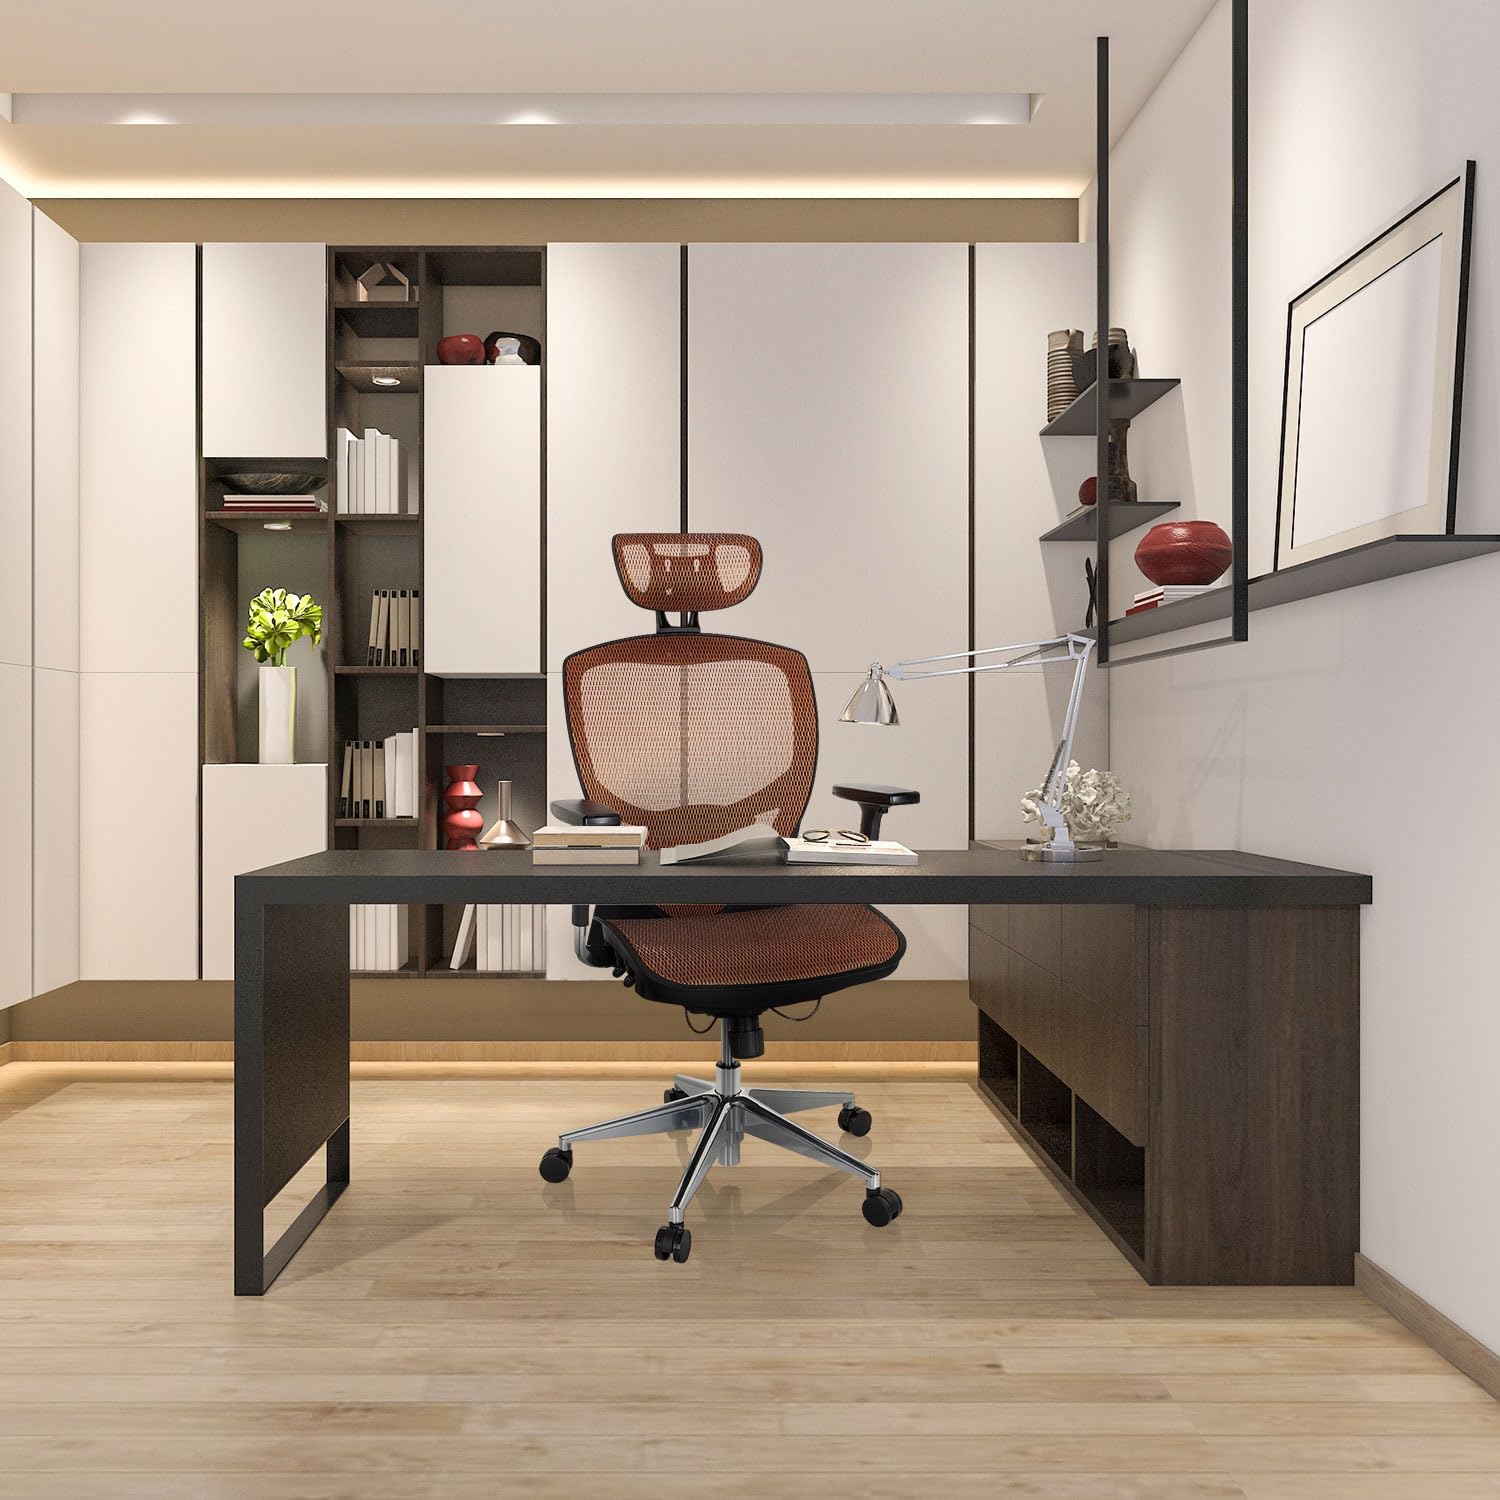
Image: Illustration of the chair's recline function and the locking mechanism for the backrest angle.
Maintenance
Regular maintenance will extend the life and performance of your hjh OFFICE Venus One chair.
- Cleaning: Use a soft, damp cloth to wipe down the mesh and frame. For more stubborn dirt, a mild soap solution can be used, followed by wiping with a clean, damp cloth. Avoid abrasive cleaners or harsh chemicals.
- Inspection: Periodically check all screws and bolts to ensure they are tight. Retighten if necessary.
- Moving Parts: Ensure all adjustment mechanisms operate smoothly. If any part feels stiff, a small amount of silicone spray lubricant can be applied to moving metal parts, avoiding fabric or mesh.
- Castors: Clean any hair or debris from the castors to ensure smooth movement.
Troubleshooting
If you encounter issues with your hjh OFFICE Venus One chair, refer to the following common troubleshooting tips:
| Problem | Possible Cause | Solution |
|---|---|---|
| Chair does not adjust height. | Gas lift cylinder malfunction or lever not engaged. | Ensure the height adjustment lever is fully engaged. If the problem persists, the gas lift may need replacement. Contact customer support. |
| Chair wobbles or feels unstable. | Loose screws or uneven floor. | Check and tighten all assembly screws. Ensure the chair is on a flat, stable surface. |
| Backrest does not recline or lock. | Synchronous mechanism locked or tension too high. | Ensure the recline lock lever is disengaged. Adjust the recline tension knob to a lighter setting. |
| Castors do not roll smoothly. | Debris caught in castors or damaged castors. | Remove any hair or debris from the castor wheels. If damaged, castors may need replacement. |
If these steps do not resolve the issue, please contact hjh OFFICE customer support for further assistance.
Specifications
| Feature | Detail |
|---|---|
| Brand | hjh OFFICE |
| Model Number | 657020 |
| Color | Orange |
| Material | Mesh (Backrest and Seat), Aluminum (Frame) |
| Product Dimensions (L x W x H) | 48 x 61 x 124 cm (18.9 x 24 x 48.8 inches) |
| Item Weight | 22.3 Kilograms (49.16 lbs) |
| Maximum Weight Capacity | 120 kg (264 lbs) |
| Special Features | Adjustable Headrest, Adjustable Backrest, Adjustable Height, Adjustable Lumbar Support, Synchronous Mechanism, Adjustable Armrests, Adjustable Seat Depth, Weight-sensitive Castors. |
| Care Instructions | Clean with a damp cloth. |
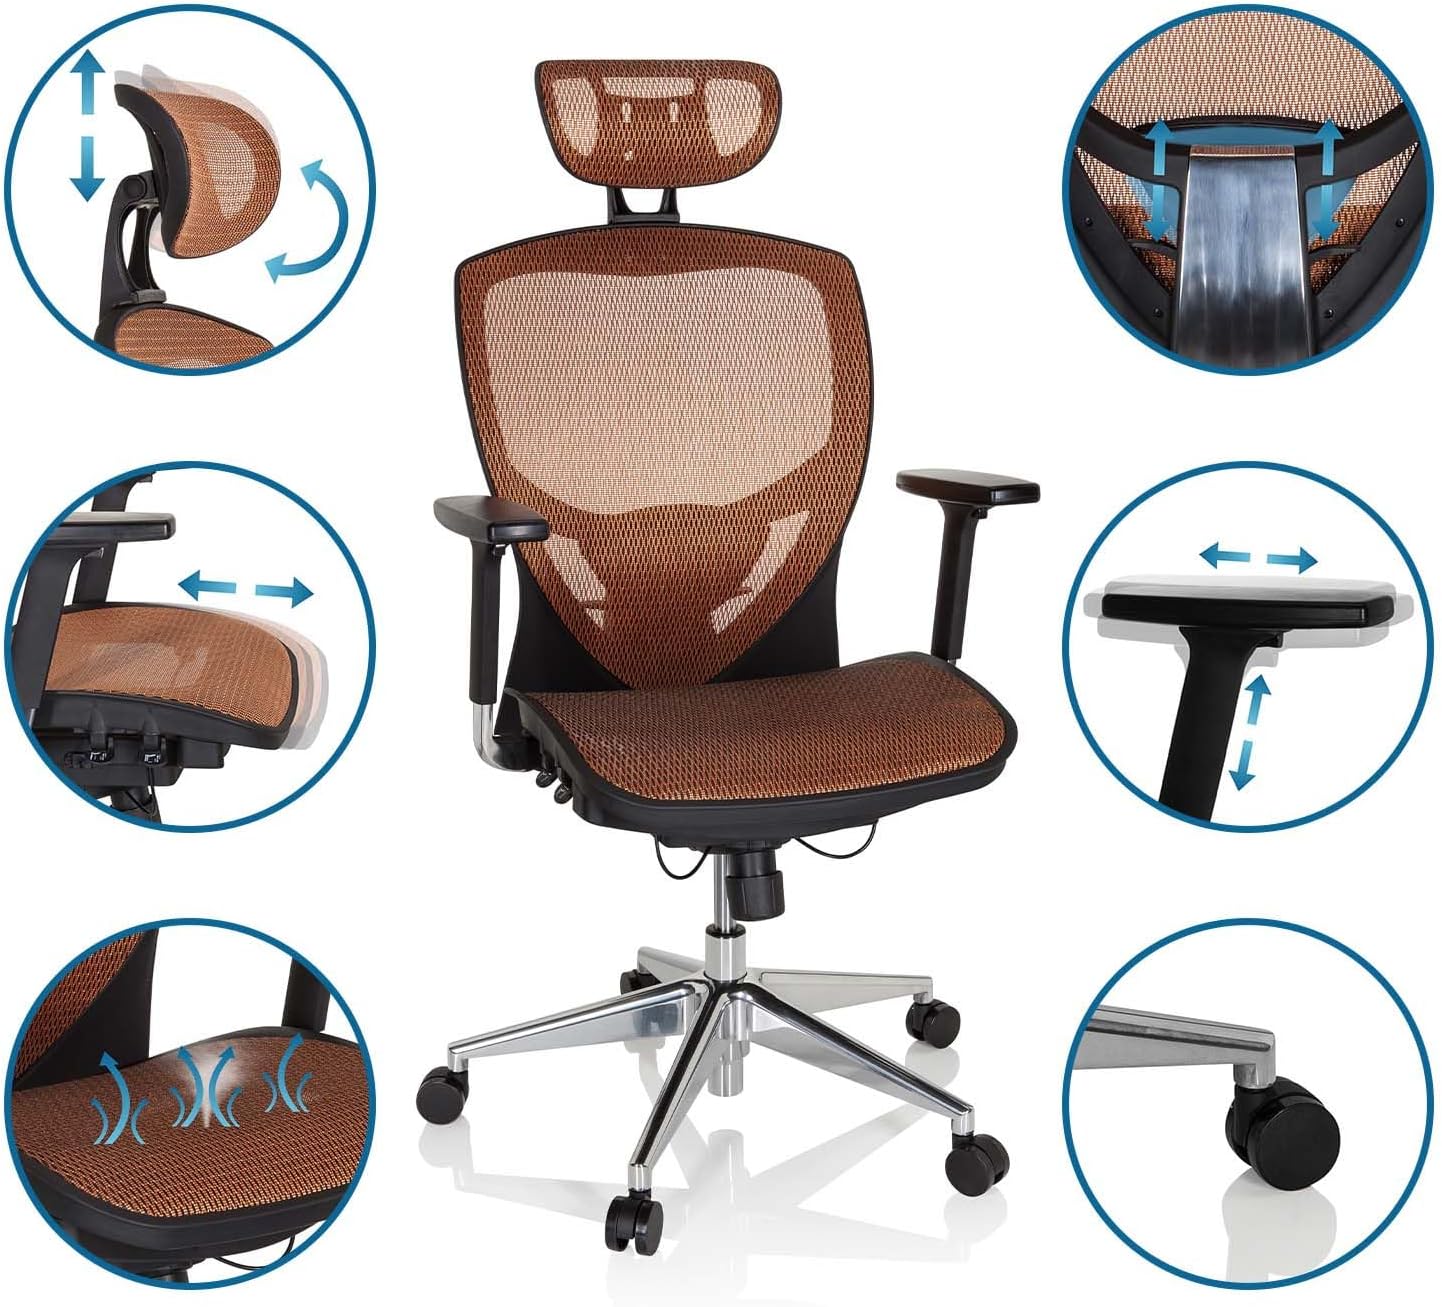
Image: Side view of the hjh OFFICE Venus One chair, illustrating its ergonomic profile and adjustable components.

Image: Front view of the hjh OFFICE Venus One chair, showcasing the breathable mesh material and overall design.
Warranty Information
The hjh OFFICE Venus One ergonomic swivel office chair comes with a 4-year warranty from the date of purchase. This warranty covers manufacturing defects and material flaws under normal use. Please retain your proof of purchase for warranty claims.
The warranty does not cover damage resulting from misuse, accidents, unauthorized repairs, or normal wear and tear. For detailed warranty terms and conditions, please refer to the documentation included with your purchase or contact hjh OFFICE customer support.
Customer Support
For any questions, concerns, or assistance regarding your hjh OFFICE Venus One chair, please contact our customer support team:
- Website: Visit the official hjh OFFICE website for FAQs and contact information.
- Email: Refer to your purchase documentation for the customer service email address.
- Phone: Refer to your purchase documentation for the customer service phone number.
When contacting support, please have your model number (657020) and proof of purchase readily available.