
1. Product Overview
The Mount-It! MI-203 is a low-profile fixed TV wall mount designed for screens ranging from 13 to 32 inches. It offers a sleek, space-saving solution, holding your display just 0.55 inches from the wall. Constructed from heavy-duty steel, it supports up to 60 lbs and is compatible with VESA 75x75 mm and 100x100 mm patterns. This mount is ideal for various settings including RVs, campers, homes, and offices, featuring a built-in bubble level for simplified installation.

Image: Key features of the Mount-It! MI-203 mount, highlighting its suitability for tight spaces, quick setup, strong hold, and stability.

Image: Visual representation of the mount's capacity, supporting monitors or TVs up to 32 inches and a maximum weight of 60 lbs.
Key Features:
- Sleek Low-Profile Design: Holds screens just 0.55 inches from the wall for a slim, space-saving solution.
- Universal Compatibility: Fits 13-32 inch TVs and monitors with VESA 75x75 mm or 100x100 mm patterns.
- Heavy-Duty Steel Construction: Supports up to 60 lbs, ensuring reliable mounting.
- Built-in Bubble Level: Simplifies installation by ensuring perfect alignment.
- Space-Saving Solution: Ideal for tight spaces like RVs, campers, kitchens, and offices.
2. Safety Information
Please read and understand all instructions before installation. Improper installation can result in property damage or personal injury. If you have any questions, contact Mount-It! customer support.
- Weight Capacity: Do not exceed the maximum weight capacity of 60 lbs (27.2 kg).
- Screen Size: This mount is designed for screens between 13 and 32 inches.
- Wall Structure: Ensure the mounting surface can safely support the combined weight of the mount and your display. For wood stud installation, ensure the mount is secured to the center of a stud. For concrete or brick walls, use appropriate anchors.
- Hidden Utilities: Before drilling, use a stud finder or other detection tools to locate electrical wires, gas lines, water pipes, or other potential hazards behind the wall.
- Tools: Use appropriate tools and wear safety gear during installation.
3. Package Contents
Verify that all components are present and undamaged before beginning installation. If any parts are missing or defective, contact Mount-It! customer support.

Image: All mounting hardware included with the MI-203, showing the VESA plate, wall plate, various screws, washers, and wall anchors.
Included Hardware:
- VESA Plate (for TV)
- Wall Plate (for wall)
- Mounting Screws (various sizes for TV and wall)
- Washers
- Wall Anchors (for concrete/brick)
- Built-in Bubble Level (on wall plate)
4. Installation Guide
4.1. Check TV Compatibility
Before starting, ensure your TV is compatible with the MI-203 mount. This mount supports VESA patterns of 75x75 mm and 100x100 mm. The screen size should be between 13-32 inches, and the weight should not exceed 60 lbs.
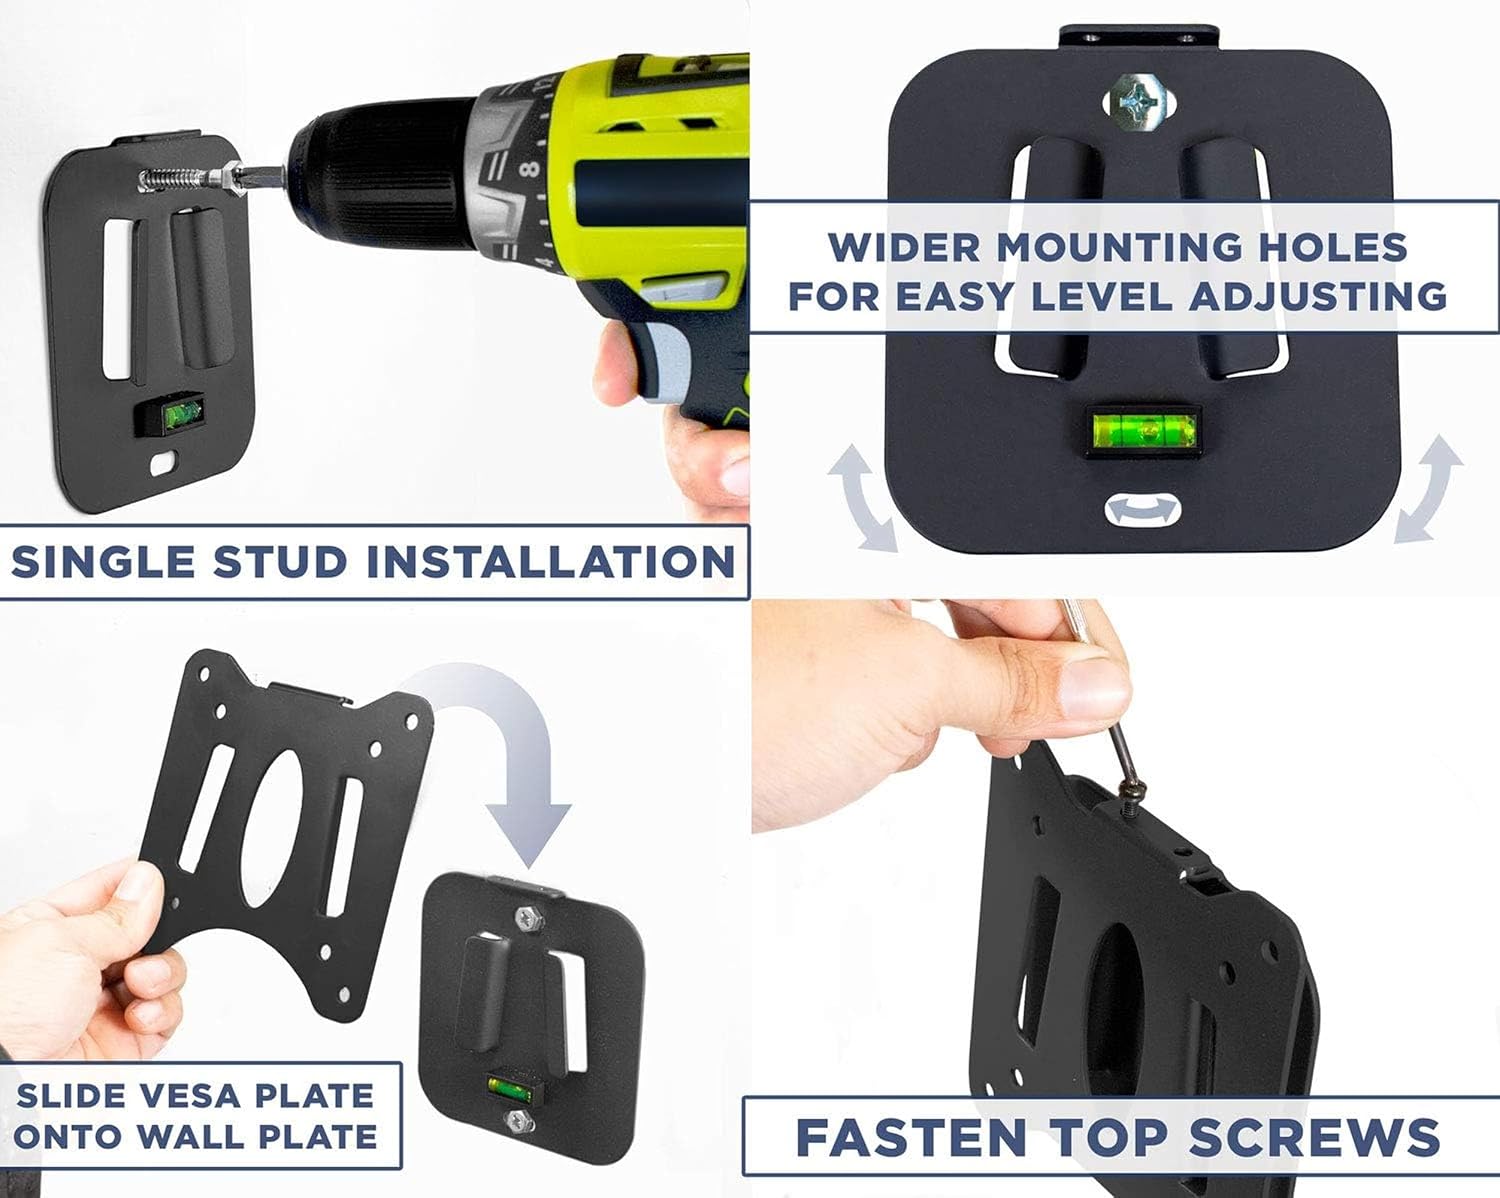
Image: A diagram illustrating how to measure the VESA mounting holes on the back of your TV to confirm compatibility with 75x75mm or 100x100mm patterns. It also shows that larger patterns are not compatible.

Image: A detailed diagram specifying the VESA 75x75mm (3"x3") and 100x100mm (4"x4") mounting hole patterns supported by the mount.
4.2. Prepare the TV
- Carefully lay your TV face down on a soft, clean surface to prevent scratches.
- Attach the VESA plate to the back of your TV using the appropriate screws and washers from the package. Ensure they are securely tightened but do not overtighten.

Image: A close-up view showing the VESA plate being screwed onto the back of a television, illustrating the initial step of attaching the mount to the display.
4.3. Mark Wall Mounting Points
- Determine the desired height for your TV.
- Hold the wall plate against the wall at the desired location. Use the built-in bubble level to ensure it is perfectly horizontal.
- Mark the pilot hole locations on the wall using a pencil.

Image: A visual demonstrating the wider mounting holes on the wall plate, designed to facilitate easy adjustment for perfect leveling during installation.
4.4. Drill Pilot Holes and Install Anchors
- For wood stud installation: Drill pilot holes into the center of the wood stud. No anchors are needed.
- For concrete or brick walls: Drill pilot holes and insert the provided wall anchors. Tap them gently with a hammer until flush with the wall surface.

Image: A diagram illustrating the process of single stud installation, showing how the wall plate is secured to a single wooden stud.

Image: This image highlights the "Rock Solid Support" of the Mount-It! MI-203, indicating its suitability for installation on brick, concrete, and wood walls without wobble or sway.
4.5. Attach Wall Plate
Align the wall plate with the drilled holes and secure it to the wall using the appropriate screws. Ensure the screws are fully tightened.
4.6. Mount TV to Wall Plate
- Carefully lift the TV (with the VESA plate attached) and align the VESA plate with the wall plate.
- Slide the VESA plate onto the wall plate.
- Secure the TV by fastening the top screws on the VESA plate to the wall plate.

Image: A step-by-step visual demonstrating the action of sliding the VESA plate, already attached to the TV, onto the wall plate for secure mounting.

Image: A close-up view illustrating the final step of fastening the top screws to firmly secure the TV to the wall mount, ensuring stability.
4.7. Installation Videos
For visual guidance, please refer to the following installation videos:
Video: Installation guide for a Mount-It! Fixed TV Wall Mount (MI-306). While not the exact MI-203 model, the installation steps for fixed mounts are generally similar and provide helpful visual instructions.
Video: Features overview for the Mount-It! MI-203 Low Profile Fixed TV Mount, demonstrating its design and quick disconnect functionality.
5. Operating Instructions
The Mount-It! MI-203 is a fixed TV wall mount, meaning it does not offer tilt, swivel, or rotation adjustments once installed. Its primary function is to hold your TV securely in a low-profile position.
Quick Disconnect Feature:
This mount features a quick disconnect mechanism, allowing for easy removal of the TV from the wall plate when needed. This is useful for accessing cables or moving the TV temporarily. Refer to the product features video in the installation section for a visual demonstration.

Image: A side profile view of a television mounted with the MI-203, emphasizing its ultra-slim design that positions the screen only 0.55 inches from the wall.
6. Maintenance
- Cleaning: Clean the mount with a soft, dry cloth. Avoid abrasive cleaners or solvents.
- Periodic Checks: Periodically check all screws and connections to ensure they remain tight and secure.
- Damage: If any part of the mount becomes damaged, discontinue use and contact customer support for replacement parts or advice.
7. Troubleshooting
- TV Not Level: The built-in bubble level on the wall plate helps ensure level installation. If the TV appears unlevel after mounting, carefully re-check the wall plate's alignment and adjust if necessary before re-mounting the TV.
- TV Feels Unstable: Ensure all mounting screws (both to the wall and to the TV) are securely tightened. Verify that your TV's weight does not exceed the 60 lbs capacity and that the VESA pattern is correctly matched.
- Mounting Holes Don't Match TV: Double-check your TV's VESA pattern against the mount's specifications (75x75 mm or 100x100 mm). If they do not match, this mount is not compatible with your TV.
8. Specifications
| Feature | Detail |
|---|---|
| Brand | Mount-It! |
| Model Number | MI-203 |
| Screen Size Compatibility | 13-32 inches |
| VESA Compatibility | 75x75 mm, 100x100 mm |
| Weight Capacity | 60 lbs (27.2 kg) |
| Profile from Wall | 0.55 inches |
| Movement Type | Fixed |
| Material | Alloy Steel |
| Color | Black |
| Item Weight | 15.5 ounces |
| Product Dimensions | 6.1 x 1.1 x 5 inches |
9. Warranty and Support
The Mount-It! MI-203 Low Profile Fixed TV Wall Mount is backed by a Lifetime Warranty. Mount-It! provides expert US-based customer service to ensure a worry-free experience.
For further assistance, please visit the official Mount-It! store or contact their customer support directly.


