1. Introduction
Thank you for purchasing the Denon AVR-488 5.1 Stereo Surround Sound Receiver. This receiver is designed to deliver high-quality audio and video performance for your home entertainment system. This manual provides detailed instructions for the proper setup, operation, and maintenance of your new receiver to ensure optimal performance and longevity.
Please read this manual thoroughly before connecting or operating your receiver. Keep this manual for future reference.
2. Setup
2.1 Unpacking and Initial Inspection
Carefully remove the receiver from its packaging. Ensure all accessories are present and that the unit has not been damaged during transit. If any items are missing or damaged, contact your dealer immediately.
- Denon AVR-488 Receiver
- Remote Control (not pictured, but typically included)
- Power Cord
- AM Loop Antenna
- FM Indoor Antenna
2.2 Front Panel Overview
The front panel of the Denon AVR-488 provides access to essential controls and indicators for daily operation.
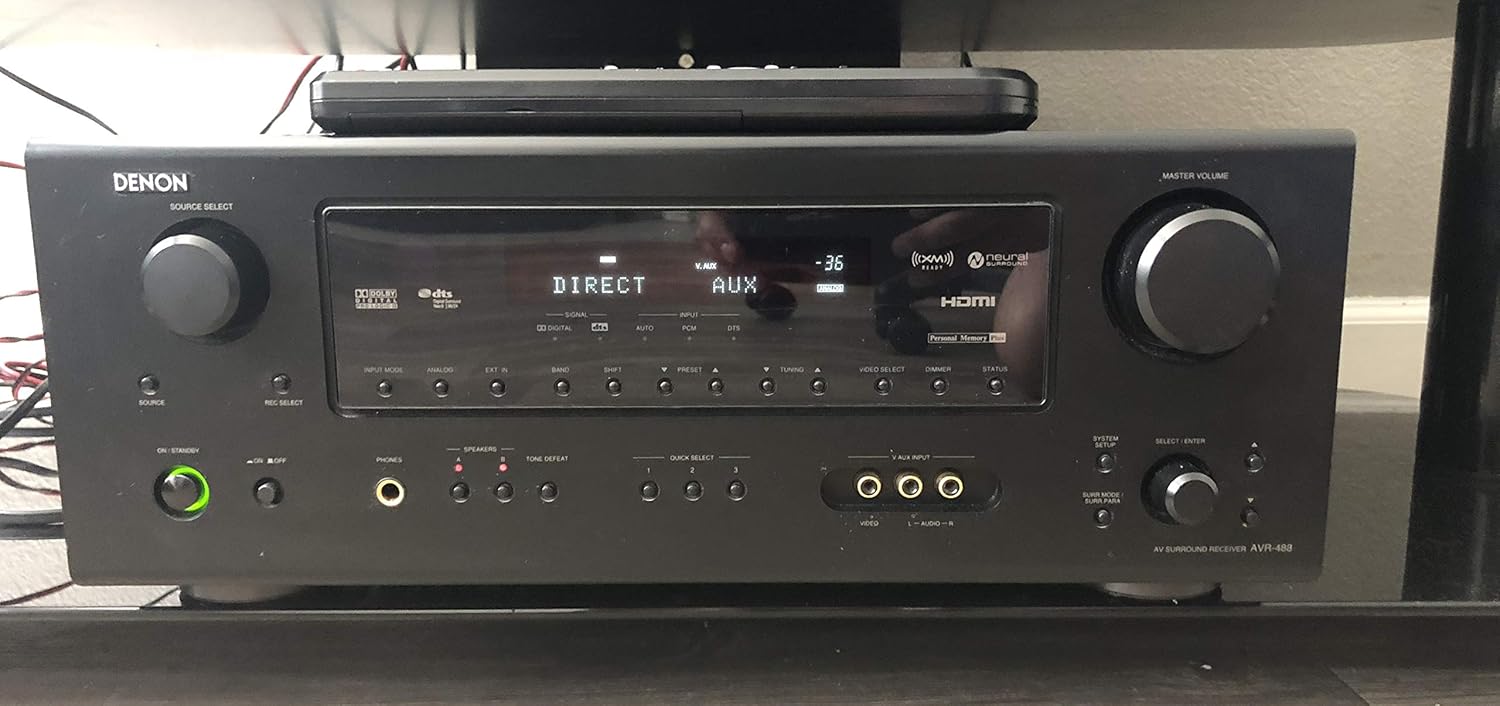
Figure 2.2.1: Front Panel of Denon AVR-488. This image displays the front of the Denon AVR-488 receiver, showing the main display, input selectors, volume knob, and various control buttons for source selection, tone control, and system setup. The power button is located on the lower left.
2.3 Rear Panel Connections
The rear panel houses all the input and output terminals for connecting your audio and video components, as well as speakers.

Figure 2.3.1: Rear Panel of Denon AVR-488. This image illustrates the rear panel of the Denon AVR-488 receiver, detailing the extensive array of connectivity options including HDMI, component video, composite video, optical and coaxial digital audio inputs, analog audio inputs, speaker terminals for 5.1 channels, and antenna connections.
2.4 Connecting Speakers
The AVR-488 supports a 5.1 channel speaker configuration. Ensure correct polarity (+ to + and - to -) when connecting speakers.
- Front Speakers (L/R): Connect to the FRONT L/R terminals.
- Center Speaker: Connect to the CENTER terminal.
- Surround Speakers (L/R): Connect to the SURROUND L/R terminals.
- Subwoofer: Connect an active subwoofer to the PRE OUT SUBWOOFER terminal using an RCA cable.
Note: Ensure speaker impedance matches the receiver's specifications (4-16 ohms for front/center/surround).
2.5 Connecting Audio/Video Components
Connect your source devices (e.g., Blu-ray player, game console, cable box) to the appropriate input terminals.
- HDMI Connections: Use HDMI cables for devices with HDMI outputs (e.g., Blu-ray players, game consoles). Connect to HDMI IN 1 or HDMI IN 2. Connect HDMI OUT to your TV or projector.
- Component Video Connections: For devices with component video outputs (Y, Pb, Pr), connect to COMPONENT VIDEO IN 1, 2, or 3.
- Analog Audio Connections: Use RCA cables for devices like CD players or older VCRs. Connect to ANALOG AUDIO IN terminals (e.g., CD, DVD, VCR).
- Digital Audio Connections: For devices with optical or coaxial digital audio outputs, connect to OPTICAL IN or COAXIAL IN terminals.
- Antenna Connections: Connect the supplied AM loop antenna and FM indoor antenna to their respective terminals for radio reception.
2.6 Power Connection
After all other connections are made, plug the power cord into the AC INlet on the rear of the receiver, then into a wall outlet.
3. Operating Your Receiver
3.1 Basic Operation
- Power On/Off: Press the POWER button on the front panel or remote control.
- Input Selection: Use the SOURCE SELECT knob on the front panel or the input buttons on the remote control (e.g., CD, DVD, TV/CBL) to select the desired input source.
- Volume Control: Rotate the MASTER VOLUME knob on the front panel or use the VOLUME +/- buttons on the remote control to adjust the sound level.
- Mute: Press the MUTE button on the remote control to temporarily silence the audio. Press again to unmute.
3.2 Audio Settings
- Surround Modes: Press the SURROUND MODE buttons on the remote to cycle through various surround sound modes (e.g., Dolby Digital, DTS, Stereo).
- Tone Control: Use the BASS and TREBLE controls (if available on remote or via menu) to adjust the bass and treble levels.
- Speaker Level Adjustment: Access the speaker setup menu (refer to on-screen display if available, or front panel menu) to adjust individual speaker levels for balanced sound.
3.3 Radio Operation (AM/FM Tuner)
- Select Tuner Input: Press the TUNER button on the remote or front panel.
- Tuning: Use the TUNING +/- buttons to manually tune to a station. Use the PRESET +/- buttons to select preset stations.
- Presetting Stations: Tune to the desired station, then press and hold a MEMORY button (if available) or follow the on-screen instructions to save it as a preset.
4. Maintenance
- Cleaning: Wipe the unit with a soft, dry cloth. For stubborn dirt, dampen the cloth with a mild detergent solution and wipe gently. Do not use abrasive cleaners or solvents.
- Ventilation: Ensure adequate ventilation around the receiver. Do not block the ventilation holes on the top or sides of the unit. Avoid placing the receiver in an enclosed cabinet without proper airflow.
- Power Cord: Periodically check the power cord for any damage. If damaged, discontinue use and contact a qualified service technician.
5. Troubleshooting
If you experience problems with your receiver, refer to the following table for common issues and their solutions.
| Problem | Possible Cause | Solution |
|---|---|---|
| No power | Power cord not connected; Power outlet faulty; Receiver in standby mode. | Ensure power cord is securely plugged in; Test outlet with another device; Press the POWER button. |
| No sound | Incorrect input selected; Volume too low; Speakers not connected properly; Mute function active. | Select correct input source; Increase volume; Check speaker connections and polarity; Deactivate mute. |
| No video output | Incorrect video input selected; Video cables not connected properly; TV input not selected correctly. | Select correct video input; Check all video cable connections; Ensure TV is on the correct input for the receiver. |
| Remote control not working | Batteries are dead or inserted incorrectly; Obstruction between remote and receiver; Remote sensor blocked. | Replace batteries, ensuring correct polarity; Remove any obstructions; Ensure remote sensor on receiver is clear. |
6. Specifications
The following are key specifications for the Denon AVR-488 receiver:
- Channels: 5.1-Channel
- Power Output: 75 watts per channel (x 5 channels)
- Decoder: Dolby Digital 5.1, Dolby Pro Logic II, DTS 5.1, DTS Neo6
- Video Upconversion: 1080p
- HDMI: 2 In / 1 Out (HDMI 1.3a switching, No Audio Support)
- Component Video: 3 In / 1 Out
- Digital Optical Audio: 2 In
- Digital Coaxial Audio: 2 In
- Analog Audio: Multiple RCA inputs/outputs
- Headphone Jack: 1
- Multi Channel Input: 1 X Multichannel Analog Audio input
- Radio: AM/FM Tuner, Satellite Radio Ready (XM)
- Special Features: Denon's new audio technology for compressed audio formats, Deep Color up to 36-bit, xvYCC broader color space support, Discrete devices for ultimate HD video performance, Minimum signal path design, Direct Mechanical Ground, Dual power transformer, Denon customised block capacitor, Separate unit design.
- Connectivity Technology: Auxiliary, HDMI, RCA
- Compatible Devices: Smartphone, Speaker
- Item Model Number: Denon 5.1 Stereo Surround Sound Receiver
- ASIN: B004CSFHCW
- Date First Available: November 17, 2010
7. Warranty and Support
Denon products are manufactured to the highest quality standards. For specific warranty information, please refer to the warranty card included with your product or visit the official Denon website. Warranty terms may vary by region and purchase date.
For technical support, service, or inquiries regarding your Denon AVR-488 receiver, please contact Denon customer support through their official website or the contact information provided in your product's packaging. When contacting support, please have your model number (AVR-488) and serial number ready.
Please note that product specifications and features are subject to change without notice.


