1. Introduction
This manual provides essential instructions for the safe and efficient operation, setup, and maintenance of your Festool OFK 700 EQ-Plus Edge Milling Machine. Please read this manual thoroughly before using the machine to ensure proper handling and to prevent injury or damage.

Figure 1: Festool OFK 700 EQ-Plus Edge Milling Machine and included accessories, neatly organized in a Systainer SYS 2 T-LOC case.
2. Safety Information
Always observe general safety regulations when operating power tools. Failure to follow these instructions may result in electric shock, fire, and/or serious injury.
- Wear appropriate personal protective equipment (PPE), including eye protection, hearing protection, and dust masks.
- Ensure the workpiece is securely clamped before milling.
- Keep hands and body parts clear of the milling cutter during operation.
- Disconnect the machine from the power supply before making any adjustments, changing accessories, or performing maintenance.
- Use the dust extraction connection to minimize dust exposure.
- Do not operate the machine in damp or wet conditions.
3. Components and Package Contents
The Festool OFK 700 EQ-Plus Edge Milling Machine comes with the following standard accessories:
- OFK 700 EQ-Plus Edge Milling Machine
- Clamp Ø 8 mm
- Suction hood
- Flush cutter D 19 x 16
- Service Tools (e.g., wrench for cutter change)
- SYSTAINER SYS 2 T-LOC case for storage and transport

Figure 2: Side view of the OFK 700 EQ-Plus, highlighting the dust extraction port and ergonomic design.
4. Setup
- Cutter Installation:
Ensure the machine is unplugged. Use the spindle lock mechanism for quick and easy cutter changes. Insert the desired cutter (e.g., Flush cutter D 19 x 16) into the clamp (Ø 8 mm) and tighten securely with the service tools provided.
- Dust Extraction Connection:
Attach a suitable dust extraction hose to the 27 mm dust suction connection port on the machine. This helps maintain a clean working environment and improves visibility.
- Milling Table Adjustment:
The insertable milling table provides excellent support. Adjust the table to the desired position for your application. The table is designed with a 1.5° incline for optimal milling results.
- Milling Depth Adjustment:
Adjust the milling depth with precision, up to 1/10 mm accuracy. Use the adjustment mechanism to set the vertical and horizontal milling depths as required for your task.

Figure 3: Detailed view of the milling depth adjustment and the spring feeler, crucial for precise operations.
5. Operating Instructions
The Festool OFK 700 EQ-Plus is designed for precise edge milling applications. Follow these steps for operation:
- Power On:
Connect the machine to a suitable power outlet (230V AC). Turn on the machine using the power switch. The empty speed can be adjusted between 10,000 and 26,000 min⁻¹.
- Positioning:
Position the milling machine on the edge of the workpiece. The spring feeler ensures a perfect milling surface by maintaining consistent contact.

Figure 4: Demonstrating the machine in use for edge milling on a curved wooden piece, showing precise control.
- Milling Process:
Guide the machine smoothly along the edge of the workpiece. The OFK 700 EQ-Plus is suitable for various tasks:
- Creating protrusions on surfaces and edges made of plastic or wood.
- Rounding and beveling of edges.
- Milling front grooves for housing edges with PVC core.
- Flushing of laminate plates.
- Milling gluing profiles in concave and convex pieces, such as round tables or desk plates.
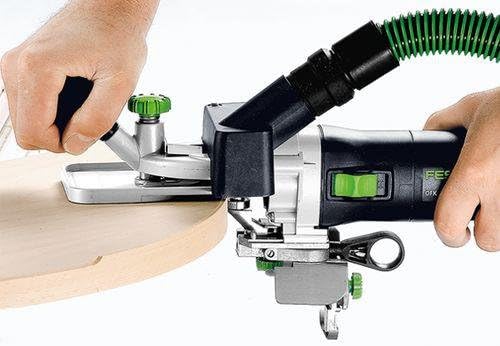
Figure 5: A detailed view of the milling operation, illustrating the clean and precise cut achieved on a wooden edge.
- Power Off:
Once milling is complete, turn off the machine and disconnect it from the power supply.
6. Maintenance
Regular maintenance ensures the longevity and optimal performance of your Festool OFK 700 EQ-Plus.
- Cleaning: After each use, clean the machine, especially the milling table and cutter area, to remove dust and debris. Use a brush or compressed air.
- Cutter Inspection: Regularly inspect the milling cutter for wear or damage. Replace dull or damaged cutters immediately to ensure precise results and prevent strain on the machine.
- Lubrication: Refer to the detailed service manual for specific lubrication points and schedules, if applicable.
- Storage: Store the machine and its accessories in the SYSTAINER SYS 2 T-LOC case in a dry, secure location, away from direct sunlight and extreme temperatures.
7. Troubleshooting
| Problem | Possible Cause | Solution |
|---|---|---|
| Machine does not start | No power supply; faulty power cord; power switch off. | Check power connection; inspect power cord for damage; ensure power switch is in 'ON' position. |
| Poor milling quality | Dull or incorrect cutter; incorrect milling depth; unstable workpiece. | Replace cutter; adjust milling depth; secure workpiece firmly. |
| Excessive vibration | Loose cutter; damaged cutter; internal mechanical issue. | Tighten cutter securely; replace damaged cutter; contact Festool service if problem persists. |
For issues not listed here, please contact Festool customer support.
8. Technical Specifications
| Feature | Specification |
|---|---|
| Power Consumption | 720 W |
| Empty Speed | 10,000 - 26,000 min⁻¹ |
| Max. Cutter Diameter | 26 mm |
| Clamp Diameter | 6-8 mm |
| Max. Vertical Milling Depth | 9 mm |
| Max. Horizontal Milling Depth | 5 mm |
| Max. Milling Width | 14 mm |
| Dust Suction Connection Ø | 27 mm |
| Weight | 2 kg (4.4 lbs) |
| Voltage | 230V AC |
| Material | Plastic |
| Product Dimensions (L x W x H) | 6.34 x 15.51 x 3.94 inches |
9. Warranty and Support
For detailed warranty information, please refer to the warranty card included with your product or visit the official Festool website. For technical support, spare parts, or service inquiries, please contact Festool customer service or visit the Festool Store on Amazon.