1. Introduction
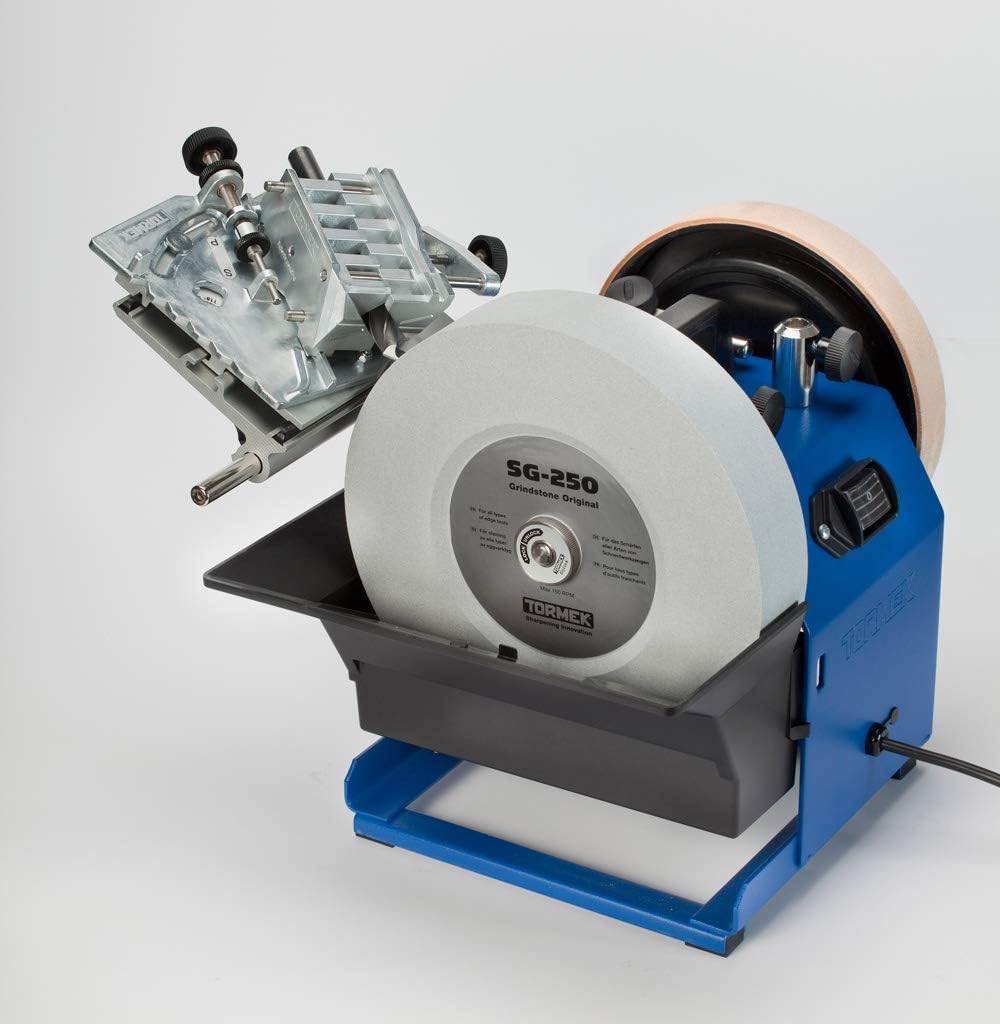
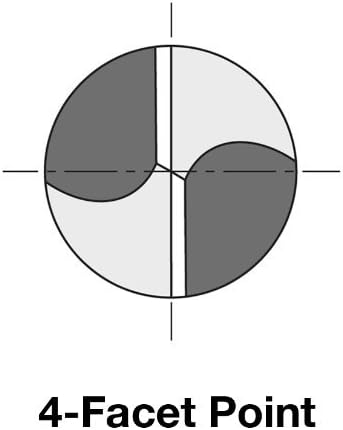
The Tormek DBS-22 Drill Bit Sharpening Jig Attachment is engineered to provide exceptional precision in sharpening and restoring drill bits. This attachment is compatible with Tormek T-7, T-4, T-3, and Supergrind 2000 sharpening systems. It produces a unique 4-facet point, which significantly enhances drilling performance and extends the lifespan of your drill bits.
Key features of the Tormek DBS-22 include:
- 4-facet point: Brings the point to a chisel edge that will not walk and bores round, straight holes with close tolerances.
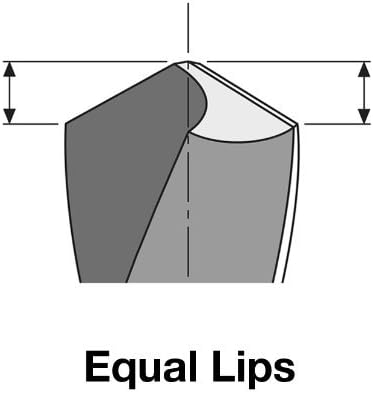
- Symmetrical Cutting Edges: The always equal two cutting edges are sharpened symmetrically and work in perfect unison, prolonging the life of the drill.
- Adjustable Point Angles: Sharpens all point angles between 90 and 150 degrees.
- Optimal Clearance Angle: The optimal clearance angle can be set according to each drilling requirement to 7, 9, 11, or 14 degrees.
- Wide Bit Compatibility: One drill holder sharpens drill bits from 1/8-Inch (3mm) to 7/8-Inch (22 mm).
2. Setup
Proper setup of the DBS-22 jig is crucial for achieving optimal sharpening results. Follow these steps to prepare your sharpening system and the jig:
- Prepare the Sharpening System: Ensure your Tormek water-cooled sharpening system (e.g., T-7, T-3) is set up according to its own manual, with the grindstone properly dressed and water reservoir filled.
- Set Universal Support Distance: Use the setting template provided with the DBS-22 to set the correct distance of the universal support from the grindstone. This is done by inserting the universal support bar through the designated hole in the template and adjusting its position until the template rests against the stone.
- Mount the Base Plate: Attach the DBS-22 base plate onto the universal support. The patented design ensures a secure lock.
- Set Clearance Angle: On the setting template, identify the recommended clearance angle for your drill bit's material and size. Adjust the jig accordingly. A common clearance angle is 11 degrees.
- Mount Drill Bit: Insert the drill bit into the drill holder.
- Set Protrusion: Use the measuring stop on the guide to set the correct protrusion of the drill bit from the holder.
- Align Cutting Edges: Carefully align the drill bit's cutting edges so they are parallel with the horizontal lines on the jig. For smaller drill bits, use the supplied magnifier for precise alignment.

3. Operating Instructions
The Tormek DBS-22 allows for precise and controlled sharpening. The following steps detail the sharpening process:
3.1 Sharpening Primary Facets
- Position for Primary Facet: Place the drill holder so that the lug rests on the primary stop (P) on the jig.
- Feed to Stone: Gently feed the drill bit until it just touches the grindstone.
- Set Cutting Depth: Adjust the cutting depth using the setting screw. One full turn of the setting screw equals 0.5 mm of cutting depth. Lock the setting with the locking nut.
- Grind First Primary Facet: Begin grinding the first primary facet. The continuous water cooling prevents overheating and micro-cracks. Continue until the grinding sound subsides, indicating the edge is fully ground.
- Grind Second Primary Facet: Turn the jig around and sharpen the other primary facet in the same manner.
3.2 Sharpening Secondary Facets and Point
After sharpening the primary facets, proceed to grind the secondary facets and form the drill bit's point.
- Position for Secondary Facet: Move the drill holder to the next stop, marked 'S', to sharpen the secondary facets.
- Tilt and Lock: Tilt the base until the drill bit touches the grindstone and lock it in position.
- Set Cutting Depth: Set the cutting depth by 1.5 turns of the setting screw.
- Grind Secondary Facet: Grind the secondary facet. Continue until the drill holder has moved downward and the lug touches the stop.
- Check Grinding: Inspect the drill bit's point. If the secondary facets need further sharpening to meet in the center and create a perfect point, feed another quarter of a turn and repeat the grinding process.

3.3 Honing (Optional)
For an even finer edge and to remove any burr, you can proceed to hone the drill bit on the profiled leather honing wheels of your Tormek system.
4. Maintenance
To ensure the longevity and optimal performance of your Tormek DBS-22 Drill Bit Sharpening Jig Attachment, regular maintenance is recommended:
- Cleaning: After each use, clean the jig thoroughly to remove any metal particles or grinding residue. Use a damp cloth and dry completely.
- Lubrication: Periodically apply a light machine oil to the moving parts and threads to ensure smooth operation.
- Storage: Store the jig in a dry, clean environment to prevent rust and damage.
- Inspect for Wear: Regularly inspect all components for signs of wear or damage. Replace any worn parts to maintain precision.
5. Troubleshooting
If you encounter issues while using your Tormek DBS-22, consider the following common troubleshooting tips:
- Uneven Sharpening: Ensure the drill bit is correctly aligned in the holder and that the jig is securely positioned on the universal support. Re-check the clearance and point angle settings.
- Drill Bit Not Centering: Verify that the 4-facet point is forming correctly and meeting precisely in the center. Adjust the secondary facet grinding if necessary.
- Excessive Heat During Sharpening: Confirm that your Tormek sharpening system's water reservoir is adequately filled and that the grindstone is continuously cooled.
- Difficulty Adjusting Settings: Clean and lubricate the adjustment screws and moving parts. Ensure no debris is obstructing movement.
- Poor Cutting Performance After Sharpening: Re-evaluate the chosen point and clearance angles for the material being drilled. Ensure the honing step is performed if a burr is present.
6. Specifications
| Attribute | Value |
|---|---|
| Material | Precision-cast zinc, stainless steel, black composite |
| Shank Diameter | 3 Millimeters |
| Cutting Diameter | 3 Millimeters |
| Shank Type | Straight |
| Cutting Angle String | 90 Degrees |
| Item dimensions L x W x H | 14 x 7 x 3 inches |
| Item Weight | 10.6 ounces |
| Minimum Bore Diameter | 0.32 Inches |
| Point Style | Brad Point |
| Number of Flutes | 2 |
| UPC | 739248500200 |
| Manufacturer | TORMEK |
| Part Number | DBS-22 |
7. Warranty and Support
The Tormek DBS-22 Drill Bit Sharpening Jig Attachment comes with a 1-year warranty from the manufacturer. This warranty covers defects in materials and workmanship under normal use.
For technical support, warranty claims, or additional product information, please visit the official Tormek website or contact their customer service department. You can also find more resources and products at the Tormek Store on Amazon.


