
Product Overview
The Southbend S60DD-2RR is a robust 60-inch commercial restaurant range designed for demanding kitchen environments. It features a durable stainless steel front, sides, and high shelf, complemented by chrome oven handles and metal knobs. This model includes six powerful burners, a 24-inch raised griddle/broiler, and two standard ovens capable of accommodating full-size sheet pans. The ovens offer a temperature range of +175°F to +550°F with full porcelain enameled interiors and two non-removable rack guides, each supplied with one rack.
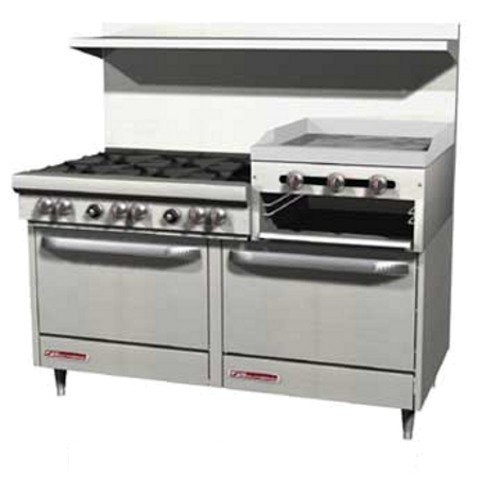
Image: Southbend S60DD-2RR 60-inch Commercial Restaurant Range. This image displays the full commercial range unit, highlighting its six top burners, central raised griddle, and the two oven doors below.
Setup Instructions
Unpacking and Placement
- Carefully remove all packaging materials from the range. Inspect for any shipping damage.
- Ensure the installation area is level and can support the weight of the unit (approximately 860 lbs).
- Position the range, ensuring adequate clearance from combustible surfaces as per local codes. The unit includes 6-inch stainless steel adjustable legs for leveling.
Gas Connection
- All gas connections must be performed by a qualified and licensed technician.
- Connect the range to the appropriate gas supply (LP Gas or Natural Gas) as specified on the unit's data plate.
- Ensure all connections are leak-tested using a non-corrosive leak detection solution.
Initial Burn-Off
- Before first use, operate all burners, the griddle, and ovens at their maximum settings for approximately 15-30 minutes.
- This process helps to burn off any manufacturing oils or residues and should be done in a well-ventilated area.
Operating Instructions
Burner Operation
- Ensure the gas supply is open.
- Push in and turn the burner knob to the 'PILOT' position to ignite the pilot light (if applicable).
- Once the pilot is lit, turn the knob to the desired flame setting (LOW to HIGH).
- The range features removable 12"Wx12"D cast iron grates with non-clog burners.
Griddle Operation
- The 24-inch raised griddle/broiler has manual controls.
- Turn the griddle control knob to the desired temperature. Allow sufficient time for the 1/2" thick, smooth-polished steel surface to heat evenly.
- Regularly empty the removable grease pan located beneath the griddle.
Oven Operation
- Open the oven door and ensure the rack is in the desired position using the two position non-removable rack guides.
- Turn the oven thermostat knob to the desired temperature between +175°F and +550°F.
- Allow the oven to preheat fully before placing food inside. The full porcelain enameled interior facilitates even heating.
Maintenance and Cleaning
Daily Cleaning
- Exterior: Wipe down stainless steel surfaces with a damp cloth and mild detergent. Dry thoroughly to prevent streaks.
- Burner Grates: Remove cast iron grates and clean with a stiff brush or scraper. They can be washed with warm, soapy water.
- Drip Tray: Empty and clean the removable one-piece drip tray beneath the burners.
- Griddle Surface: Scrape off food residue with a griddle scraper. Clean with a griddle brick or pad and warm water. Re-season lightly with cooking oil if necessary.
- Grease Pan: Empty and clean the removable grease pan from the griddle.
Weekly/Monthly Cleaning
- Oven Interior: Clean the porcelain enameled interior with a commercial oven cleaner, following product instructions. Ensure proper ventilation.
- Pilot Lights: Inspect pilot lights for proper flame size and adjust if necessary (consult a qualified technician).
- Gas Lines: Check visible gas lines for any signs of wear or leaks.
Preventative Maintenance
- Schedule annual inspections and maintenance by a qualified service technician to ensure optimal performance and safety.
- Regularly check and clean burner ports to prevent clogging and ensure efficient combustion.
Troubleshooting Guide
| Problem | Possible Cause | Solution |
|---|---|---|
| Burner not igniting | Pilot light out; Gas supply off; Clogged burner port | Relight pilot; Check gas valve; Clean burner port |
| Uneven griddle heating | Griddle not preheated long enough; Uneven surface | Allow more preheat time; Ensure unit is level |
| Oven not reaching temperature | Thermostat setting incorrect; Oven door not sealed; Gas supply issue | Verify thermostat setting; Check door seal; Consult technician for gas supply |
| Excessive smoke during operation | Food residue buildup; Initial burn-off not complete | Clean thoroughly; Ensure proper ventilation during initial use |
Technical Specifications
| Feature | Specification |
|---|---|
| Model Number | S60DD-2RR |
| Dimensions (Overall) | 60"W x 34"D x 59.5"H (including 6" legs) |
| Item Weight | 860 lbs |
| Burners | 6 (24,000 BTU LP Gas / 28,000 BTU Natural Gas each) |
| Griddle/Broiler | 24" raised, 1/2" thick polished steel surface, 33,500 BTU |
| Ovens | 2 Standard Ovens (24,000 BTU LP Gas / 28,000 BTU Natural Gas each) |
| Oven Interior Dimensions | 26"W x 26.5"D x 14"H |
| Oven Temperature Range | +175°F to +550°F |
| Material | Stainless Steel (front, sides, high shelf) |
| Fuel Type | Gas (LP or Natural) |
| Installation Type | Freestanding |
Warranty and Support
For specific warranty information, please refer to the documentation provided with your Southbend S60DD-2RR range at the time of purchase, or visit the official Southbend website. In case of technical issues, service requests, or to purchase replacement parts, please contact Southbend customer support or an authorized service provider. Always provide your model number (S60DD-2RR) and serial number when seeking assistance.
Contact Information: Please refer to the manufacturer's official website or your purchase documentation for the most current contact details.


