Introduction
This manual provides comprehensive instructions for the safe and effective operation, maintenance, and troubleshooting of the Testo 400563 4354 IAQ Kit. This device is designed for simple and intuitive operation for reading, saving, and analyzing ventilation and indoor air quality parameters, including Relative Humidity (RH), Temperature, Carbon Dioxide (CO2), and Barometric Pressure.
Safety Information
Please read this section carefully before operating the device. Failure to comply with these instructions may result in injury or damage to the instrument.
- Always operate the device within its specified operating temperature and humidity ranges.
- Do not expose the device to extreme temperatures, direct sunlight, or corrosive environments.
- Avoid dropping or subjecting the device to strong impacts.
- Only use specified batteries and dispose of them properly.
- Do not attempt to open or repair the device yourself. Refer all servicing to qualified personnel.
- Keep the device clean and free from dust and debris.
Product Overview
The Testo 400563 4354 IAQ Kit is a versatile instrument for environmental measurements. Familiarize yourself with its components:
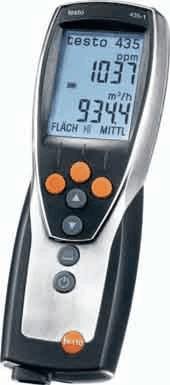
Figure 1: Testo 435-4 IAQ Meter. This image displays the handheld meter, featuring a large digital display at the top showing readings like "1037 ppm" and "934.4 m³/h". Below the screen are several control buttons: three orange circular buttons at the top, followed by two grey arrow buttons (up and down), another grey circular button, and finally a power button with a power symbol. The device has a sleek, ergonomic design with a black body and silver-colored accents.
Key Components:
- Display: Large LCD for clear reading of measurement values and menu navigation.
- Control Buttons: Intuitive buttons for power, navigation, selection, and function activation.
- Sensor Input: Port for connecting various probes (e.g., CO2, humidity, temperature).
- Battery Compartment: Located at the rear for power supply.
Setup
1. Battery Installation:
- Locate the battery compartment cover on the back of the device.
- Open the cover by sliding or unscrewing it (refer to specific model instructions if screws are present).
- Insert the required batteries (e.g., AA or AAA, typically 3 or 4) ensuring correct polarity (+/-).
- Close the battery compartment cover securely.
2. Probe Connection:
- Connect the desired measurement probe (e.g., CO2 probe, humidity/temperature probe) to the designated input port on the device.
- Ensure the connection is firm and secure to prevent inaccurate readings.
Operating Instructions
1. Powering On/Off:
- To power on, press and hold the Power button (usually marked with Ⓢ) until the display illuminates.
- To power off, press and hold the Power button again until the display turns off.
2. Taking Measurements:
- Once powered on and a probe is connected, the device will typically display real-time measurements for the connected parameters (e.g., CO2 in ppm, Temperature in °C/°F, RH in %).
- Position the probe in the environment you wish to measure. Ensure proper air circulation around the sensor for accurate readings.
- Allow a few moments for readings to stabilize, especially for CO2 and humidity.
3. Navigating Menus and Saving Data:
- Use the Up/Down arrow buttons to navigate through different measurement modes or menu options.
- Press the Enter/OK button (often a central circular button) to select an option or confirm a setting.
- To save a measurement, look for a Save or Memory button/option. Follow the on-screen prompts to store data.
- To recall saved data, navigate to the Memory or Recall menu option.
Maintenance
1. Cleaning:
- Wipe the device casing with a soft, damp cloth. Do not use abrasive cleaners or solvents.
- Ensure no liquid enters the sensor openings or electrical connections.
- For probes, follow specific cleaning instructions provided with the probe itself.
2. Battery Replacement:
- Replace batteries when the low battery indicator appears on the display.
- Always use new batteries of the specified type.
- Dispose of old batteries according to local regulations.
3. Calibration:
- Regular calibration is essential for maintaining measurement accuracy.
- Refer to the device's on-screen calibration menu or consult Testo's official support for recommended calibration intervals and procedures.
- Some probes may require specific calibration gases or humidity standards.
Troubleshooting
| Problem | Possible Cause | Solution |
|---|---|---|
| Device does not power on. | Dead or incorrectly installed batteries. | Check battery polarity; replace with new batteries. |
| Inaccurate readings. | Sensor dirty, damaged, or out of calibration; improper probe connection. | Clean sensor; ensure probe is securely connected; perform calibration. |
| Display shows "Error" or "---". | Sensor malfunction; out of measurement range; internal error. | Check probe connection; move to an environment within measurement range; restart device; contact support if persistent. |
| Cannot save data. | Memory full; incorrect save procedure. | Delete old data; refer to operating instructions for saving data. |
Specifications
The following specifications are for the Testo 400563 4354 IAQ Kit:
- Product Type: CO2/Temp/RH/Barometric Meter
- Model: 400563 4354
- Brand: Testo
- Part Number: AO-10382-23
- Package Quantity: EACH
- Package Dimensions: 16.3 x 13 x 4.3 inches; 8.2 Pounds
- ASIN: B00481RUUA
- First Available: July 18, 2012
Note: Specific measurement ranges and accuracies depend on the probes used with the device. Refer to individual probe documentation for detailed specifications.
Warranty and Support
For warranty information, technical support, or service inquiries, please contact Testo customer service or visit their official website.
You can find more information and contact details on the Testo Store on Amazon.


