Introduction
This manual provides comprehensive instructions for the installation, operation, and maintenance of the Gateway MB Audio/Video a15006-202 motherboard. Please read this manual thoroughly before attempting any installation or operation to ensure proper functionality and to prevent damage to the component or other system parts.
The Gateway a15006-202 is a motherboard designed for audio/video applications, featuring integrated components for multimedia processing. It is a critical component for building or upgrading a computer system.
Product Overview
The Gateway a15006-202 motherboard is a complex electronic component. Understanding its layout and key features is essential for proper handling and installation.
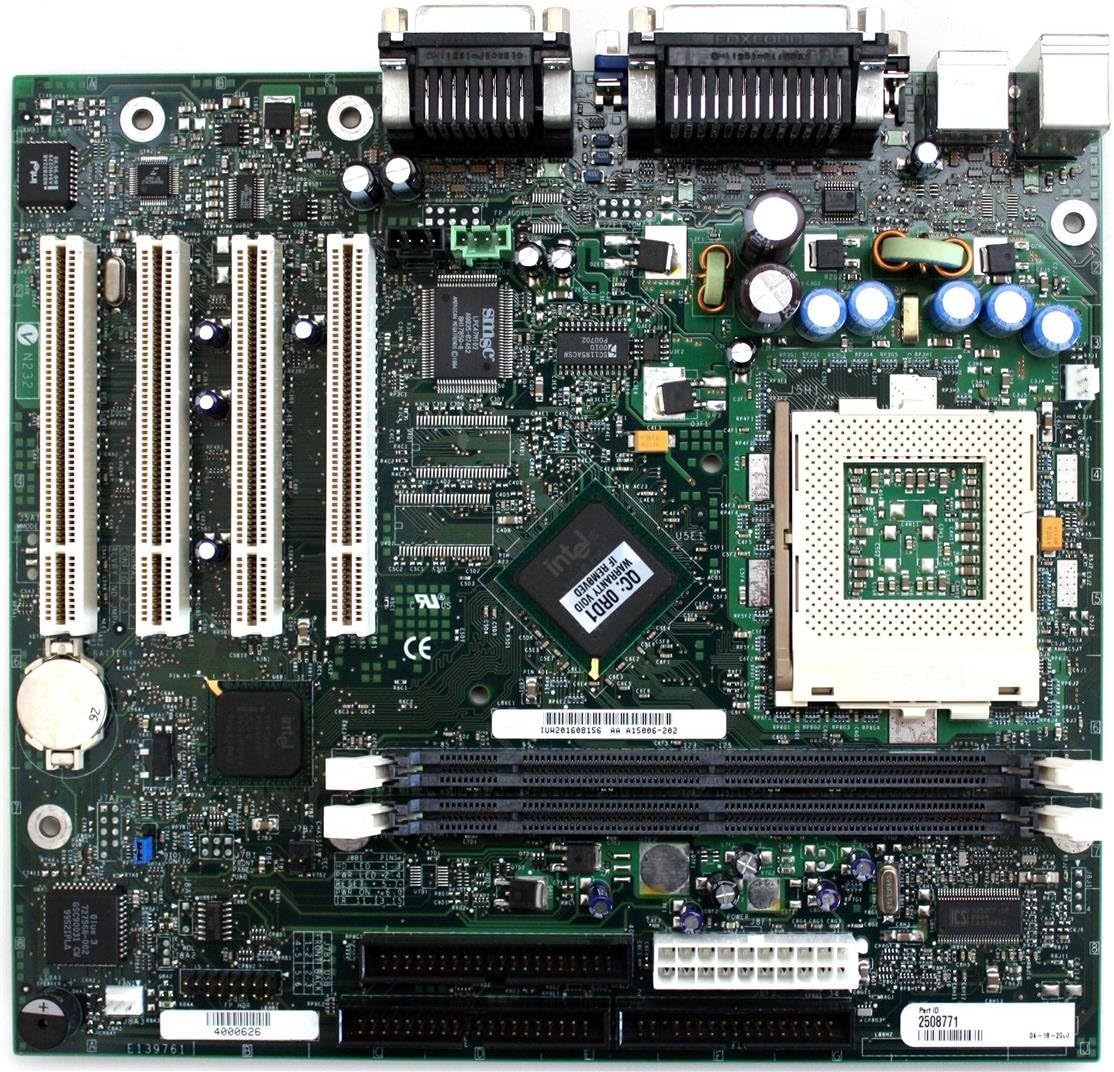
Figure 1: Gateway a15006-202 Motherboard Layout. This image displays the full view of the motherboard, highlighting the arrangement of its various connectors, chips, and slots. Key areas include the CPU socket, memory (RAM) slots, PCI/PCIe expansion slots, and the integrated I/O panel connectors.
Key Components:
- CPU Socket: Location for the central processing unit.
- RAM Slots: Slots for installing system memory modules.
- Expansion Slots: PCI/PCIe slots for adding expansion cards (e.g., graphics cards, network cards).
- I/O Ports: Connectors for external devices (e.g., USB, audio, video).
- Chipsets: Integrated circuits managing communication between components.
- Power Connectors: Points for connecting the power supply unit.
Setup and Installation
Before beginning installation, ensure your workspace is clean, well-lit, and static-free. Use an anti-static wrist strap to prevent damage to sensitive components.
1. Preparing the Motherboard:
- Carefully remove the motherboard from its anti-static packaging.
- Place the motherboard on a non-conductive, flat surface.
2. Installing the CPU:
- Locate the CPU socket on the motherboard.
- Open the CPU socket lever.
- Align the CPU with the socket, ensuring the triangular marker on the CPU matches the marker on the socket.
- Gently lower the CPU into the socket. Do not force it.
- Close the CPU socket lever to secure the CPU.
- Apply a thin, even layer of thermal paste to the top of the CPU.
- Install the CPU cooler according to its manufacturer's instructions.
3. Installing RAM Modules:
- Locate the RAM slots.
- Open the clips at both ends of the RAM slot.
- Align the notch on the RAM module with the key in the slot.
- Press down firmly on both ends of the RAM module until the clips snap into place.
4. Mounting the Motherboard in the Case:
- Install the I/O shield into the case's rear opening.
- Install standoffs in the case according to the motherboard's screw holes.
- Carefully place the motherboard onto the standoffs, aligning the screw holes.
- Secure the motherboard with screws. Do not overtighten.
5. Connecting Power and Peripherals:
- Connect the main 20/24-pin ATX power connector from the power supply to the motherboard.
- Connect the 4/8-pin CPU power connector.
- Connect SATA cables for storage drives.
- Connect front panel headers (power button, reset button, USB, audio) according to the motherboard manual or case instructions.
- Install any necessary expansion cards (e.g., graphics card) into the appropriate slots and secure them.
Operating Instructions
Once the motherboard and other components are installed, you can proceed with initial power-on and operating system installation.
Initial Power-On:
- Ensure all connections are secure.
- Connect the power cord to the power supply and a wall outlet.
- Press the power button on your computer case.
- Observe for POST (Power-On Self-Test) beeps and display output.
- Access the BIOS/UEFI setup by pressing the designated key (usually Del, F2, F10, or F12) during startup.
BIOS/UEFI Configuration:
The BIOS/UEFI interface allows you to configure system settings, boot order, and hardware parameters. Refer to the on-screen prompts or a more detailed BIOS manual for specific settings.
Operating System Installation:
Insert your operating system installation media (USB drive or DVD) and set the boot order in BIOS/UEFI to boot from it. Follow the on-screen instructions to install your preferred operating system.
Driver Installation:
After OS installation, install the necessary drivers for the motherboard's chipsets, audio, network, and any other integrated components. These are typically found on a driver CD included with the motherboard or can be downloaded from the Gateway support website.
Maintenance
Proper maintenance ensures the longevity and stable operation of your Gateway a15006-202 motherboard.
Dust Removal:
- Regularly clean dust from inside your computer case using compressed air.
- Pay attention to CPU cooler fins, fan blades, and heatsinks.
- Ensure the system is powered off and unplugged before cleaning.
BIOS/UEFI Updates:
Periodically check the Gateway support website for BIOS/UEFI updates. Updates can improve compatibility, stability, and performance. Follow the update instructions carefully to avoid system damage.
Driver Updates:
Keep your device drivers updated. Outdated drivers can lead to performance issues or instability. Download drivers only from the official Gateway website or component manufacturers.
Environmental Conditions:
- Operate the computer in a well-ventilated area.
- Avoid extreme temperatures and humidity.
- Protect the system from power surges using a surge protector.
Troubleshooting
This section provides solutions to common issues you might encounter with your motherboard.
| Problem | Possible Cause | Solution |
|---|---|---|
| No Power / System Does Not Turn On | Loose power connections, faulty power supply, faulty power button. |
|
| No Display Output | Incorrect monitor connection, faulty graphics card, RAM issues, CPU not seated correctly. |
|
| System Instability / Crashes | Overheating, faulty RAM, outdated drivers, corrupted OS. |
|
If these steps do not resolve your issue, please refer to the support section or contact Gateway technical support.
Specifications
Below are the key specifications for the Gateway MB Audio/Video a15006-202 motherboard.
| Feature | Detail |
|---|---|
| Model Number | a15006-202 |
| Brand | Gateway |
| Type | Motherboard (Audio/Video) |
| Item Weight | 3 pounds |
| ASIN | B004572REG |
| Date First Available | March 16, 2012 |
Warranty Information
For detailed warranty terms and conditions, please refer to the documentation included with your purchase or visit the official Gateway support website. Warranty coverage typically includes defects in materials and workmanship under normal use.
Note: Tampering with the motherboard, improper installation, or physical damage may void the warranty.
Support and Contact Information
If you require further assistance or encounter issues not covered in this manual, please contact Gateway technical support.
- Official Website: Visit the official Gateway website for drivers, FAQs, and support resources.
- Technical Support: Refer to the contact information provided on the Gateway website for phone or email support.
- Online Resources: Search for community forums or knowledge bases for additional troubleshooting tips.


