
1. Introduction
Welcome to the Velleman KSR1 Robot Car Kit. This kit provides an engaging and educational experience for enthusiasts interested in robotics and electronics. Designed for assembly, the KSR1 allows users to build and understand the fundamental principles of robotic movement and control. Please read this manual thoroughly before beginning assembly or operation to ensure safe and correct usage.
2. Safety Information
Always observe the following safety precautions to prevent injury or damage to the kit:
- Adult Supervision: This kit contains small parts and electronic components. Adult supervision is recommended, especially for younger users.
- Choking Hazard: Keep small components out of reach of children under 3 years of age.
- Electrical Safety: Ensure all wiring is correctly connected before applying power. Incorrect wiring can cause short circuits or damage components.
- Battery Safety: Use only the recommended battery type and ensure correct polarity. Do not mix old and new batteries, or different types of batteries. Remove batteries if the kit will not be used for an extended period.
- Tool Usage: Use appropriate tools for assembly and handle them with care to avoid injury.
3. Package Contents
Please verify that all components are present and undamaged before starting assembly. While specific component lists may vary, a typical Velleman KSR1 kit includes:
- Robot chassis components
- DC motors and gearboxes
- Wheels and tires
- Main control board (PCB)
- Various sensors (e.g., line-following, obstacle avoidance)
- Battery holder and connecting wires
- Fasteners (screws, nuts, standoffs)
- Assembly instructions (this manual)
If any parts are missing or damaged, please contact Velleman customer support.
4. Setup and Assembly
Follow these general steps for assembling your KSR1 Robot Car Kit. Refer to detailed diagrams provided within the physical kit for precise component placement.
- Chassis Assembly: Begin by assembling the main chassis components according to the provided diagrams. Ensure all parts fit securely.
- Motor and Wheel Installation: Attach the DC motors to the chassis. Mount the wheels onto the motor shafts.
- Control Board Mounting: Secure the main control board (PCB) to the chassis using standoffs and screws.
- Wiring Connections: Carefully connect the motors, sensors, and battery holder to the control board as indicated in the wiring diagrams. Pay close attention to polarity for power connections.
- Battery Installation: Insert the required batteries (typically AA or AAA, check kit specifics) into the battery holder, observing correct polarity.
- Final Checks: Before powering on, double-check all connections to ensure they are firm and correctly placed.
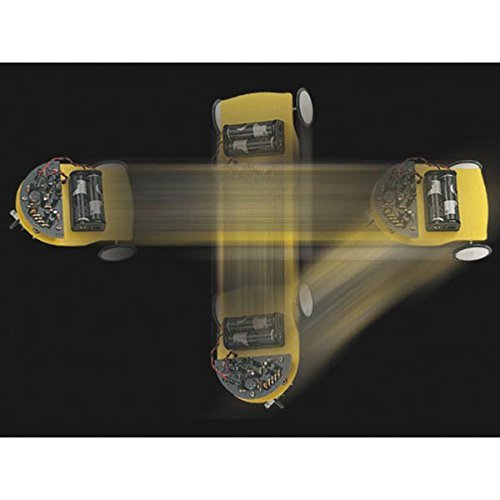
Figure 1: The Velleman KSR1 Robot Car Kit in motion, illustrating its design and battery placement.
5. Operating Instructions
Once assembled, your KSR1 Robot Car Kit is ready for operation. The specific control methods depend on the version of the kit and any programming you may apply.
- Power On: Locate the power switch on the control board or battery holder and switch it to the 'ON' position. Indicators (LEDs) on the board may light up.
- Initial Movement: Depending on the kit's default programming, the robot may begin moving automatically, follow a line, or react to obstacles.
- Programming (if applicable): If your kit supports programming (e.g., via Arduino or similar platforms), connect it to your computer using the appropriate cable and upload your code. Refer to the programming guide for your specific kit version.
- Experimentation: Explore the robot's capabilities. Observe how it interacts with its environment based on its sensors and programming.
- Power Off: When finished, switch the power off to conserve battery life.
6. Maintenance
Proper maintenance ensures the longevity and optimal performance of your KSR1 Robot Car Kit.
- Cleaning: Periodically clean the chassis and wheels to remove dust and debris that can hinder movement or sensor performance. Use a soft, dry cloth. Avoid using liquids directly on electronic components.
- Battery Care: Replace batteries when performance degrades. Remove batteries if the robot will be stored for an extended period to prevent leakage.
- Component Checks: Regularly inspect wires for fraying or loose connections. Ensure all screws and fasteners are tight.
7. Troubleshooting
If you encounter issues with your KSR1 Robot Car Kit, consult the following common troubleshooting steps:
| Problem | Possible Cause | Solution |
|---|---|---|
| Robot does not power on. | Dead batteries, incorrect battery polarity, loose power connection, power switch off. | Replace batteries, check battery orientation, ensure power switch is ON, verify power wiring. |
| Robot moves erratically or not at all. | Loose motor wires, obstructed wheels, incorrect motor connection, programming error. | Check motor wiring, clear any obstructions from wheels, verify motor connections to PCB, review programming code. |
| Sensors not responding. | Loose sensor connection, dirty sensor lens, incorrect sensor type selected in code. | Check sensor wiring, clean sensor lenses, verify sensor configuration in programming. |
| Components feel hot. | Short circuit, overloaded motor, incorrect voltage. | Immediately power off. Recheck all wiring for shorts. Ensure correct battery voltage is used. |
8. Specifications
Key specifications for the Velleman KSR1 Robot Car Kit:
- Model Number: KSR1
- Manufacturer: Velleman
- Item Weight: Approximately 3.62 kg
- Package Quantity: 1 kit
- Discontinued: No (as of last update)
- First Available: August 27, 2014
9. Warranty and Support
For detailed warranty information and technical support, please refer to the official Velleman website or contact their customer service directly. Keep your purchase receipt as proof of purchase.
Velleman Official Website: www.velleman.eu

