1. Introduction
Thank you for purchasing the Digiquest Invisible DVB-T2 HEVC H.265 Digital Terrestrial Receiver. This device is designed to provide high-definition digital terrestrial television reception, including HEVC H.265 encoded channels. Its compact and adjustable design allows for discreet installation behind your television. This manual provides detailed instructions for setup, operation, and troubleshooting to ensure optimal performance.

Image 1.1: Digiquest Invisible DVB-T2 HEVC H.265 Digital Terrestrial Receiver.
2. Package Contents
Please check the package carefully to ensure all items are present and in good condition. If any items are missing or damaged, please contact your retailer.

Image 2.1: Contents of the Digiquest Invisible DVB-T2 HEVC H.265 Receiver package.
- Digiquest Invisible DVB-T2 HEVC H.265 Receiver Unit
- Remote Control
- External Power Supply (AC 100-240V - DC 12V)
- Remote Control Extender (IR sensor with adhesive)
- Removable Support with Hole and Adhesive
- User Manual / Quick Guide
3. Product Overview
3.1. Receiver Unit
The Digiquest Invisible receiver is designed for compact and flexible installation. It features a 180° adjustable SCART connector, allowing it to be positioned optimally behind your TV.

Image 3.1: Side view of the receiver unit with the adjustable SCART connector.
3.2. Ports and Connections
Familiarize yourself with the various ports on your receiver:

Image 3.2: Detailed diagram showing all ports and their functions.
- USB 2.0 Port (Lateral): For connecting USB storage devices to play multimedia content.
- RF IN: Terrestrial antenna input for connecting your DVB-T/T2 antenna.
- LAN: Ethernet port for network connection, primarily for FTP updates.
- HDMI: High-Definition Multimedia Interface for connecting to a modern TV.
- IR: Input for the external IR sensor (remote control extender).
- Power Input: For connecting the 12V DC power adapter.
- SCART Socket: 180° adjustable connector for older TVs.
3.3. Remote Control
The remote control allows you to operate all functions of the receiver. Insert two AAA batteries (not included) into the battery compartment.

Image 3.3: Layout of the remote control buttons.
- Power Button: Turns the receiver on or off.
- Mute Button: Mutes or unmutes the audio.
- TXT: Teletext function.
- SUBT: Subtitle selection.
- INFO: Displays channel information.
- FAV: Accesses favorite channel list.
- Color Buttons (Red, Green, Yellow, Blue): For specific functions as indicated on-screen.
- LANG: Audio language selection.
- MENU: Accesses the main menu.
- Navigation Buttons (Up/Down/Left/Right) & OK: For menu navigation and selection.
- EXIT: Exits the current menu or function.
- Volume Up/Down: Adjusts the volume.
- Channel Up/Down: Changes channels.
- Numeric Keypad (0-9): For direct channel input.
- EPG: Electronic Program Guide.
4. Setup & Installation
Follow these steps to connect and set up your Digiquest Invisible receiver.
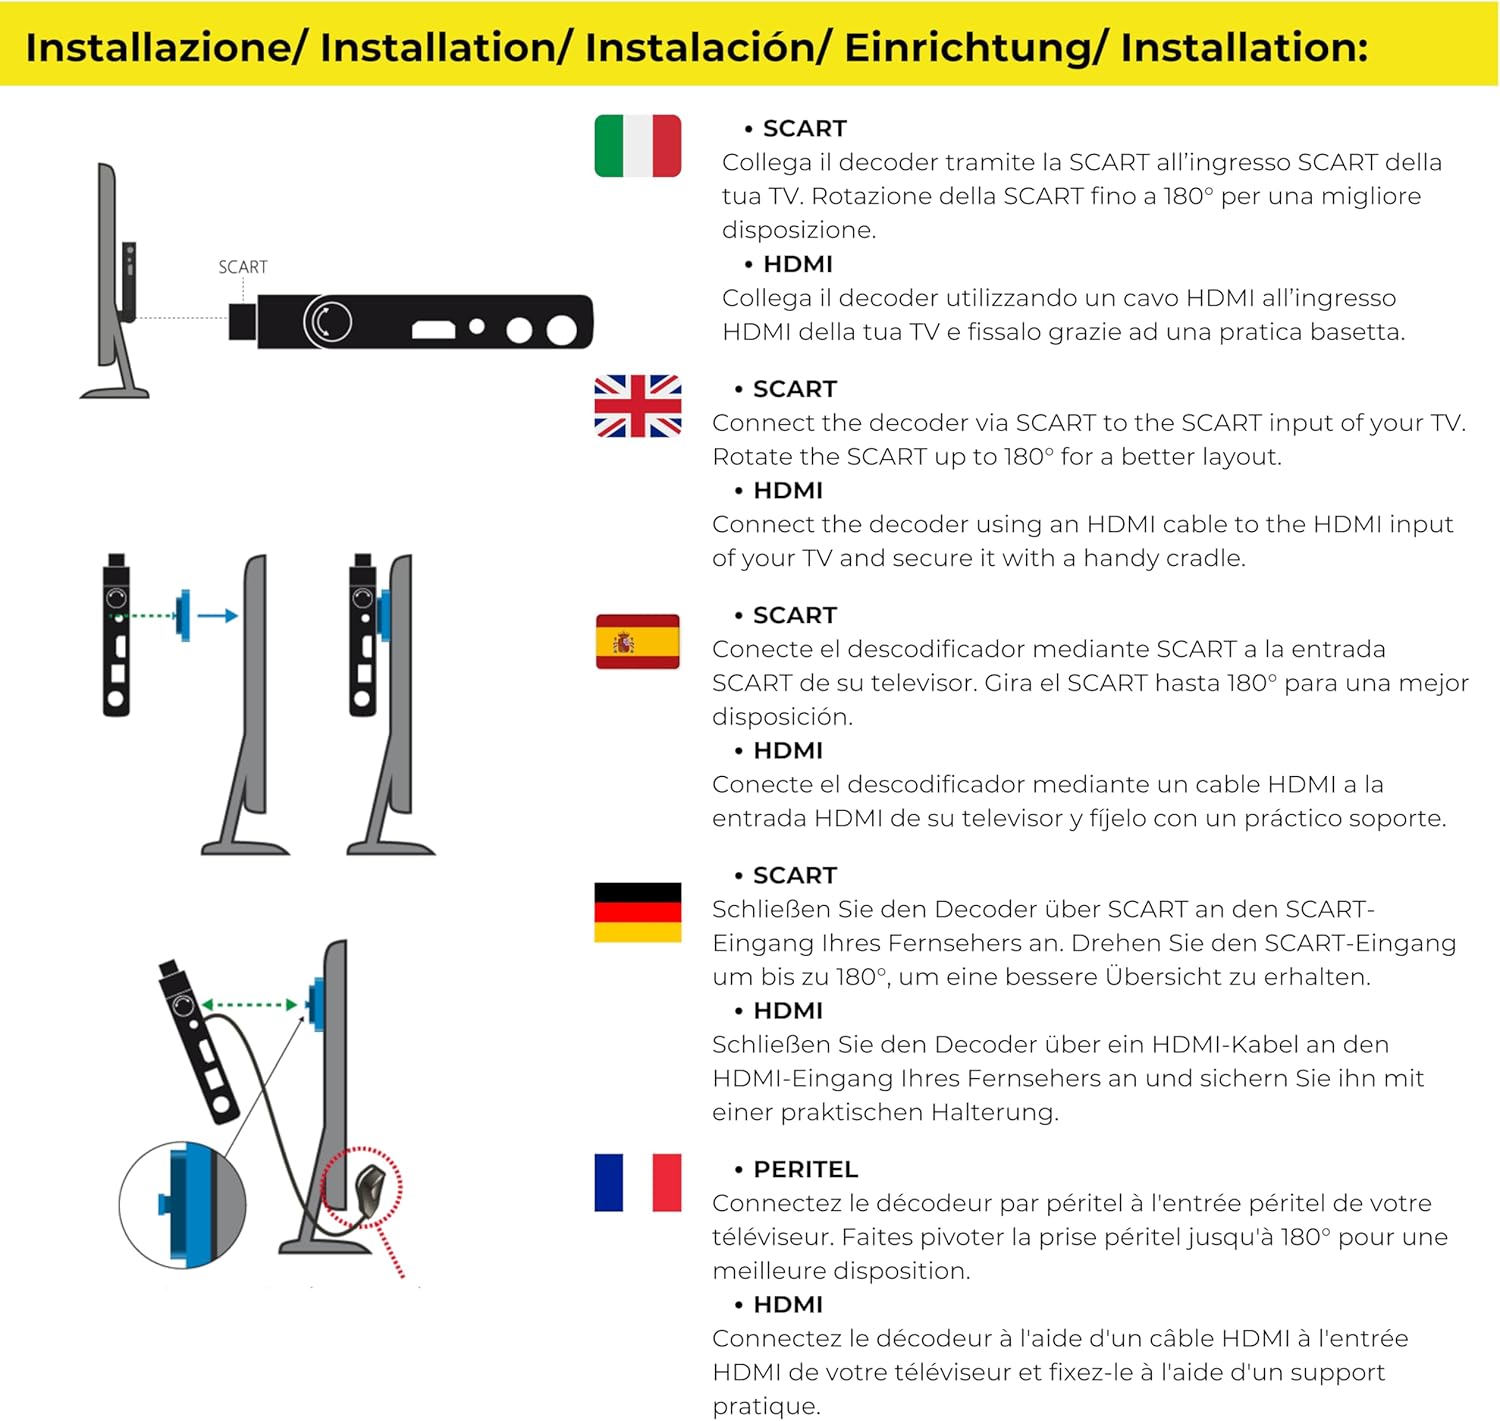
Image 4.1: Connection options for the receiver via SCART or HDMI.
4.1. Connecting to Your TV
The receiver offers flexible connection options:
- Using SCART: Connect the receiver directly to your TV's SCART input. The 180° articulated SCART connector allows you to position the receiver discreetly behind the TV.
- Using HDMI: For TVs with an HDMI port, connect the receiver using an HDMI cable (not included). You can use the provided removable support to secure the receiver if needed.

Image 4.2: Example of the receiver connected discreetly behind a TV using the SCART connector.
4.2. Antenna and Power Connection
- Connect your terrestrial antenna cable to the RF IN port on the receiver.
- If using the remote control extender, plug its cable into the IR port. Position the IR sensor in a location where it can receive signals from your remote control.
- Connect the external power supply to the Power Input port on the receiver, then plug the power adapter into a wall outlet.
4.3. Initial Setup and Channel Scan
- Turn on your TV and select the correct input source (SCART or HDMI) where the receiver is connected.
- Power on the Digiquest receiver using the remote control.
- The first-time installation wizard should appear. Follow the on-screen prompts to select your language, country, and initiate an automatic channel scan.
- Allow the receiver to complete the channel scan. This may take several minutes.
- Once the scan is complete, you should be able to view available digital terrestrial channels.
5. Basic Operation
5.1. Channel Selection
- Use the Channel Up/Down buttons on the remote to browse channels sequentially.
- Enter the channel number directly using the Numeric Keypad.
- Press the OK button to display the channel list, then use the navigation buttons to select a channel.
5.2. Volume Control
Adjust the volume using the Volume Up/Down buttons on the remote control. For optimal control, set your TV's volume to a high fixed level and use the receiver's remote for daily volume adjustments.
5.3. CEC Function (Consumer Electronics Control)
If your TV supports CEC and it is enabled, you may be able to control basic functions of the receiver (like power on/off) using your TV's remote control. Refer to your TV's manual for CEC setup.

Image 5.1: CEC Functionality.
5.4. Subtitles and Audio Language
- Press the SUBT button to enable or disable subtitles, or to select from available subtitle tracks.
- Press the LANG button to select from available audio languages (if broadcast).
6. Media Player Functions
The Digiquest Invisible receiver includes a media player function, allowing you to view photos, listen to music, and watch videos from a USB storage device.

Image 6.1: Media Player functionality for various file types.
- Insert a USB storage device (e.g., USB flash drive) into the USB 2.0 Port on the side of the receiver.
- Access the Media Player menu from the main menu.
- Navigate through your USB device's folders to select the desired video, audio, or image file.
- Press OK to play or view the selected file.
7. Troubleshooting
If you encounter problems with your receiver, please refer to the following common issues and solutions before contacting support.
| Problem | Possible Cause | Solution |
|---|---|---|
| No picture or sound | Incorrect TV input selected; Loose cable connections; Receiver not powered on. | Ensure TV is on correct input (SCART/HDMI). Check all cable connections (antenna, power, video). Power on the receiver. |
| No channels found | Antenna not connected or faulty; Poor signal strength; No channel scan performed. | Check antenna connection. Adjust antenna position. Perform a new channel scan from the menu. |
| Remote control not working | Batteries depleted or incorrectly inserted; IR sensor blocked or not connected. | Replace batteries. Ensure batteries are inserted with correct polarity. Check IR sensor connection and ensure it has a clear line of sight to the remote. |
| Channels reorder after power off | Specific software behavior or setting. | Check receiver settings for channel sorting options. Ensure any custom channel lists are saved. If the issue persists, check for firmware updates. |
| Menu language not available | Limited language options in firmware. | The receiver may have a limited set of menu languages. Check for available firmware updates that might include additional languages. |
8. Specifications
Key technical specifications for the Digiquest Invisible DVB-T2 HEVC H.265 Digital Terrestrial Receiver:
- Brand: DIGIQUEST
- Model: Invisible DVB-T2 HEVC H.265
- Color: Black
- Connectivity: HDMI, SCART (180° adjustable), USB 2.0 (x2), LAN (Ethernet), RF IN, IR
- Compatible Devices: Television
- Video Encoding: HEVC Main 10
- Audio Output Mode: Surround
- Power Supply: 12V DC (External AC 100-240V adapter included)
- Weight: 200 Grams
- Control Method: Remote Control
- Features: Full HD, Mediaplayer, CEC Function, FTP Update via LAN

Image 8.1: LAN port for FTP updates.

Image 8.2: 12V power supply.
9. Warranty & Support
9.1. Manufacturer's Warranty
This product comes with a 2-year manufacturer's warranty. Please retain your proof of purchase for warranty claims. The warranty covers defects in materials and workmanship under normal use.
9.2. Customer Support
For technical assistance, troubleshooting beyond this manual, or warranty inquiries, please contact your retailer or visit the official Digiquest website for support information.
10. Safety Information
Please read and follow these safety guidelines to ensure safe operation and prevent damage to the device:
- Do not expose the receiver to rain, moisture, or extreme temperatures.
- Ensure proper ventilation around the device to prevent overheating.
- Use only the provided power adapter. Using unauthorized adapters may damage the device and void the warranty.
- Do not attempt to open or repair the receiver yourself. Refer all servicing to qualified personnel.
- Keep the device away from strong magnetic fields.
- Dispose of electronic waste responsibly according to local regulations.


