
Dual XHDR6435
Contents
Dual XHDR6435 AM/FM/MP3/WMA/USB/HD Ready Receiver User Manual
Model: XHDR6435
1. Introduction
This manual provides detailed instructions for the installation, operation, and maintenance of your Dual XHDR6435 AM/FM/MP3/WMA/USB/HD Ready Receiver. Please read this manual thoroughly before using the product to ensure proper operation and to prevent damage.
The Dual XHDR6435 is a versatile car stereo receiver featuring CD/MP3/WMA playback, front panel 3.5mm auxiliary input, front panel USB input for direct iPod/iPhone control and charging, and is ready for Bluetooth (requires BTM60) and HD Radio (requires HDM90). It delivers 240 Watts total power (60 x 4) via MOSFET amplification and includes an infrared remote control.

Figure 1: Front view of the Dual XHDR6435 AM/FM/MP3/WMA/USB/HD Ready Receiver, showing the display, control buttons, CD slot, USB port, and auxiliary input.
2. Safety Information
Always observe the following safety precautions when installing or operating the receiver:
- Do not operate the unit in any way that would distract you from safe driving.
- Keep the volume at a level where you can still hear outside traffic noises.
- For installation, consult a qualified professional. Incorrect wiring can cause damage to the vehicle's electrical system or the unit itself.
- Ensure all wiring is properly insulated and secured to prevent short circuits.
- Do not expose the unit to moisture or extreme temperatures.
- Use only accessories and parts specified by the manufacturer.
3. Setup
3.1 Installation
The Dual XHDR6435 is designed for standard DIN-sized openings. Professional installation is highly recommended to ensure correct wiring and secure mounting. Refer to the detailed wiring diagram provided with the product packaging for specific connections.
- Mounting: Securely mount the receiver in the vehicle's dashboard using the supplied mounting sleeve and hardware.
- Antenna Connection: Connect the vehicle's antenna cable to the antenna input on the rear of the receiver.
3.2 Wiring Connections
Ensure the vehicle's battery is disconnected before making any electrical connections. The main wiring harness includes connections for power, ground, accessory, illumination, and speaker outputs. The unit also features 2 pairs of RCA outputs (Front + Rear/Subwoofer selectable) for external amplifiers.
- Power (Yellow): Connect to a constant +12V power source.
- Ground (Black): Connect to a clean chassis ground point.
- Accessory (Red): Connect to a switched +12V power source (ignition).
- Speaker Outputs: Connect to the vehicle's speakers, observing correct polarity.
- RCA Outputs: Connect to external amplifiers if used.
- Steering Wheel Interface Input (PAC SWI-PS): Connect compatible steering wheel control adapters here.
- Bluetooth Ready (requires BTM60): Connect the optional BTM60 module for Bluetooth functionality.
- HD Radio Ready (requires HDM90): Connect the optional HDM90 module for HD Radio reception.
3.3 Initial Power On
After all connections are made and verified, reconnect the vehicle's battery. Press the POWER/SELECT button on the unit's front panel to turn it on. The 2-Line LCD display will illuminate.
4. Operating Instructions
4.1 Basic Controls
- POWER/SELECT Button: Press to turn the unit ON/OFF. Rotate to adjust volume. Press to confirm selections in menus.
- MODE Button: Press to cycle through available sources (Tuner, CD, USB, AUX).
- DISP Button: Press to change display information (e.g., clock, track title).
- AUDIO Button: Access audio settings like Bass, Treble, Balance, Fader, EQ.
- BAND/ESC Button: In tuner mode, press to change radio bands (FM1, FM2, FM3, AM1, AM2). In menu mode, press to exit current menu.
- MUTE Button: Mutes or unmutes audio output.
- SCAN/HD-SK Button: In tuner mode, initiates station scan. With HD Radio module, seeks HD Radio stations.
- Seek/Track Buttons (<< / >>): In tuner mode, seek up/down stations. In CD/USB mode, skip tracks.
4.2 Radio Operation
Press the MODE button until "TUNER" or "RADIO" is displayed. Use the BAND button to select FM1, FM2, FM3, AM1, or AM2. Use the Seek buttons to tune to stations. Press and hold the Seek buttons for manual tuning.
Preset Stations: To store a station, tune to the desired frequency, then press and hold one of the preset buttons (1-6) until you hear a beep.
HD Radio (with optional HDM90): When the HDM90 module is connected, the unit will automatically detect and tune to HD Radio broadcasts. The display will indicate "HD Radio Ready" or similar. Use the HD-SK button to seek HD Radio stations.
4.3 CD/MP3/WMA Playback
Insert a CD into the disc slot. The unit will automatically switch to CD mode and begin playback. If a disc is already inserted, press the MODE button to select "CD".
- Play/Pause: Press the 4 / II button.
- Skip Track: Press the Seek buttons.
- Fast Forward/Reverse: Press and hold the Seek buttons.
- Repeat (RPT): Press the 1 RPT button to repeat current track/folder.
- Random (RDM): Press the 2 RDM button for random playback.
- Intro Scan (INT): Press the 3 INT button to play the first few seconds of each track.
4.4 USB/iPod/iPhone Operation
Connect your USB device or iPod/iPhone to the front panel USB input. The unit will automatically switch to USB mode and begin playback. The unit supports direct USB control for iPod/iPhone and charges any iPod via USB.
- Navigation: Use the Seek buttons to navigate tracks. Use the FOLDER (buttons 5 and 6) to navigate folders on USB devices.
- iPod/iPhone Control: Basic playback controls (play/pause, skip) are available directly from the receiver. Advanced browsing may be done from the iPod/iPhone itself.
4.5 Auxiliary Input
Connect an external audio device (e.g., MP3 player) to the front panel 3.5mm auxiliary input. Press the MODE button until "AUX" is displayed. Audio will play through the vehicle's speakers.
4.6 Bluetooth (with optional BTM60)
If the optional BTM60 Bluetooth module is connected, refer to the BTM60 manual for pairing and operation instructions. The unit will allow for hands-free calling and audio streaming once paired with a compatible device.
4.7 Steering Wheel Control Interface
The unit supports a steering wheel interface input (PAC SWI-PS). If a compatible adapter is installed, refer to the adapter's manual for programming and operation of your vehicle's steering wheel controls with the XHDR6435.
4.8 Remote Control Operation
The included infrared remote control provides convenient access to most functions. Point the remote control directly at the receiver's front panel when operating.
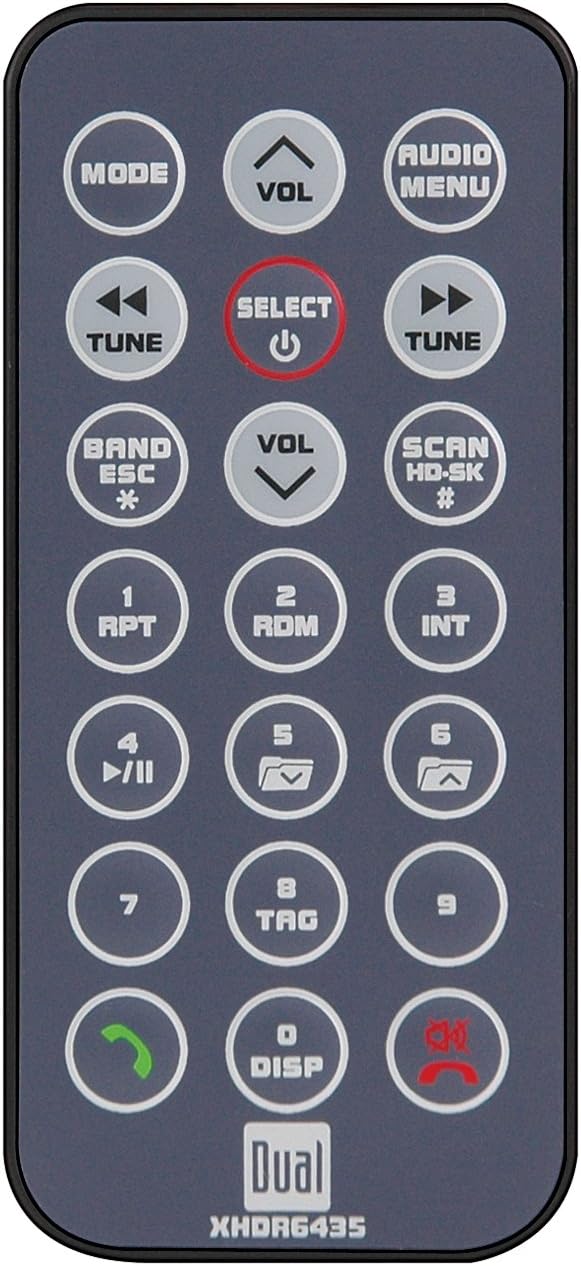
Figure 2: The infrared remote control for the Dual XHDR6435 receiver, showing various buttons for mode, volume, tuning, playback, and menu navigation.
- MODE: Changes source.
- VOL +/-: Adjusts volume.
- TUNE/SEEK << / >>: Tunes radio or skips tracks.
- SELECT/POWER: Power ON/OFF, confirms selections.
- AUDIO MENU: Accesses audio settings.
- BAND/ESC: Changes radio band, exits menus.
- SCAN/HD-SK: Scans stations, seeks HD stations.
- 1-6 (Preset Buttons): Accesses preset radio stations or specific playback functions (RPT, RDM, INT).
- DISP: Changes display information.
- Mute/Call Buttons: Mutes audio, answers/ends calls (with BTM60).
5. Maintenance
- Cleaning the Unit: Use a soft, dry cloth to wipe the front panel. For stubborn stains, dampen the cloth with water only. Do not use abrasive cleaners, waxes, or solvents.
- Disc Care: Handle CDs by their edges. Keep discs clean and free of scratches. Do not use irregularly shaped discs or discs with adhesive labels.
- General Care: Avoid exposing the unit to direct sunlight for extended periods or to extreme temperatures. Ensure proper ventilation around the unit.
6. Troubleshooting
| Problem | Possible Cause | Solution |
|---|---|---|
| No power | Blown fuse; Incorrect wiring; Vehicle battery low. | Check and replace fuse; Verify power and ground connections; Charge vehicle battery. |
| No sound | Volume too low; Mute activated; Speaker wires disconnected/shorted; Fader/Balance set incorrectly. | Increase volume; Deactivate mute; Check speaker connections; Adjust Fader/Balance settings. |
| Poor radio reception | Antenna not connected; Antenna damaged; Weak signal area. | Ensure antenna is securely connected; Inspect antenna for damage; Try tuning to stronger stations. |
| CD/USB playback issues | Dirty/scratched disc; Incompatible file format; USB device not recognized. | Clean or replace disc; Ensure files are MP3/WMA; Reconnect USB device, try different USB device. |
| Remote control not working | Dead battery; Obstruction; Not pointing correctly. | Replace battery; Remove obstructions; Point directly at receiver. |
7. Specifications
| Feature | Detail |
|---|---|
| Model Number | XHDR6435 |
| Power Output | 240 Watts total (60 Watts x 4 channels) MOSFET |
| Disc Compatibility | CD, MP3, WMA |
| USB Input | Front panel, Direct control for iPod/iPhone, Charges iPod via USB |
| Auxiliary Input | Front panel 3.5mm |
| RCA Outputs | 2 Pairs (Front + Rear/Subwoofer selectable) |
| Display | 2-Line LCD |
| Remote Control | Infrared remote included |
| Steering Wheel Control | Interface input (PAC SWI-PS compatible) |
| Bluetooth Ready | Requires optional BTM60 module |
| HD Radio Ready | Requires optional HDM90 module |
| Dimensions (L x W x H) | 25.4 x 13.97 x 13.97 cm |
| Weight | 2 kg (4.4 Pounds) |
8. Warranty & Support
For warranty information and technical support, please refer to the warranty card included with your product or visit the official Dual Electronics website. Keep your proof of purchase for warranty claims.
If you encounter issues not covered in the troubleshooting section, contact Dual customer service for assistance. Do not attempt to repair the unit yourself, as this may void your warranty.
Ask a question about this manual
Ask about setup, troubleshooting, compatibility, parts, safety, or missing instructions. Manuals+ will review the question and use this page’s manual context to help answer it.