Introduction
This instruction manual provides detailed guidance for assembling the Zvezda 7293 Soviet Attack Helicopter MI-24V/VP HIND E plastic model kit. This highly detailed 1/72 scale model allows enthusiasts to recreate the iconic Soviet attack helicopter. Please read all instructions carefully before beginning assembly.

Figure 1: Zvezda 7293 MI-24V/VP HIND E Model Kit Box Art
Safety Information
Always observe the following safety precautions when working with plastic model kits:
- Keep small parts away from young children to prevent choking hazards.
- Use sharp tools (e.g., hobby knife, nippers) with extreme care. Always cut away from your body.
- Work in a well-ventilated area when using glues, paints, and thinners. Avoid inhaling fumes.
- Wear appropriate personal protective equipment, such as safety glasses and gloves, if recommended by glue or paint manufacturers.
- Dispose of waste materials responsibly according to local regulations.
Package Contents
The Zvezda 7293 model kit includes the following components:
- Plastic sprues with 270 parts for the MI-24V/VP HIND E helicopter.
- Detailed cockpit components.
- Two pilot figures.
- Decal sheet for three different versions.
- Instruction booklet (this manual).
Please note that glue, paint, and finishing supplies are not included and must be purchased separately.
Setup and Assembly
Before starting, ensure you have a clean workspace and the necessary tools, such as a hobby knife, plastic cement, tweezers, and sanding sticks.
General Assembly Steps:
- Review Instructions: Carefully read through the entire instruction manual and familiarize yourself with the parts layout on the sprues.
- Part Preparation: Carefully remove parts from the sprues using nippers or a hobby knife. Clean any mold lines or excess plastic (flash) with a hobby knife or fine-grit sandpaper.
- Dry Fit: Before applying glue, dry fit parts together to ensure proper alignment and fit. Make any necessary adjustments.
- Gluing: Apply a small amount of plastic cement to the mating surfaces. Hold parts firmly together until the glue sets.
- Sub-Assemblies: Assemble smaller sections (e.g., cockpit, landing gear, rotors, weapons pylons) first, then integrate them into the main fuselage.
Key Assembly Areas:
The kit features highly detailed engines and a detailed cockpit. Pay close attention to these areas for an accurate representation.
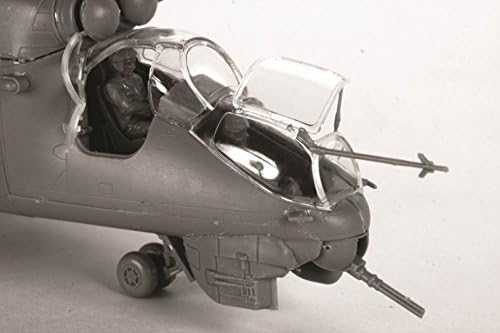
Figure 2: Detailed Cockpit Assembly
The kit allows for two versions: the MI-24V with a machine gun and the MI-24VP with a cannon. Follow the specific instructions for your chosen variant.

Figure 3: Assembled MI-24V/VP HIND E Model
Operating (Painting and Finishing)
Once the model is fully assembled, it is ready for painting and decaling. The kit is designed for use with oil paints, but acrylics or enamels can also be used depending on personal preference and desired finish.
Painting:
- Primer: Apply a thin coat of primer to ensure paint adhesion and a uniform surface.
- Base Coats: Apply base colors according to your chosen camouflage scheme. Refer to historical references or the box art for guidance.
- Detail Painting: Paint smaller details such as the cockpit interior, landing gear, and weapons.
- Weathering: (Optional) Apply weathering effects like washes, dry brushing, or chipping to enhance realism.

Figure 4: Finished Model with Camouflage and Decals
Decal Application:
The kit includes a decal sheet for various markings and insignias.
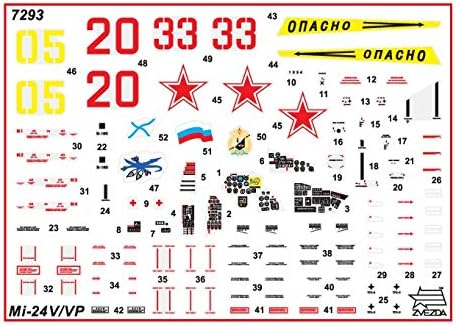
Figure 5: Decal Sheet
- Gloss Coat: Apply a gloss clear coat over the painted surface where decals will be placed. This prevents 'silvering' of the decals.
- Cut Decals: Carefully cut out each decal from the sheet.
- Soak Decals: Dip the decal in lukewarm water for a few seconds until it can slide freely from the backing paper.
- Apply Decals: Slide the decal onto the model surface. Position it carefully using tweezers or a wet brush.
- Setting Solution: Use a decal setting solution to help the decal conform to surface details and eliminate air bubbles.
- Matte/Satin Coat: Once decals are dry, apply a final matte or satin clear coat to seal them and unify the finish.
Maintenance
Proper care will preserve the appearance of your finished model.
- Cleaning: Dust your model regularly with a soft, dry brush or a can of compressed air. Avoid using harsh chemicals or wet cloths, which can damage paint or decals.
- Storage: Store the model in a cool, dry place away from direct sunlight to prevent fading or warping. Display cases can protect against dust and accidental damage.
- Handling: Handle the model by its sturdy parts, such as the fuselage, to avoid breaking delicate components like antennas or rotor blades.
Troubleshooting
Here are solutions to common issues encountered during model assembly:
| Problem | Possible Cause | Solution |
|---|---|---|
| Parts do not fit together properly. | Excess plastic (flash), mold lines, or misalignment. | Carefully trim flash and sand mold lines. Dry fit parts before gluing to identify and correct alignment issues. |
| Decals 'silver' (appear milky or have air bubbles). | Uneven surface, air trapped under decal, or insufficient setting solution. | Apply decals over a gloss surface. Use a decal setting solution and gently press out air bubbles with a soft cloth or cotton swab. |
| Paint does not adhere or chips easily. | Surface not clean, no primer used, or paint applied too thickly. | Clean parts thoroughly before painting. Use a primer. Apply paint in thin, even coats. |
| Small parts break during removal from sprue. | Incorrect tools or excessive force. | Use sharp nippers or a hobby knife. Cut parts away from the sprue gates carefully, leaving a small amount of sprue attached to be trimmed later. |
Specifications
- Model Name: Zvezda 7293 Soviet Attack Helicopter MI-24V/VP HIND E
- Brand: Zvezda
- Scale: 1:72
- Number of Pieces: 270
- Assembled Length: Approximately 298 mm (11.75 inches)
- Material: Plastic
- Recommended Paint Type: Oil (other types compatible)
- Features: Highly detailed engines, detailed cockpit with 2 pilot figures, options for MI-24V (machine gun) or MI-24VP (cannon) versions.
Warranty and Support
As a plastic model kit, this product typically does not come with a direct warranty for the assembled item. However, if you encounter missing or defective parts upon opening the kit, please contact the manufacturer, Zvezda, or your retailer for assistance. Keep your proof of purchase for any claims.
For additional modeling tips, techniques, or community support, consider visiting online modeling forums or manufacturer websites.