
Introduction
This manual provides essential information for the proper setup, operation, and maintenance of your Hitachi LE19S304 19-inch LED LCD 720p HDTV. Please read these instructions thoroughly before using your television to ensure optimal performance and safety.

Figure 1: Front view of the Hitachi LE19S304 19-inch LED LCD 720p HDTV. This image displays the television's screen and bezel, illustrating its compact design suitable for various spaces.
1. Setup
1.1 Unpacking
Carefully remove the television and all accessories from the packaging. Retain the packaging materials for future transport or service needs. Ensure all components listed below are present:
- Hitachi LE19S304 Television
- Table Stand
- Remote Control
- Power Cord
- User Manual (this document)
1.2 Stand Installation
To install the included table stand:
- Place the television screen-down on a soft, clean surface to prevent scratches.
- Align the stand with the mounting holes on the bottom of the television.
- Secure the stand using the provided screws. Do not overtighten.
- Carefully place the television upright on a stable, level surface.
1.3 Wall Mounting (Optional)
The Hitachi LE19S304 is VESA compliant, allowing for wall mounting. A VESA-compatible wall mount kit (sold separately) is required. Follow the instructions provided with your wall mount kit for proper installation. Ensure the wall can support the weight of the television.
1.4 Connecting External Devices
Connect your external devices (e.g., cable box, DVD player, gaming console) to the appropriate ports on the television. Refer to the image below for port locations.
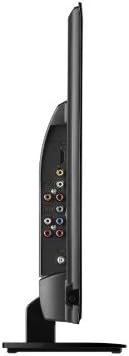
Figure 2: Side view of the Hitachi LE19S304 television, highlighting the various input ports. This includes HDMI, component, composite, and VGA connections for external devices.
- HDMI (High-Definition Multimedia Interface): For high-quality digital audio and video connections. Connect HDMI cables from your devices to the HDMI ports on the TV.
- Component Video (YPbPr): For high-quality analog video connections. Connect the Y, Pb, and Pr cables from your device to the corresponding ports on the TV.
- Composite Video (AV): For standard-definition analog video and audio connections. Connect the yellow video cable and red/white audio cables from your device to the AV IN ports.
- VGA (PC Input): For connecting a computer. Connect a VGA cable from your computer to the VGA port on the TV.
- Antenna/Cable In: Connect an antenna or cable TV coaxial cable to this port for receiving broadcast channels.
1.5 Power Connection
After connecting all desired devices, plug the power cord into the TV's power input, then plug the other end into a standard electrical outlet.
2. Operating Instructions
2.1 Power On/Off
Press the POWER button on the remote control or on the television's control panel to turn the TV on or off.
2.2 Remote Control Functions
The remote control allows access to all TV functions. Familiarize yourself with the buttons for power, volume, channel, input selection, menu navigation, and smart features.
2.3 Input Selection
To switch between connected devices, press the INPUT or SOURCE button on the remote control. Use the arrow buttons to select the desired input (e.g., HDMI1, AV, VGA) and press ENTER.
2.4 Channel Scan (Antenna/Cable)
If using an antenna or cable connection, you will need to perform a channel scan:
- Press the MENU button on the remote.
- Navigate to the "Channel" or "Setup" menu.
- Select "Auto Scan" or "Channel Search" and confirm.
- The TV will scan for available digital (ATSC) and analog channels. This process may take several minutes.
2.5 Picture and Sound Settings
Access the TV's menu to adjust picture and sound settings:
- Picture Modes: Select from preset modes like Standard, Dynamic, Movie, or customize settings such as Brightness, Contrast, Color, and Sharpness.
- Sound Modes: Choose from modes like Standard, Music, Movie, or adjust Bass, Treble, and Balance.
2.6 Internet Browser
The television includes a basic internet browser. To access the browser, navigate through the main menu. Note that internet connectivity may require an external network adapter, as the TV does not feature built-in connectivity technology.
3. Maintenance and Care
3.1 Cleaning the Screen
To clean the screen, gently wipe it with a soft, lint-free cloth. For stubborn marks, lightly dampen the cloth with water or a specialized screen cleaner. Do not use harsh chemicals, abrasive cleaners, or spray liquids directly onto the screen.
3.2 Cleaning the Cabinet
Wipe the TV cabinet with a soft, dry cloth. Avoid using solvents or abrasive materials.
3.3 Storage
If storing the television for an extended period, disconnect it from power, remove batteries from the remote, and cover it to protect from dust. Store in a cool, dry place.
4. Troubleshooting
Before contacting customer support, refer to the following common issues and solutions:
| Problem | Possible Cause | Solution |
|---|---|---|
| No power | Power cord disconnected; outlet malfunction; TV in standby mode. | Ensure power cord is securely plugged in. Test outlet with another device. Press POWER button on remote or TV. |
| No picture, but sound is present | Incorrect input selected; external device off or disconnected; picture settings. | Press INPUT/SOURCE to select correct input. Check external device power and connections. Adjust picture settings. |
| No sound, but picture is present | Volume muted or too low; incorrect audio settings; external device audio issue. | Increase volume. Check MUTE status. Verify audio cables for external devices. Check TV audio settings. |
| Remote control not working | Batteries depleted or incorrectly inserted; obstruction; remote sensor blocked. | Replace batteries. Ensure correct polarity. Remove obstructions between remote and TV. Clean remote sensor on TV. |
| Cannot find channels (Antenna/Cable) | Antenna/cable not connected; channel scan not performed; poor signal. | Ensure antenna/cable is securely connected. Perform a channel scan (Section 2.4). Adjust antenna position or check cable signal strength. |
5. Specifications
The following are the technical specifications for the Hitachi LE19S304 19-inch LED LCD 720p HDTV:
| Model Name | LE19S304 |
| Screen Size | 19 Inches |
| Display Technology | LED-LCD |
| Resolution | 720p (1366x768) |
| Aspect Ratio | 16:9 |
| Color | Black |
| Item Weight | 8 Pounds |
| Mounting Type | Table Mount, VESA Compliant |
| Tuner Type | ATSC |
| Connectivity Technology | No (Requires external adapter for internet) |
| Hardware Interface | HDMI, Component, Composite-Video, VGA |
| Number of HDMI Inputs | (Not specified, typically 1-2 for this model type) |
| Number of Component Inputs | 1 |
| Number of Composite-Video Inputs | 1 |
| Number of VGA Inputs | 1 |
| Included Components | Stand, TV |
| Control Method | Remote |

Figure 3: Energy Guide label for the Hitachi LE19S304A television. This label provides estimated yearly energy cost and consumption information, based on standard usage.
6. Warranty Information
Hitachi provides a limited warranty for this product. The warranty typically covers defects in materials and workmanship under normal use for a specified period from the original date of purchase. Please refer to the warranty card included with your product or visit the official Hitachi website for detailed terms and conditions, including specific coverage, limitations, and procedures for making a claim.
Keep your purchase receipt as proof of purchase for warranty service.
7. Customer Support
If you encounter issues that cannot be resolved using the troubleshooting guide, or require further assistance, please contact Hitachi customer support.
- Online Support: Visit the official Hitachi website for FAQs, support documents, and contact forms.
- Telephone Support: Refer to your product documentation or the Hitachi website for regional customer service telephone numbers.
When contacting support, please have your television model number (LE19S304) and serial number ready.