1. Introduction
This manual provides comprehensive instructions for the setup, operation, and maintenance of your Jensen JCR-175 AM/FM Alarm Clock Radio. Please read this manual thoroughly before using the device to ensure proper function and to maximize your user experience. Keep this manual for future reference.
2. Safety Information
Observe the following safety precautions to prevent electric shock, fire, or damage to the unit.
- Do not expose this appliance to rain or moisture.
- Do not block any ventilation openings. Install in accordance with the manufacturer's instructions.
- Do not install near any heat sources such as radiators, heat registers, stoves, or other apparatus (including amplifiers) that produce heat.
- Protect the power cord from being walked on or pinched, particularly at plugs, convenience receptacles, and the point where they exit from the appliance.
- Only use attachments/accessories specified by the manufacturer.
- Unplug this appliance during lightning storms or when unused for long periods of time.
- Refer all servicing to qualified service personnel. Servicing is required when the appliance has been damaged in any way, such as power-supply cord or plug is damaged, liquid has been spilled or objects have fallen into the appliance, the appliance has been exposed to rain or moisture, does not operate normally, or has been dropped.
- Battery Safety: Do not mix old and new batteries. Do not mix alkaline, standard (carbon-zinc), or rechargeable (nickel-cadmium) batteries. Ensure batteries are inserted with correct polarity. Remove batteries if the unit is not used for an extended period.
3. Package Contents
Verify that all items are present upon opening the package:
- Jensen JCR-175 AM/FM Alarm Clock Radio
- Owner's Manual (this document)
4. Product Overview
The Jensen JCR-175 is an AM/FM alarm clock radio featuring a 0.9-inch green LED display. It allows you to wake to either the radio or a traditional alarm tone and includes snooze functionality.

Image 4.1: Front view of the Jensen JCR-175 with key features and controls labeled, including the 0.9-inch green LED display, AM/FM digital tuner, AUX-IN jack, and buttons for HR, MIN, Tuning+, Preset, Snooze, Volume+, Mode, and Radio/Power.
4.1 Controls and Display Elements
- 0.9-inch Green LED Display: Shows current time, alarm status, and radio frequency.
- HR Button: Adjusts the hour for clock and alarm settings.
- MIN Button: Adjusts the minute for clock and alarm settings.
- -TUNING+ / PRESET Buttons: Used to tune radio frequencies or navigate through preset stations.
- SNOOZE Button: Temporarily silences the alarm for a short period.
- -VOLUME+ Buttons: Adjusts the audio output level.
- MODE Button: Cycles through different operating modes (e.g., time display, alarm setting).
- RADIO / POWER Button: Turns the radio on/off and switches between AM/FM bands.
- AUX-IN Jack (on back): Connects external audio devices.

Image 4.2: A clear front-angle view of the Jensen JCR-175 AM/FM Alarm Clock Radio, showcasing its compact design and green LED display.
5. Setup
5.1 Power Connection
Connect the AC power cord to a standard AC 120V/60Hz wall outlet. The unit is now powered and the display will illuminate.
5.2 Battery Backup Installation
The JCR-175 features a battery backup system to maintain time and alarm settings during a power outage. This requires one 9V battery (not included).
- Locate the battery compartment cover on the bottom of the unit.
- Open the cover.
- Insert one 9V battery, observing the correct polarity (+ and -).
- Close the battery compartment cover securely.
Note: The battery backup only preserves settings; it does not power the display or alarm functions during a power outage.
6. Operating Instructions
6.1 Setting the Clock
- Ensure the unit is in time display mode (not radio or alarm setting mode).
- Press and hold the TIME SET button (if available, otherwise use a combination like MODE + HR/MIN, or refer to specific model instructions if TIME SET is not present). If no dedicated TIME SET, typically pressing and holding the HR or MIN button will initiate time setting.
- While holding the TIME SET button, press the HR button repeatedly to set the hour. Observe the PM indicator for afternoon hours.
- While holding the TIME SET button, press the MIN button repeatedly to set the minutes.
- Release the TIME SET button to confirm the time.
6.2 Radio Operation
- Press the RADIO / POWER button to turn on the radio.
- Press the RADIO / POWER button again to switch between AM and FM bands.
- Use the -TUNING+ buttons to manually tune to your desired station.
- To Set Presets:
- Tune to the desired station.
- Press and hold the PRESET button until the preset number flashes on the display.
- Use the -TUNING+ buttons to select the desired preset number (1-10 for AM, 1-10 for FM).
- Press the PRESET button again to save the station.
- To Recall Presets: Briefly press the PRESET button to cycle through saved stations.
- Adjust the volume using the -VOLUME+ buttons.
- Press the RADIO / POWER button to turn off the radio.
6.3 Setting Alarms
The JCR-175 supports two independent alarms (Alarm 1 and Alarm 2).
- Press the MODE button once for Alarm 1 setting, or twice for Alarm 2 setting. The alarm time will flash.
- Press the HR button to set the desired alarm hour.
- Press the MIN button to set the desired alarm minute.
- Press the MODE button again to select the wake source: ALARM TONE (bell icon) or RADIO (music note icon).
- Press the MODE button once more to confirm and exit alarm setting mode. The alarm indicator (bell or music note) will appear on the display.
6.4 Snooze Function
When the alarm sounds, press the large SNOOZE button. The alarm will temporarily stop and sound again after approximately 9 minutes.
6.5 Auxiliary Input
The JCR-175 features an AUX-IN jack on the back, allowing you to connect external audio devices such as MP3 players or smartphones.
- Connect one end of a 3.5mm audio cable (not included) to the AUX-IN jack on the back of the JCR-175.
- Connect the other end of the cable to the headphone jack or audio output of your external device.
- Press the MODE button until 'AUX' appears on the display (or the unit automatically switches to AUX mode).
- Start playback on your external device.
- Adjust the volume using the -VOLUME+ buttons on the JCR-175 and/or your external device.
7. Maintenance
7.1 Cleaning the Unit
To clean the exterior of the unit, use a soft, slightly damp cloth. Do not use abrasive cleaners, waxes, or solvents as these can damage the finish. Ensure the unit is unplugged before cleaning.
7.2 General Care
- Avoid placing the unit in direct sunlight or near heat sources.
- Keep the unit away from strong magnetic fields.
- Do not drop the unit or subject it to strong impacts.
- If the unit will not be used for an extended period, remove the backup battery.
8. Troubleshooting
If you encounter issues with your JCR-175, refer to the following common problems and solutions:
| Problem | Possible Cause | Solution |
|---|---|---|
| No power / Display off | Power cord not connected; Power outlet not active | Ensure AC power cord is securely plugged into a working outlet. |
| Radio reception is poor | Antenna not extended/positioned correctly; Interference | Extend and reposition the FM wire antenna. For AM, rotate the unit for best reception. Move away from other electronic devices. |
| Alarm does not sound | Alarm not set or not activated; Volume too low (for radio alarm) | Verify alarm time is set and the alarm indicator is visible on the display. Increase volume if waking to radio. |
| Time/settings lost after power outage | Backup battery not installed or depleted | Install a fresh 9V battery in the backup compartment. |
| No sound from AUX-IN | Cable not connected properly; Volume too low; Incorrect mode selected | Ensure audio cable is fully inserted. Increase volume on both the unit and the external device. Confirm AUX mode is selected. |
9. Specifications
The following are the technical specifications for the Jensen JCR-175 AM/FM Alarm Clock Radio:
- Brand: Jensen
- Model: JCR-175
- Color: Black
- Display Type: Digital, 0.9-inch Green LED
- Power Source: Corded Electric (AC 120V/60Hz)
- Battery Backup: 1 x 9V battery (not included)
- Product Dimensions: 6.4"W x 3"H (approximately)
- Item Weight: 14.4 ounces
- Special Features: Alarm, Snooze, AM/FM Radio, Auxiliary Input
- Material: Plastic
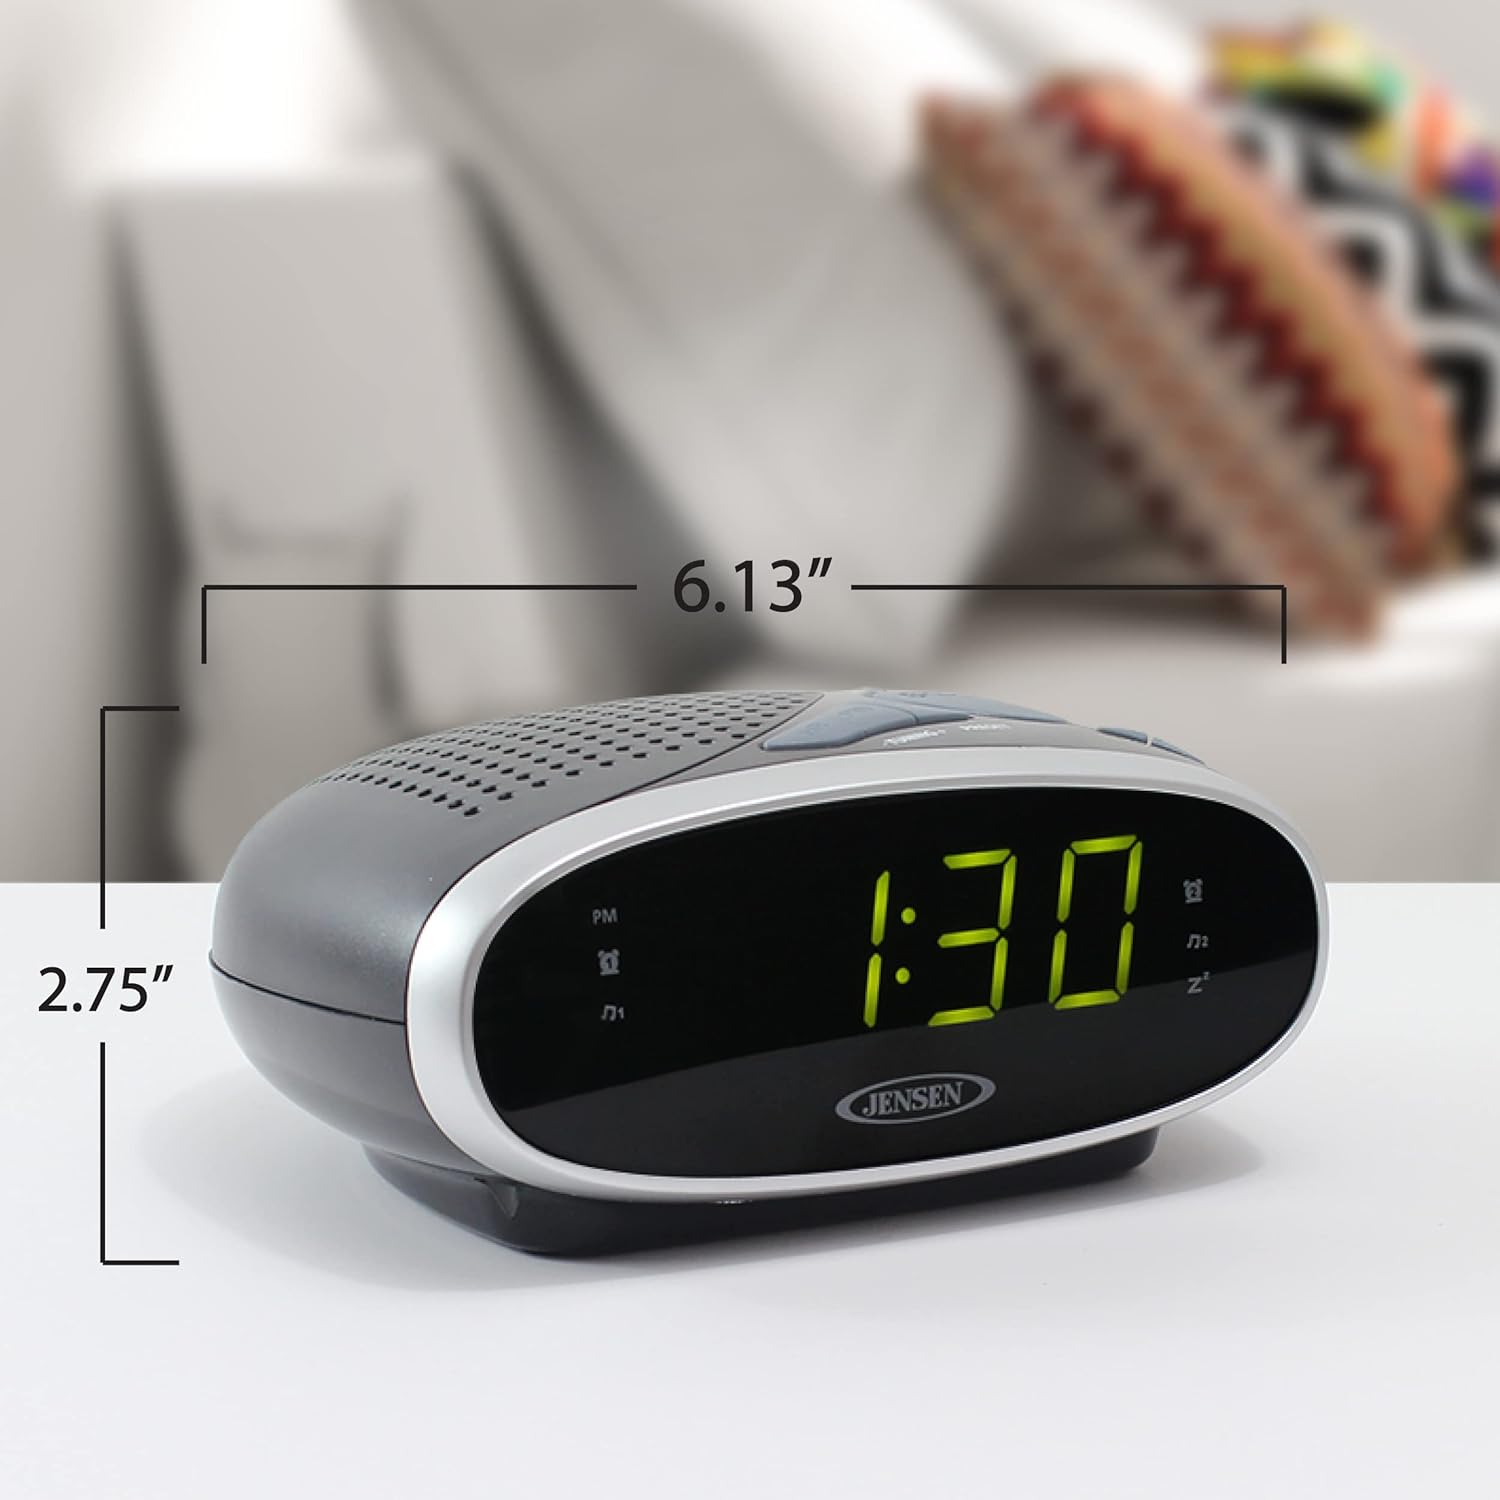
Image 9.1: The Jensen JCR-175 Alarm Clock Radio with its approximate dimensions indicated for reference.
10. Warranty and Support
For warranty information and customer support, please refer to the documentation included with your purchase or visit the official Jensen website. Keep your proof of purchase for any warranty claims.


