1. Introduction
The Cobra 441R Parasleeve Anchor is a pre-assembled, all-purpose medium-duty anchor designed for secure fastening in various materials. Its one-step installation process simplifies usage, and the anchor's design ensures that the anchor size matches the required hole size for efficient application. These anchors are corrosion-resistant, providing reliable performance in appropriate environments.
This manual provides essential information for the correct and safe installation and use of your Cobra 441R Parasleeve Anchors.
2. Safety Information
Always prioritize safety during installation. Failure to follow these safety guidelines may result in injury or damage.
- Wear appropriate personal protective equipment, including safety glasses and gloves, when drilling and installing anchors.
- Before drilling, verify the absence of electrical wires, plumbing, or other utilities behind the drilling surface. Use a stud finder or utility scanner if necessary.
- Ensure the drilling surface is stable and capable of supporting the intended load.
- Do not overload anchors beyond their specified weight capacity. Consult local building codes and engineering standards for critical applications.
- Keep children and bystanders away from the work area.
3. Package Contents
Your package contains Cobra 441R Parasleeve Anchors (quantity as purchased).
4. Tools Required
To install the Cobra 441R Parasleeve Anchors, you will need the following tools:
- Drill (corded or cordless)
- Drill Bit: 1/4 inch diameter (matching anchor size)
- Hammer
- Wrench or Socket (for tightening the nut)
- Measuring Tape or Ruler
- Marker or Pencil
- Safety Glasses and Gloves
5. Setup and Installation
Follow these steps for proper installation of the Cobra 441R Parasleeve Anchor:
- Mark the Drilling Location: Use a marker or pencil to precisely indicate where the anchor will be installed.
- Drill the Hole: Using a 1/4 inch drill bit, drill a hole to the appropriate depth. The hole depth should be at least the length of the anchor sleeve. Ensure the hole is straight and clean.
- Clean the Hole: Remove all dust and debris from the drilled hole. A brush or compressed air can be used for this purpose. A clean hole is crucial for proper anchor expansion and holding power.
- Insert the Anchor: Insert the Cobra 441R Parasleeve Anchor into the drilled hole. If necessary, gently tap the anchor with a hammer until the washer and nut are flush against the surface.
- Tighten the Nut: Using a wrench or socket, tighten the nut clockwise. As the nut is tightened, the anchor's sleeve will expand, creating a secure grip within the material. Tighten until firm, but do not overtighten, as this can damage the base material or the anchor.
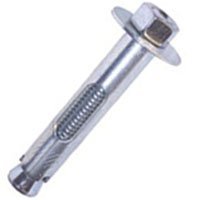
Image 1: A close-up view of the Cobra 441R Parasleeve Anchor. The image displays the metal bolt with a hexagonal nut and washer at one end, and the expanding sleeve mechanism at the other end, designed for secure fastening.
Once tightened, the anchor is ready to support the intended fixture.
6. Operating
The Cobra 441R Parasleeve Anchor functions as a permanent fastening point once correctly installed. Its operation is passive, providing a secure attachment for objects. Ensure that the load applied to the anchor does not exceed its rated capacity to maintain structural integrity and safety.
7. Maintenance
Cobra 441R Parasleeve Anchors require minimal maintenance after installation. However, periodic inspection is recommended, especially in environments prone to vibration, moisture, or extreme temperatures.
- Visual Inspection: Check for any signs of corrosion, rust, or physical damage to the anchor or the surrounding material.
- Tightness Check: Periodically check the tightness of the nut. If it has loosened, re-tighten it carefully with a wrench until firm. Do not overtighten.
- Load Assessment: Re-evaluate the load on the anchor if there are changes to the attached fixture or environmental conditions.
8. Troubleshooting
If you encounter issues during or after installation, consider the following:
- Anchor Spins in Hole: This usually indicates that the drilled hole is too large. The anchor cannot properly expand to grip the material. You may need to use a larger diameter anchor or fill the hole and re-drill in a new location.
- Anchor Will Not Tighten: Ensure the hole is clean and free of debris. Verify that the anchor is fully inserted and that the nut is not cross-threaded. If the anchor is bottoming out before expansion, the hole might not be deep enough.
- Anchor Feels Loose After Tightening: This could be due to improper tightening, a damaged anchor, or a weak base material. Re-check the tightening procedure and the integrity of the material.
If problems persist, consult a professional or contact Cobra customer support.
9. Specifications
| Model Number | 441R |
| Anchor Size | 1/4" X 1-3/8" |
| Manufacturer | COBRA ANCHORS |
| Part Number | 441R |
| Item Weight | 2.4 ounces (per unit, approximate) |
| Cutting Diameter | 1/4 Inches |
| Measurement System | inch |
| Usage | Metal (suitable for various base materials) |
| Assembled Diameter | 1/4 Inches |
10. Warranty Information
Specific warranty details for Cobra 441R Parasleeve Anchors are not provided in this manual. For information regarding product warranty, please refer to the official COBRA ANCHORS website or contact their customer service directly.
11. Customer Support
For technical assistance, product inquiries, or further support, please visit the official COBRA ANCHORS website or contact their customer service department. Contact information can typically be found on the manufacturer's packaging or website.
COBRA ANCHORS Official Website: Visit the COBRA Store on Amazon (This link directs to the brand's store on Amazon, which may contain further contact information or product details.)


