
1. Introduction
This manual provides essential instructions for the safe and efficient operation, installation, and maintenance of the Cole-Parmer Pfeiffer PK-D61-707 Magnetic Drive Rotary Vane Pump. This pump features a magnetic drive coupling to eliminate oil leaks, a dual-mode gas ballast for versatile vacuum adjustments, and a sealed head design for high pumping speeds. The safety valve seals the pump during power loss, ensuring system integrity. Please read this manual thoroughly before operating the pump.
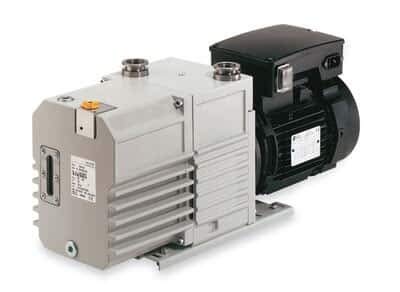
Figure 1: Pfeiffer PK-D61-707 Magnetic Drive Rotary Vane Pump. This image shows the compact design of the pump, highlighting its robust construction and connection points for vacuum lines and power.
2. Safety Information
Always observe the following safety precautions to prevent injury and damage to the equipment.
- Electrical Hazard: Ensure the pump is properly grounded. Disconnect power before performing any maintenance or service.
- Hot Surfaces: The pump motor and housing may become hot during operation. Avoid direct contact.
- Oil Handling: Use appropriate personal protective equipment (PPE) when handling pump oil. Dispose of used oil according to local regulations.
- Vacuum System Integrity: Ensure all connections are secure to prevent air leaks and maintain vacuum integrity.
- Ventilation: Operate the pump in a well-ventilated area to dissipate heat and any oil vapor.
- Emergency Shutdown: Familiarize yourself with the emergency shutdown procedure.
3. Setup
3.1 Unpacking
Carefully remove the pump from its packaging. Inspect for any signs of shipping damage. Retain packaging for future transport or storage.
3.2 Placement
Place the pump on a stable, level surface. Ensure adequate clearance around the pump for ventilation and access for maintenance. Avoid locations with excessive dust, moisture, or corrosive vapors.
3.3 Electrical Connection
Connect the pump to a grounded 115 VAC power supply. Verify that the voltage and frequency match the pump's specifications. Use only the provided power cord or an approved equivalent.
3.4 Vacuum Line Connection
Connect the vacuum system to the pump's inlet port. Ensure all connections are tight and leak-free. Use appropriate vacuum fittings and tubing for your application.
3.5 Oil Filling (Initial)
Before initial operation, ensure the pump is filled with the correct type and amount of vacuum pump oil. Refer to the oil level indicator. If necessary, add oil through the fill port until the level is within the recommended range.
4. Operating Instructions
4.1 Starting the Pump
- Ensure all vacuum connections are secure.
- Verify the oil level is correct.
- Turn on the main power switch for the pump. The pump will begin to evacuate the system.
- Monitor the vacuum gauge to confirm proper operation.
4.2 Gas Ballast Operation
The dual-mode gas ballast allows for the introduction of a small amount of atmospheric air into the pump to prevent condensation of condensable vapors. This is useful when pumping moist or solvent-laden gases.
- To activate the gas ballast, open the gas ballast valve.
- Adjust the valve to achieve the desired effect.
- Close the gas ballast valve when not needed to achieve the ultimate vacuum.
4.3 Stopping the Pump
- Close any valves isolating the vacuum system from the pump.
- Turn off the main power switch for the pump.
- Allow the pump to cool down before moving or performing maintenance.
5. Maintenance
Regular maintenance ensures optimal performance and extends the lifespan of your pump. Always disconnect power before performing maintenance.
5.1 Oil Change
Change the pump oil regularly, depending on usage and the type of gases being pumped. Dirty or discolored oil indicates a need for replacement.
- Ensure the pump is off and cool.
- Place a suitable container under the oil drain plug.
- Remove the oil drain plug and allow all oil to drain.
- Replace the drain plug.
- Refill with new, recommended vacuum pump oil through the fill port to the correct level.
- Dispose of used oil responsibly.
5.2 Filter Cleaning/Replacement
Check and clean or replace the inlet filter and exhaust filter (if present) as needed. Clogged filters can reduce pumping efficiency.
5.3 General Cleaning
Keep the exterior of the pump clean and free of dust and debris to ensure proper heat dissipation.
6. Troubleshooting
| Problem | Possible Cause | Solution |
|---|---|---|
| Pump does not start | No power supply; Faulty power cord; Motor issue | Check power connection and outlet; Replace power cord; Contact service technician |
| Poor vacuum performance | System leak; Dirty oil; Clogged filter; Gas ballast open | Check all connections for leaks; Change oil; Clean/replace filter; Close gas ballast valve |
| Excessive noise/vibration | Low oil level; Contaminated oil; Pump not level; Internal damage | Check/add oil; Change oil; Ensure pump is on a level surface; Contact service technician |
| Oil mist at exhaust | Overfilled oil; Exhaust filter saturated; Pumping condensable vapors | Check oil level and drain if overfilled; Replace exhaust filter; Use gas ballast if appropriate |
7. Specifications
| Parameter | Value |
|---|---|
| Model Number | AO-79500-20 |
| Manufacturer | Cole-Parmer |
| Pumping Speed | 3.5 CFM |
| Voltage | 115 VAC |
| Dimensions (L x W x H) | 73.66 x 48.26 x 33.02 cm (29 x 19 x 13 inches) |
| Weight | 29.03 kg (64 lbs) |
| Drive Type | Magnetic Coupling |
| Gas Ballast | Dual-mode |
8. Warranty and Support
This product is covered by a standard manufacturer's warranty against defects in materials and workmanship. For specific warranty terms and conditions, please refer to the documentation provided with your purchase or contact Cole-Parmer customer support.
For technical assistance, spare parts, or service inquiries, please contact Cole-Parmer customer service. Have your model number (AO-79500-20) and serial number ready when contacting support.
