
Packard Bell PX.T190W.006
Packard Bell Studio ST 500GB Multimedia Player and Recorder User Manual
Model: Studio ST 500GB (PX.T190W.006)
1. Introduction
This manual provides detailed instructions for the setup, operation, maintenance, and troubleshooting of your Packard Bell Studio ST 500GB Multimedia Player and Recorder. Please read this manual thoroughly before using the device to ensure proper functionality and to prevent damage.
The Packard Bell Studio ST 500GB is a versatile multimedia device designed to store and play various media files directly on your television or other display devices. It features a 500GB hard drive, HDMI and composite video outputs, USB 2.0 connectivity, and supports a wide range of audio, video, and image formats.
2. Important Safety Information
- Do not expose the device to rain or moisture.
- Do not open the casing. Refer all servicing to qualified personnel.
- Ensure proper ventilation around the device to prevent overheating.
- Use only the power adapter supplied with the device.
- Keep the device away from direct sunlight, heat sources, and strong magnetic fields.
- Clean the device with a soft, dry cloth. Do not use liquid cleaners.
3. Package Contents
Verify that all items are present in the package:
- Packard Bell Studio ST 500GB Multimedia Player
- Remote Control
- Power Adapter
- USB Cable
- HDMI Cable (may vary by region)
- User Manual (this document)
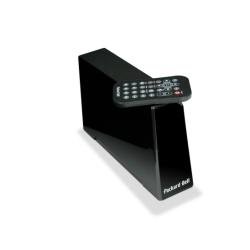
Image 1: Packard Bell Studio ST 500GB Multimedia Player and included accessories.
4. Setup
4.1 Connecting to Power
- Connect the power adapter to the DC IN port on the back of the Studio ST.
- Plug the power adapter into a wall outlet.
- The power indicator light on the front of the device will illuminate.
4.2 Connecting to a TV or Display
The Studio ST offers multiple video output options:
- HDMI Connection (Recommended): For the best video and audio quality, connect an HDMI cable from the HDMI OUT port on the Studio ST to an HDMI IN port on your TV.
- Composite Video Connection: For older TVs, connect a composite video cable (yellow, red, white) from the AV OUT ports on the Studio ST to the corresponding AV IN ports on your TV.
Image 2: Rear panel connections including HDMI and composite video ports.
4.3 Connecting to a Computer (Optional)
To transfer files to the internal 500GB hard drive:
- Ensure the Studio ST is powered off.
- Connect the USB cable from the USB 2.0 port on the Studio ST to a USB port on your computer.
- Power on the Studio ST. It will appear as an external hard drive on your computer.
- Transfer your media files to the appropriate folders on the Studio ST.
- Safely eject the device from your computer before disconnecting the USB cable.
5. Operating Instructions
5.1 Powering On/Off
Press the POWER button on the remote control or the device's front panel to turn the Studio ST on or off.
5.2 Remote Control Functions
The remote control allows full navigation and control of the device. Key functions include:
- Navigation Buttons: Up, Down, Left, Right, OK (Enter) for menu navigation.
- MENU: Access the main menu.
- RETURN/BACK: Go back to the previous screen.
- PLAY/PAUSE, STOP, FWD, REV: Media playback controls.
- VOLUME +/-: Adjust audio volume.
- SUBTITLE: Select subtitle tracks (if available).
- AUDIO: Select audio tracks (if available).
Image 3: Layout of the remote control for the Studio ST.
5.3 Media Playback
- Navigate to the desired media category (Video, Music, Photo) from the main menu.
- Browse through the folders and select the file you wish to play.
- Press OK to start playback.
- Use the playback control buttons on the remote for functions like play, pause, stop, fast forward, and rewind.
Supported Formats:
- Video: AVI, VOB, XVID
- Image: BMP, GIF, JPG, PNG, TIF
- Subtitle: SMI, SRT, SUB
- Audio: (Common audio formats supported for video playback)
6. Maintenance
6.1 Cleaning the Device
To clean the exterior of the Studio ST:
- Ensure the device is powered off and unplugged from the power outlet.
- Use a soft, dry, lint-free cloth to wipe the surfaces.
- Do not use liquid cleaners, aerosols, or abrasive cleaning agents, as these can damage the casing or internal components.
6.2 Hard Drive Management
The internal 500GB hard drive requires no special maintenance under normal use. However, it is recommended to:
- Regularly back up important data to another storage device to prevent data loss.
- Avoid sudden power interruptions during file transfers or playback, which could corrupt data.
7. Troubleshooting
| Problem | Possible Cause | Solution |
|---|---|---|
| No power | Power cable not connected; Power outlet not working. | Check power cable connection; Try a different power outlet. |
| No video output | Incorrect video cable connection; TV input not selected correctly. | Ensure HDMI or AV cables are securely connected; Select the correct HDMI/AV input on your TV. |
| No audio output | Volume too low; Audio cable not connected; TV muted. | Increase volume on Studio ST and TV; Check audio cable connections; Unmute TV. |
| Remote control not working | Batteries depleted; Obstruction between remote and device. | Replace remote control batteries; Ensure clear line of sight to the device's IR receiver. |
| Cannot play certain media files | File format not supported; Corrupt file. | Refer to the "Supported Formats" section; Try playing a different file; Re-encode the file if necessary. |
8. Specifications
| Model Name | Studio ST 500GB |
| Model Number | PX.T190W.006 |
| Brand | Packard Bell (Manufactured by Acer) |
| Storage Capacity | 500 GB (3.5" SATAII Hard Drive) |
| Buffer Size | 8 MB |
| Connectivity Technology | Wired (USB, SATA) |
| USB Ports | 1 x USB 2.0 |
| HDMI Ports | 2 x HDMI |
| Video Output | HDMI, Composite Video (1) |
| Audio Output | S/PDIF, Composite Audio (2) |
| Supported Video Formats | AVI, VOB, XVID |
| Supported Image Formats | BMP, GIF, JPG, PNG, TIF |
| Supported Subtitle Formats | SMI, SRT, SUB |
| Compatible Operating Systems | Windows XP, Vista, Windows 7, Mac 9X - 10X |
| Power Requirements | 100-240V, 50-60Hz, 0.65A |
| Dimensions (H x W x D) | 216 mm x 98 mm x 294 mm |
| Weight | 1.33 kg |
| Color | Black |
9. Warranty Information
Packard Bell products are covered by a limited warranty. Please refer to the warranty card included in your product package or visit the official Packard Bell (Acer) website for detailed warranty terms and conditions specific to your region. Keep your proof of purchase for warranty claims.
The warranty typically covers manufacturing defects for a specified period from the date of purchase. It does not cover damage caused by misuse, accidents, unauthorized modifications, or normal wear and tear.
10. Customer Support
For technical assistance, product inquiries, or service requests, please contact Packard Bell (Acer) customer support:
- Online Support: Visit the official Acer support website for FAQs, drivers, and contact information. www.acer.com/support
- Telephone Support: Refer to your product documentation or the Acer support website for local telephone numbers.
When contacting support, please have your product model number (PX.T190W.006) and serial number ready.
Ask a question about this manual
Ask about setup, troubleshooting, compatibility, parts, safety, or missing instructions. Manuals+ will review the question and use this page’s manual context to help answer it.