1. Introduction and Overview
The Garmin GPSMAP 62S is a robust handheld navigator designed for outdoor enthusiasts. It integrates advanced features to provide reliable navigation and tracking capabilities in diverse environments. Key features include a 3-axis tilt-compensated electronic compass, a barometric altimeter, support for Custom Maps and BirdsEye Satellite imagery, and photo navigation. Its rugged, waterproof design and quad helix antenna ensure unparalleled reception and durability, while a high-speed USB connection and wireless capabilities enhance data transfer and connectivity with other compatible Garmin devices.
2. Setup
2.1 Battery Installation
The GPSMAP 62S operates on two AA batteries. To install, locate the battery compartment on the back of the device. Open the cover, insert the batteries according to the polarity indicators (+ and -), and securely close the compartment cover to maintain its waterproof seal.
2.2 Powering On/Off
To power on the device, press and hold the POWER button located on the side until the screen illuminates. To power off, press and hold the POWER button again until the power-off prompt appears, then select 'Power Off'.
2.3 Initial Configuration
Upon first use or after a factory reset, the device will guide you through an initial setup process. This typically includes selecting your preferred language, time zone, and measurement units. Follow the on-screen prompts to complete these settings.
3. Operating the Device
3.1 Navigation Basics
The GPSMAP 62S utilizes both GPS and GLONASS satellite systems for enhanced accuracy and faster satellite acquisition. The integrated 3-axis tilt-compensated electronic compass provides accurate heading information even when the device is not held level. The barometric altimeter offers precise elevation data, useful for tracking ascent and descent during hikes.

Image 1: Map view on the GPSMAP 62S, showing geographical features and current position.
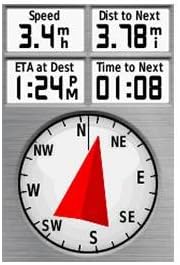
Image 2: Compass and data screen, providing real-time navigation metrics.
3.2 Mapping
The device comes with a built-in worldwide basemap with shaded relief. It features 1.7GB of internal memory and a microSD card slot, allowing you to load a wide array of detailed maps, including topographic, marine (BlueChart g2), and road maps (City Navigator NT). You can also utilize Custom Maps and BirdsEye Satellite Imagery (subscription required) for enhanced visual navigation. Photo navigation allows you to navigate to geotagged photos downloaded from Garmin Connect.
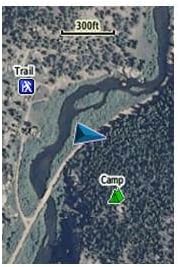
Image 3: Satellite imagery map on the GPSMAP 62S, showing a trail and a marked camp location.
3.3 Waypoints, Tracks, and Routes
The GPSMAP 62S allows you to mark waypoints, record tracks, and create routes. These can be shared wirelessly with other compatible Garmin handheld devices, facilitating group adventures. The device supports paperless geocaching, enabling you to download geocache information directly to your navigator.
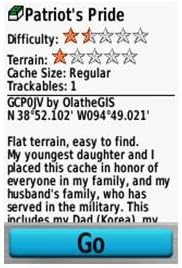
Image 4: Geocaching details screen, showing information about a specific geocache.
3.4 User Interface
The device features a button-operated interface. Use the directional pad and dedicated buttons (IN, OUT, FIND, MARK, PAGE, MENU, QUIT, ENTER) to navigate through menus, zoom maps, mark locations, and access various functions.
3.5 Official Product Video
Video 1: A product display video showcasing the Handheld GPS Satellite Receiver. This video provides a visual overview of the device's physical appearance and some interface elements.
4. Maintenance
4.1 Cleaning
To clean the device, wipe it with a cloth dampened with a mild detergent solution. Avoid using abrasive cleaners or solvents that could damage the device's casing or screen.
4.2 Storage
Store the GPSMAP 62S in a cool, dry place away from direct sunlight and extreme temperatures. If storing for an extended period, remove the AA batteries to prevent leakage and potential damage to the device.
4.3 Water Resistance
The device is designed to be rugged and waterproof. However, ensure all port covers and the battery compartment are securely closed to maintain its water resistance rating. Avoid submerging the device beyond its specified depth and duration.
5. Troubleshooting
If you encounter issues with your GPSMAP 62S, consider the following basic troubleshooting steps:
- No Power: Check if the batteries are correctly installed and fully charged. Replace with fresh batteries if necessary.
- Poor Satellite Reception: Ensure you have a clear view of the sky. Move away from tall buildings, dense tree cover, or deep canyons that might obstruct satellite signals.
- Device Freezes: Try performing a soft reset by removing and reinserting the batteries. If the issue persists, consult the full online owner's manual for advanced reset procedures.
- Map Display Issues: Verify that the correct map regions are loaded and enabled. Check the microSD card for proper insertion and corruption.
For more detailed troubleshooting guides and solutions, please refer to the comprehensive owner's manual available on the official Garmin support website.
6. Specifications
| Feature | Detail |
|---|---|
| Product Dimensions | 6.3 x 2.4 x 1.42 inches |
| Item Weight | 7.4 ounces |
| Item Model Number | 010-00868-01 |
| Batteries | 2 AA batteries required |
| Operating System | Windows (for software compatibility) |
| RAM | 1724 MB (Internal Memory) |
| Connectivity Technologies | USB |
| Special Features | Barometric Altimeter, Custom POIs, Garmin Connect Compatible, Geocaching, Hunt-Fish Calendar, Photo Navigation |
| Human Interface Input | Buttons |
| Screen Resolution | 160 x 240 pixels |
| Color | Black |
| Manufacturer | Garmin |
| Battery Life | Up to 20 Hours |
| Map Type | Street; Topographical |
| Screen Size | 2.6 Inches |
7. Warranty and Support
The Garmin GPSMAP 62S is covered by Garmin's standard limited warranty. For specific warranty terms and conditions, please refer to the warranty information included with your product packaging or visit the official Garmin website. For technical support, product registration, or service inquiries, please contact Garmin Customer Support through their website or designated support channels.


