Introduction
This manual provides comprehensive instructions for the installation, operation, maintenance, and troubleshooting of your Phylrich Revere & Savannah Lavatory Faucet, Model D102_015. Please read this manual thoroughly before beginning installation or use to ensure proper function and longevity of your product.
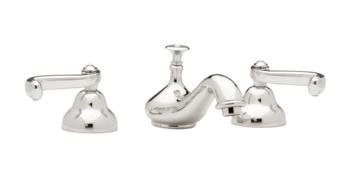
Image: Phylrich Revere & Savannah Lavatory Faucet (Model D102_015) featuring a polished finish, low spout, and lever handles. The image displays the complete widespread faucet assembly including the central spout and two side handles.
Specifications
| Feature | Detail |
|---|---|
| Brand | Phylrich |
| Model | D102_015 |
| Finish Type | Polished |
| Included Components | Drain |
| Handle Type | Lever |
| Installation Type | Widespread |
| Maximum Flow Rate | 1.5 Gallons Per Minute |
| Spout Height | 12 Inches |
| UPC | 883908753380 |
Setup and Installation
Before beginning installation, ensure you have all necessary tools and components. It is recommended to consult a professional plumber if you are unsure about any steps.
Tools Required:
- Adjustable wrench
- Plumber's putty or silicone sealant
- Phillips head screwdriver
- Basin wrench (optional, for tight spaces)
- Safety glasses
Installation Steps:
- Turn off Water Supply: Locate the main water shut-off valve for your home or the shut-off valves under the sink. Turn them off completely.
- Remove Old Faucet (if applicable): Disconnect the water supply lines from the old faucet. Unscrew the mounting nuts and remove the old faucet and drain assembly. Clean the sink surface thoroughly.
- Install New Faucet Body: Apply a thin bead of plumber's putty or silicone sealant around the base of the new faucet spout and handles. Insert the faucet body and handles into the corresponding holes on the sink or countertop.
- Secure Faucet: From underneath the sink, thread the mounting nuts onto the faucet shanks and hand-tighten. Use an adjustable wrench to tighten securely, but do not overtighten.
- Connect Water Supply Lines: Attach the hot and cold water supply lines to the corresponding inlets on the faucet shanks. Ensure connections are tight to prevent leaks.
- Install Drain Assembly: Follow the instructions provided with the included drain. Typically, this involves applying sealant to the drain flange, inserting it into the sink drain hole, and securing it from underneath with a washer and nut. Connect the drain tailpiece to your P-trap.
- Test for Leaks: Slowly turn on the main water supply. Check all connections for leaks. If leaks are present, tighten the connections as needed.
- Flush Faucet: Remove the aerator from the spout. Turn on both hot and cold water for a few minutes to flush out any debris from the lines. Turn off the water, reattach the aerator.
Operating Instructions
Your Phylrich Lavatory Faucet is designed for ease of use and reliable performance.
Water Flow and Temperature Control:
- Cold Water: Turn the right lever handle counter-clockwise to open the cold water supply.
- Hot Water: Turn the left lever handle counter-clockwise to open the hot water supply.
- Mixing Water: Adjust both lever handles to achieve your desired water temperature and flow rate.
- Shutting Off: Turn the lever handles clockwise until the water flow stops completely.
Drain Operation:
The included drain assembly typically operates via a lift rod located at the back of the faucet. Pull the rod up to close the drain stopper and push it down to open the drain.
Maintenance and Care
Proper care and maintenance will ensure the lasting beauty and performance of your Phylrich faucet.
Cleaning:
- Clean the faucet regularly with a soft, damp cloth and mild soap.
- Do NOT use abrasive cleaners, harsh chemicals, or polishes containing alcohol, ammonia, or bleach, as these can damage the polished finish.
- Rinse thoroughly after cleaning and dry with a soft cloth to prevent water spots.
Aerator Maintenance:
- If water flow becomes restricted or uneven, the aerator may be clogged.
- Unscrew the aerator from the end of the spout.
- Rinse any debris from the screen. For stubborn mineral deposits, soak the aerator in a 50/50 solution of white vinegar and water.
- Reattach the aerator securely.
Troubleshooting
Refer to the following table for common issues and their solutions.
| Problem | Possible Cause | Solution |
|---|---|---|
| Low Water Flow | Clogged aerator; partially closed shut-off valve; debris in supply line. | Clean aerator (see Maintenance); ensure shut-off valves are fully open; flush supply lines. |
| Leaking at Faucet Base | Loose mounting nuts; insufficient sealant during installation. | Tighten mounting nuts; if problem persists, reapply plumber's putty/sealant. |
| Dripping from Spout | Worn out cartridge; debris in cartridge. | Contact Phylrich customer support for replacement cartridge or professional assistance. |
| Water Temperature Issues | Incorrect hot/cold supply line connection; water heater issues. | Verify supply line connections; check water heater settings. |
If you encounter issues not listed here or if the suggested solutions do not resolve the problem, please contact Phylrich customer support.
Warranty Information
Phylrich products are manufactured to the highest quality standards and are backed by a limited warranty. For specific warranty terms and conditions applicable to your D102_015 faucet, please refer to the warranty card included with your product or visit the official Phylrich website. Keep your proof of purchase for warranty claims.
Customer Support
For technical assistance, replacement parts, or warranty inquiries, please contact Phylrich customer support:
- Website: www.phylrich.com (Please check the official website for the most current contact information.)
- Phone: Refer to the Phylrich website or product packaging for regional contact numbers.
When contacting support, please have your model number (D102_015) and proof of purchase readily available.


