1. Introduction
The DigiTech JamMan Stereo Looper Delay Pedal (Model JML2) is an advanced looping and phrase sampling device designed for musicians. It allows users to record, play back, and overdub multiple layers of audio in stereo, offering extensive memory capacity and versatile connectivity options. This manual provides detailed instructions for setting up, operating, and maintaining your JamMan Stereo Looper.
2. Key Features
- Stereo Looping: Record and play back audio in true stereo.
- Extensive Memory: Store over 35 minutes of CD-quality loops in 99 internal memories.
- SD Card Expansion: Utilize an optional SDHC memory card for over 16 hours of additional storage across 99 more slots.
- USB Connectivity: Connect to a computer for loop organization and archiving using the JamManager software.
- Reverse Playback: Play loops in reverse for creative effects.
- Microphone Input: Balanced XLR mic input with dedicated gain control for dynamic and self-powered microphones.
- Auxiliary Input: Import music from external devices like CD or MP3 players.
- Metronome: Built-in metronome with multiple rhythm sounds and time signatures.
- Footswitches: Four heavy-duty footswitches for intuitive looping control and loop selection.
- Stop Modes: Three distinct stop modes: Stop, Finish, and Fade.
- Rhythm Output: Dedicated output for sending a click track to keep other musicians in sync.
- Rugged Construction: Durable metal chassis designed for reliability.
3. Setup
Before operating your JamMan Stereo Looper, ensure all connections are made correctly. Refer to the rear panel diagram for input and output locations.
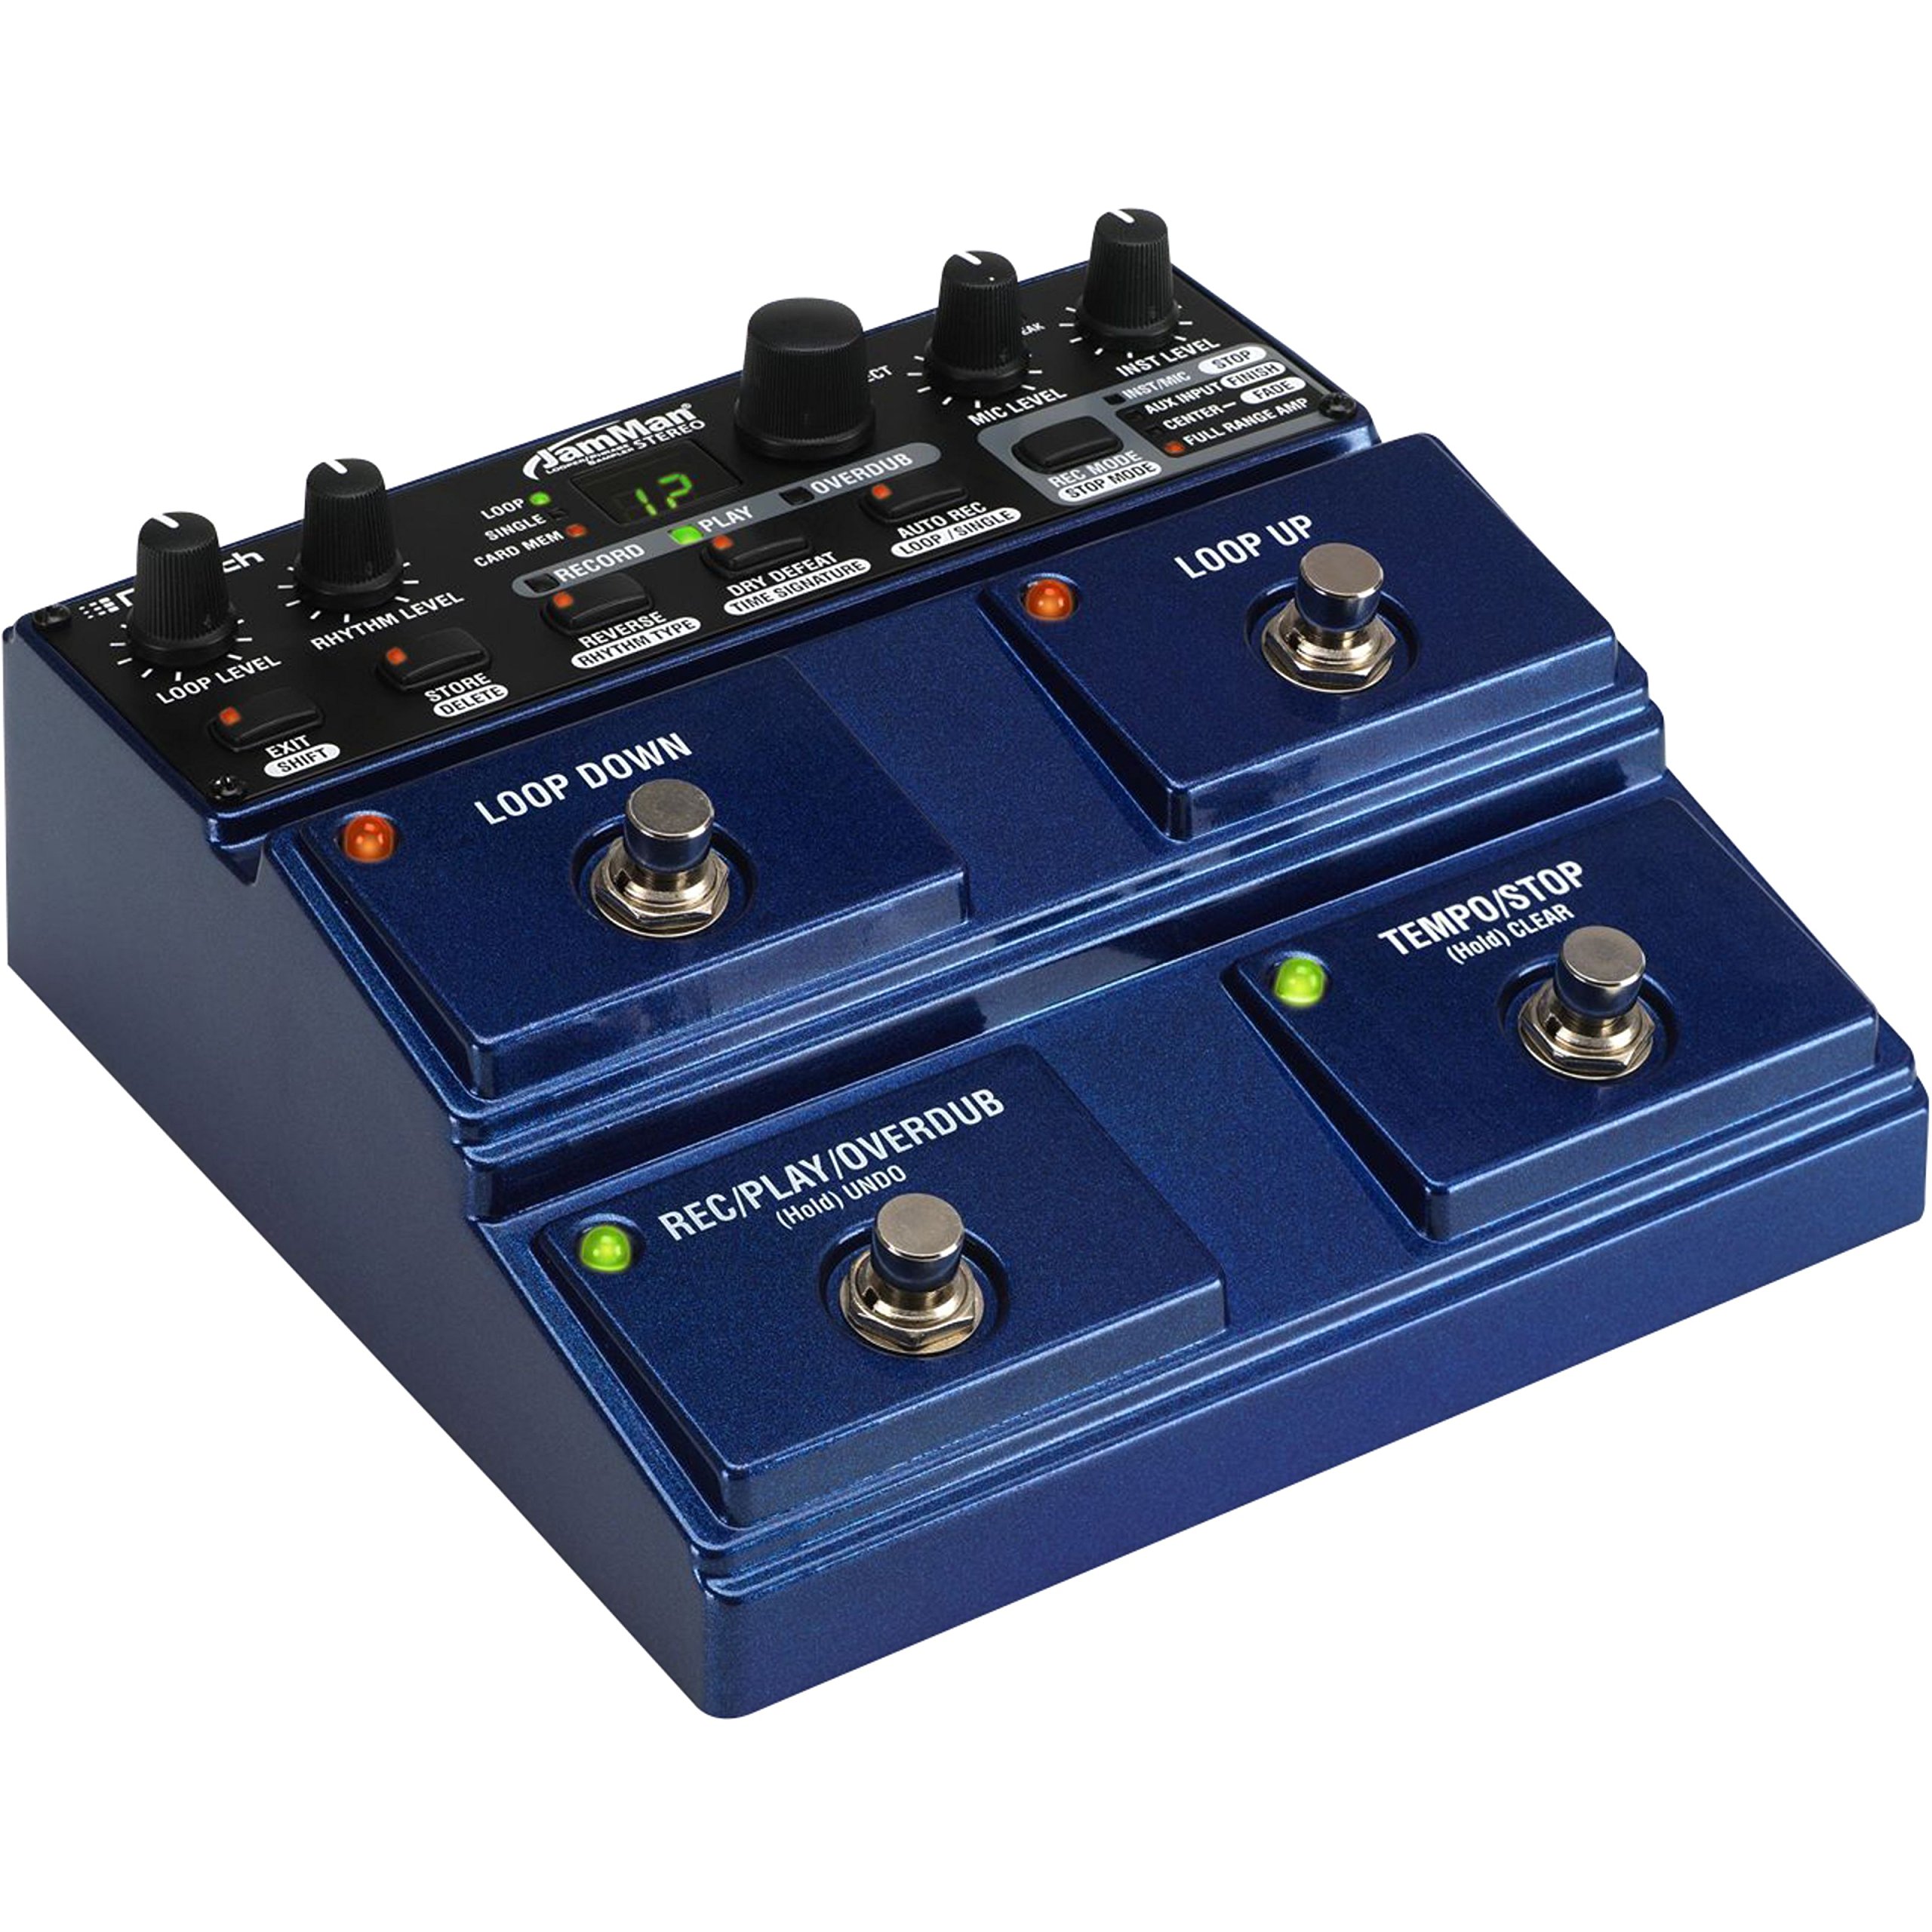
Figure 3.1: Rear Panel Connections. This image displays the rear panel of the JamMan Stereo Looper, highlighting the MIC INPUT (XLR), LEFT (Mono) OUT, RIGHT OUT, RHYTHM OUT, HEADPHONE jack, LEFT (Mono) IN, RIGHT IN, AUX INPUT, FOOTSWITCH input, MEMORY CARD slot, USB port, and 9VAC power input.
3.1 Power Connection
Connect the included 9VAC, 1300mA power supply to the 9VAC input jack on the rear panel. Plug the power supply into a suitable AC outlet.
3.2 Audio Connections
- Instrument Input: Connect your instrument (e.g., guitar, keyboard) to the LEFT (Mono) IN jack. For stereo instruments, connect the second output to the RIGHT IN jack.
- Microphone Input: For microphone use, connect an XLR cable from your microphone to the MIC INPUT. Adjust the MIC LEVEL knob on the top panel.
- Auxiliary Input: To import audio from an external device (e.g., MP3 player), connect it to the AUX INPUT jack.
- Audio Output: Connect the LEFT (Mono) OUT to your amplifier or mixer. For stereo output, also connect the RIGHT OUT.
- Headphones: For monitoring, connect headphones to the dedicated headphone jack.
- Rhythm Output: If using an external device for rhythm synchronization, connect it to the RHYTHM OUT.
3.3 Memory Card Installation
The JamMan Stereo Looper supports SDHC memory cards for expanded storage. Insert an SDHC card into the MEMORY CARD slot on the rear panel until it clicks into place. To eject, push the card in again.
3.4 USB Connection
Connect the JamMan Stereo Looper to your computer using a USB cable for use with the JamManager software. This allows for loop management and archiving.
4. Operating Instructions
The JamMan Stereo Looper features intuitive controls for recording, playback, and loop management. Familiarize yourself with the top panel controls and footswitches.

Figure 4.1: Top Panel Controls. This image shows the top control panel of the JamMan Stereo Looper, including knobs for LOOP LEVEL, RHYTHM LEVEL, MIC LEVEL, INST LEVEL, and SELECT. It also displays the RECORD, PLAY, OVERDUB buttons, the LOOP/SINGLE/CARD MEM display, and various function buttons like STORE/DELETE, REVERSE/RHYTHM TYPE, DRY DEFEAT/TIME SIGNATURE, AUTO REC/LOOP/SINGLE, REC MODE/STOP MODE, and the four large footswitches: LOOP DOWN, LOOP UP, REC/PLAY/OVERDUB (Hold UNDO), and TEMPO/STOP (Hold CLEAR).
4.1 Basic Looping Functions
- Recording a Loop:
- Press the REC/PLAY/OVERDUB footswitch once to start recording. The RECORD LED will illuminate.
- Play your desired phrase.
- Press the REC/PLAY/OVERDUB footswitch again to stop recording and immediately begin playback. The PLAY LED will illuminate.
- Overdubbing:
- While a loop is playing, press the REC/PLAY/OVERDUB footswitch once to enter overdub mode. The OVERDUB LED will illuminate.
- Play additional layers over your existing loop.
- Press the REC/PLAY/OVERDUB footswitch again to exit overdub mode and continue playback.
- Stopping Playback:
- Press the TEMPO/STOP footswitch once to stop the current loop.
- The stop mode can be configured using the REC MODE/STOP MODE button (Stop, Finish, Fade).
- Undo/Redo:
- To undo the last overdub, hold the REC/PLAY/OVERDUB footswitch for approximately 2 seconds.
- To redo the undone overdub, hold the REC/PLAY/OVERDUB footswitch again for 2 seconds.
- Clearing a Loop:
- To clear the current loop, hold the TEMPO/STOP footswitch for approximately 2 seconds.
4.2 Loop Selection and Storage
- Navigating Loops: Use the LOOP UP and LOOP DOWN footswitches to select different loop memories. The display will show the current loop number.
- Saving Loops: After creating a loop, press the STORE/DELETE button. Use the SELECT knob to choose a memory location, then press STORE/DELETE again to confirm.
- Deleting Loops: To delete a loop, select the desired loop, then hold the STORE/DELETE button for approximately 2 seconds. Confirm deletion if prompted.
- Card Memory: To access loops stored on an SDHC card, ensure the card is inserted and select "CARD MEM" using the appropriate button or menu option.
4.3 Advanced Functions
- Reverse Playback: Press the REVERSE/RHYTHM TYPE button to toggle reverse playback for the current loop.
- Metronome/Rhythm: Press the REVERSE/RHYTHM TYPE button (when not in reverse mode) to cycle through rhythm types. Adjust rhythm level with the RHYTHM LEVEL knob.
- Tempo Control: Tap the TEMPO/STOP footswitch multiple times to set the tempo for the metronome or for tempo-synced effects.
- JamManager Software: For advanced loop management, connect the JamMan Stereo Looper to your computer via USB and use the DigiTech JamManager software. This software allows you to organize, archive, and transfer loops between the pedal and your computer.
5. Maintenance
Proper maintenance ensures the longevity and optimal performance of your DigiTech JamMan Stereo Looper.
- Cleaning: Use a soft, dry cloth to clean the exterior of the unit. Avoid abrasive cleaners or solvents.
- Storage: When not in use, store the pedal in a cool, dry place away from direct sunlight and extreme temperatures.
- Power Supply: Always use the original DigiTech power supply or a compatible replacement with the correct voltage and current ratings (9VAC, 1300mA).
- Footswitches: The heavy-duty footswitches are designed for durability, but avoid excessive force.
- Firmware Updates: Check the DigiTech website periodically for any available firmware updates for your JamMan Stereo Looper.
6. Troubleshooting
If you encounter issues with your JamMan Stereo Looper, refer to the following common solutions:
| Problem | Possible Cause | Solution |
|---|---|---|
| No sound output. | Incorrect cable connections, low volume levels, incorrect input/output selection. |
|
| Poor sound quality or noise. | Improper gain staging, faulty cables, interference, low-quality power supply. |
|
| Loops not saving or loading. | Memory full, faulty SD card, incorrect save procedure. |
|
| JamManager software not recognizing the device. | USB cable issue, driver problem, software version. |
|
7. Specifications
| Feature | Detail |
|---|---|
| Model Number | JML2 |
| Item Weight | 2.22 pounds (1.01 kg) |
| Product Dimensions | 6.84 x 6.7 x 2.89 inches (17.37 x 17.02 x 7.34 cm) |
| Internal Memory | 35 minutes of CD-quality audio, 99 loops |
| External Memory | SDHC card slot (up to 16+ hours, 99 additional loops) |
| Power Source | Corded Electric, 9VAC, 1300mA |
| Hardware Interface | USB |
| Signal Format | Analog |
| Color | Blue |
8. Warranty and Support
For warranty information and technical support, please refer to the official DigiTech website or contact their customer service directly. Keep your proof of purchase for warranty claims.
DigiTech Official Website: digitech.com


