
1. Introduction
This manual provides essential information for the safe assembly, operation, maintenance, and troubleshooting of your SKIL 3410-02 10-Inch Table Saw with Folding Stand. Please read and understand all instructions and safety warnings before operating this tool. Retain this manual for future reference.
2. Safety Information
Always prioritize safety when operating power tools. Failure to follow safety instructions can result in serious injury or property damage.
- Read the Entire Manual: Understand all operating procedures and safety warnings before use.
- Wear Personal Protective Equipment (PPE): Always wear safety glasses, hearing protection, and a dust mask. Avoid loose clothing, jewelry, and long hair that can get caught in moving parts.
- Disconnect Power: Always disconnect the saw from the power source before making any adjustments, changing accessories, or performing maintenance.
- Maintain a Clean Work Area: Keep the work area well-lit and free of clutter. Ensure adequate space around the saw.
- Use Proper Support: Ensure the workpiece is properly supported before and during cutting operations.
- Never Reach Over the Blade: Keep hands clear of the blade at all times. Use a push stick or push block when necessary.
- Secure the Workpiece: Always use the rip fence or miter gauge to guide the workpiece. Never freehand cuts.
- Inspect Before Use: Check for damaged parts, loose components, or any other condition that may affect safe operation.
3. Product Overview
The SKIL 3410-02 is a 10-inch table saw designed for various woodworking tasks. It features a heavy-duty folding stand for portability and a cast aluminum table that extends for larger workpieces.


Key Features:
- 10-inch blade for versatile cutting.
- Heavy-duty steel folding stand for portability and stability.
- Extendable cast aluminum table (20-inch x 26-inch to 20-inch x 32-inch) for longer workpieces.
- 3-1/2-inch cut height capacity for 4x materials.
- Self-aligning rip fence for accurate measurements.
- EZ view measurement system for precise settings.
- Miter gauge for guiding workpieces during cross cuts.
- On-tool storage for accessories and guarding system.
4. Setup
4.1 Assembling the Folding Stand
The heavy-duty steel stand is designed for quick setup and easy transport. Follow the instructions provided in the stand's separate manual for proper assembly and attachment to the table saw unit.
4.2 Installing the Blade
Ensure the saw is unplugged before installing or changing the blade. Use the provided wrenches to loosen the arbor nut, install the 10-inch blade with teeth pointing towards the front of the saw, and securely tighten the arbor nut.
4.3 Installing the Riving Knife and Blade Guard
The riving knife and blade guard are crucial safety components. Install them according to the diagrams in your manual, ensuring they move freely and are properly aligned with the blade.
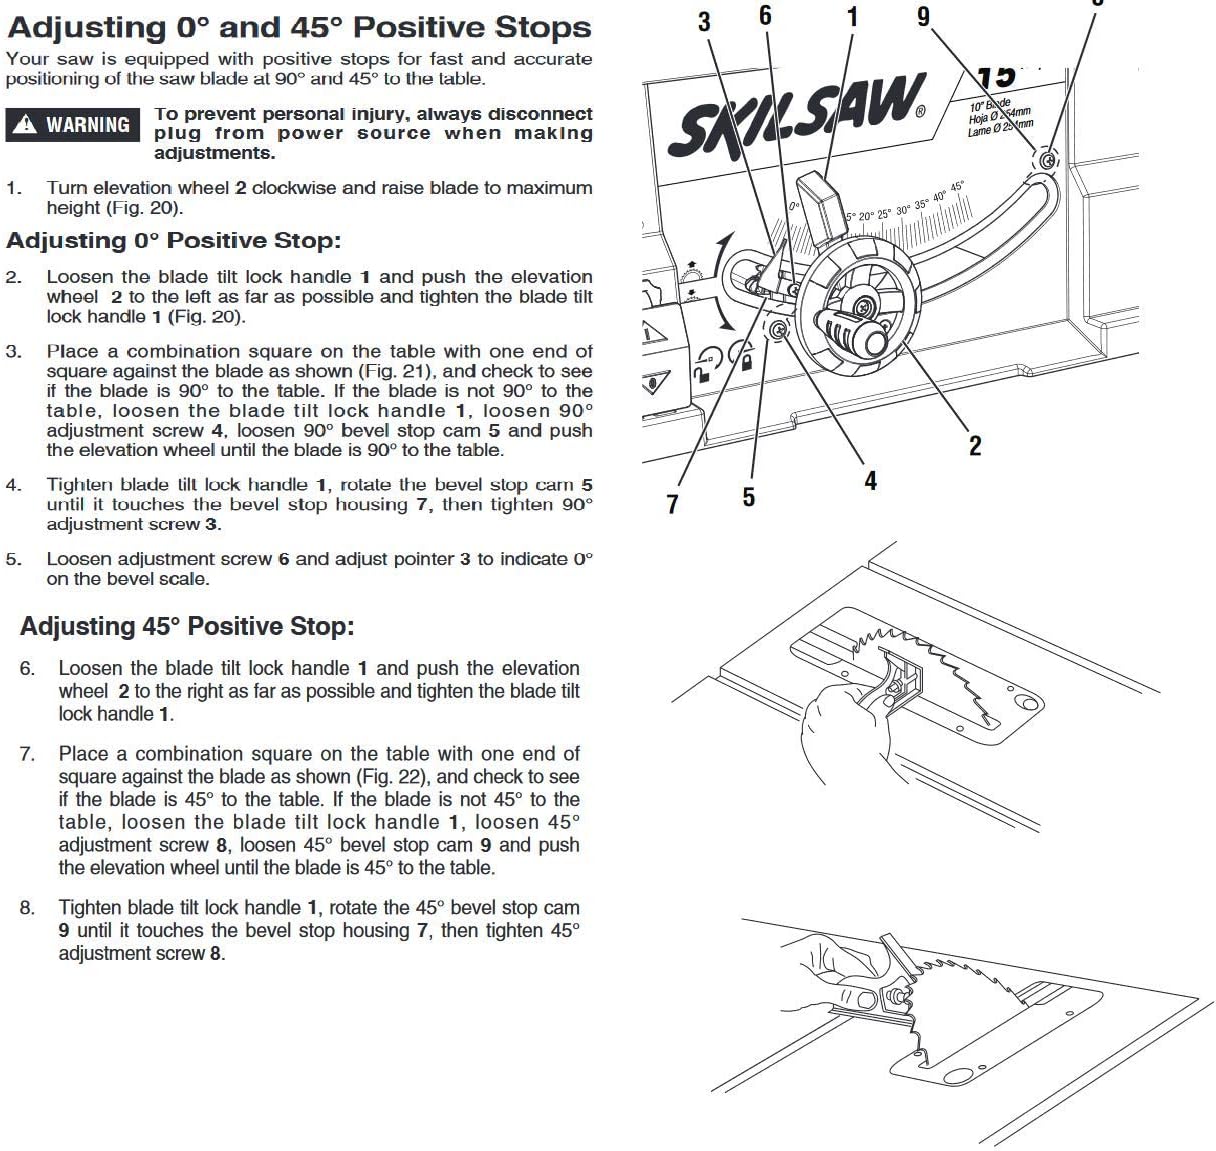
4.4 Adjusting 0° and 45° Positive Stops
Accurate 0° and 45° positive stops are essential for precise cuts. Follow these steps to adjust them:
- Adjusting 0° Positive Stop:
- Turn the elevation wheel clockwise to raise the blade to its maximum height.
- Loosen the blade tilt lock handle and push the elevation wheel to the left as far as possible. Tighten the blade tilt lock handle.
- Place a combination square on the table against the blade. If the blade is not 90° to the table, loosen the blade tilt lock handle, loosen adjustment screw, loosen 45° bevel stop cam, and push the elevation wheel until the blade is 90° to the table.
- Tighten the blade tilt lock handle. Rotate the bevel stop cam until it touches the bevel stop housing, then tighten the 90° adjustment screw.
- Loosen adjustment screw and adjust pointer to indicate 0° on the bevel scale.
- Adjusting 45° Positive Stop:
- Loosen the blade tilt lock handle and push the elevation wheel to the right as far as possible. Tighten the blade tilt lock handle.
- Place a combination square on the table against the blade. If the blade is not 45° to the table, loosen the blade tilt lock handle, loosen 45° adjustment screw, loosen 45° bevel stop cam, and push the elevation wheel until the blade is 45° to the table.
- Tighten the blade tilt lock handle. Rotate the 45° bevel stop cam until it touches the bevel stop housing, then tighten the 45° adjustment screw.
4.5 Adjusting Blade Parallel to Miter Gauge Slots
To ensure accurate cuts and prevent kickback, the blade must be parallel to the miter gauge slots. Recheck this adjustment periodically.
- WARNING: Always disconnect the plug from the power source before making any adjustments.
- Turn the elevation wheel and raise the blade as high as it will go.
- Select a point on the body of the saw blade that is set to the left when viewing the blade from the front of the saw, and mark it with a pencil.
- Place the base of a combination square against the edge of the miter gauge slot, and extend the sliding rule of the square so it just touches the marked point on the body of the saw blade at the rear of the table.
- Rotate the blade and check the same marked point of the saw blade at the front of the table.
- If the front and back measurements are not identical, loosen the four alignment bolts located on the underside of the table at the front and rear of the saw. Carefully move the saw blade until it is parallel to the miter gauge slot, and securely tighten all four bolts.

4.6 Connecting Dust Collection
For a cleaner work environment, connect a dust collection system to the saw's dust port. This helps to minimize sawdust accumulation during operation.
5. Operation
5.1 General Operation Guidelines
- Ensure the blade is sharp and appropriate for the material being cut.
- Adjust the blade height so that it is approximately 1/8 inch above the workpiece.
- Always stand to the side of the blade, not directly in line with it.
- Feed the workpiece slowly and consistently. Avoid forcing the material.
5.2 Using the Rip Fence
The self-aligning rip fence is used for making accurate rip cuts (cutting along the grain). Position the fence to the desired width, lock it securely, and guide the workpiece firmly against it while feeding.
5.3 Using the Miter Gauge
The miter gauge guides workpieces for precise cross cuts (cutting across the grain) and angled cuts. Insert the miter gauge into the table slot, set the desired angle, and push the workpiece through the blade.
6. Maintenance
6.1 Blade Care and Replacement
Regularly inspect the saw blade for sharpness and damage. A dull or damaged blade can cause kickback and poor cut quality. Replace blades as needed, ensuring the replacement blade is compatible with the saw's specifications.
6.2 Cleaning the Saw
After each use, disconnect the power and clean sawdust and debris from the table, blade guard, and motor housing. Use a brush or vacuum. Avoid using solvents that may damage plastic parts.
6.3 Lubrication
Periodically lubricate moving parts such as the blade elevation and tilt mechanisms. Refer to the detailed manual for specific lubrication points and recommended lubricants.
6.4 Inspecting Components
Regularly inspect all components, including the power cord, switches, guards, and fasteners, for wear or damage. Replace any worn or damaged parts immediately to ensure safe operation.
7. Troubleshooting
This section addresses common issues you might encounter with your table saw.
| Problem | Possible Cause | Solution |
|---|---|---|
| Saw does not start | No power, tripped circuit breaker, faulty switch | Check power connection, reset breaker, inspect switch |
| Blade binds or smokes | Dull blade, improper blade height, misaligned fence, forcing workpiece | Replace/sharpen blade, adjust blade height, align fence, reduce feed rate |
| Inaccurate cuts | Misaligned blade, loose fence, worn miter gauge | Adjust blade parallelism, secure fence, replace miter gauge if worn |
| Excessive vibration | Loose blade, damaged blade, unstable stand | Tighten blade, replace damaged blade, ensure stand is stable and assembled correctly |
8. Specifications
| Feature | Specification |
|---|---|
| Model Number | 3410-02 |
| Brand | Skil |
| Blade Diameter | 10 Inches |
| No-Load Speed | 5000 RPM |
| Cut Height Capacity | 3-1/2 Inches (for 4x materials) |
| Table Dimensions (Extended) | 20-inch x 32-inch |
| Bevel Angle Range | 0° to 47° |
| Voltage | 120 Volts |
| Wattage | 2000 watts |
| Item Weight | 67 Pounds |
| Included Components | Folding Stand |
| Power Source | Corded Electric |
| Manufacturer | Chervon- SKIL |
9. Warranty and Support
9.1 Warranty Information
This SKIL 3410-02 10-Inch Table Saw is covered by a 30 Day Money Back Guarantee and a 1-year limited warranty. Please retain your proof of purchase for warranty claims. The warranty covers defects in materials and workmanship under normal use. It does not cover damage resulting from misuse, abuse, unauthorized repairs, or normal wear and tear.
9.2 Customer Support
For technical assistance, parts, or warranty service, please contact SKIL Customer Support. Refer to the official SKIL website or your product packaging for the most current contact information.