1. Introduction
The ASUS P6X58D-E is an ATX form factor motherboard designed for Intel LGA 1366 processors, including the Intel Core i7 series and future 32nm 6-core processors. It features the Intel X58 chipset and supports DDR3 triple-channel memory. This motherboard incorporates advanced technologies such as USB 3.0 and SATA 6 Gb/s for high-speed data transfer, and ASUS exclusive innovations like Xtreme Phase power design and Stack Cool 3+ for enhanced performance and stability. This manual provides essential information for setting up, operating, and maintaining your motherboard.
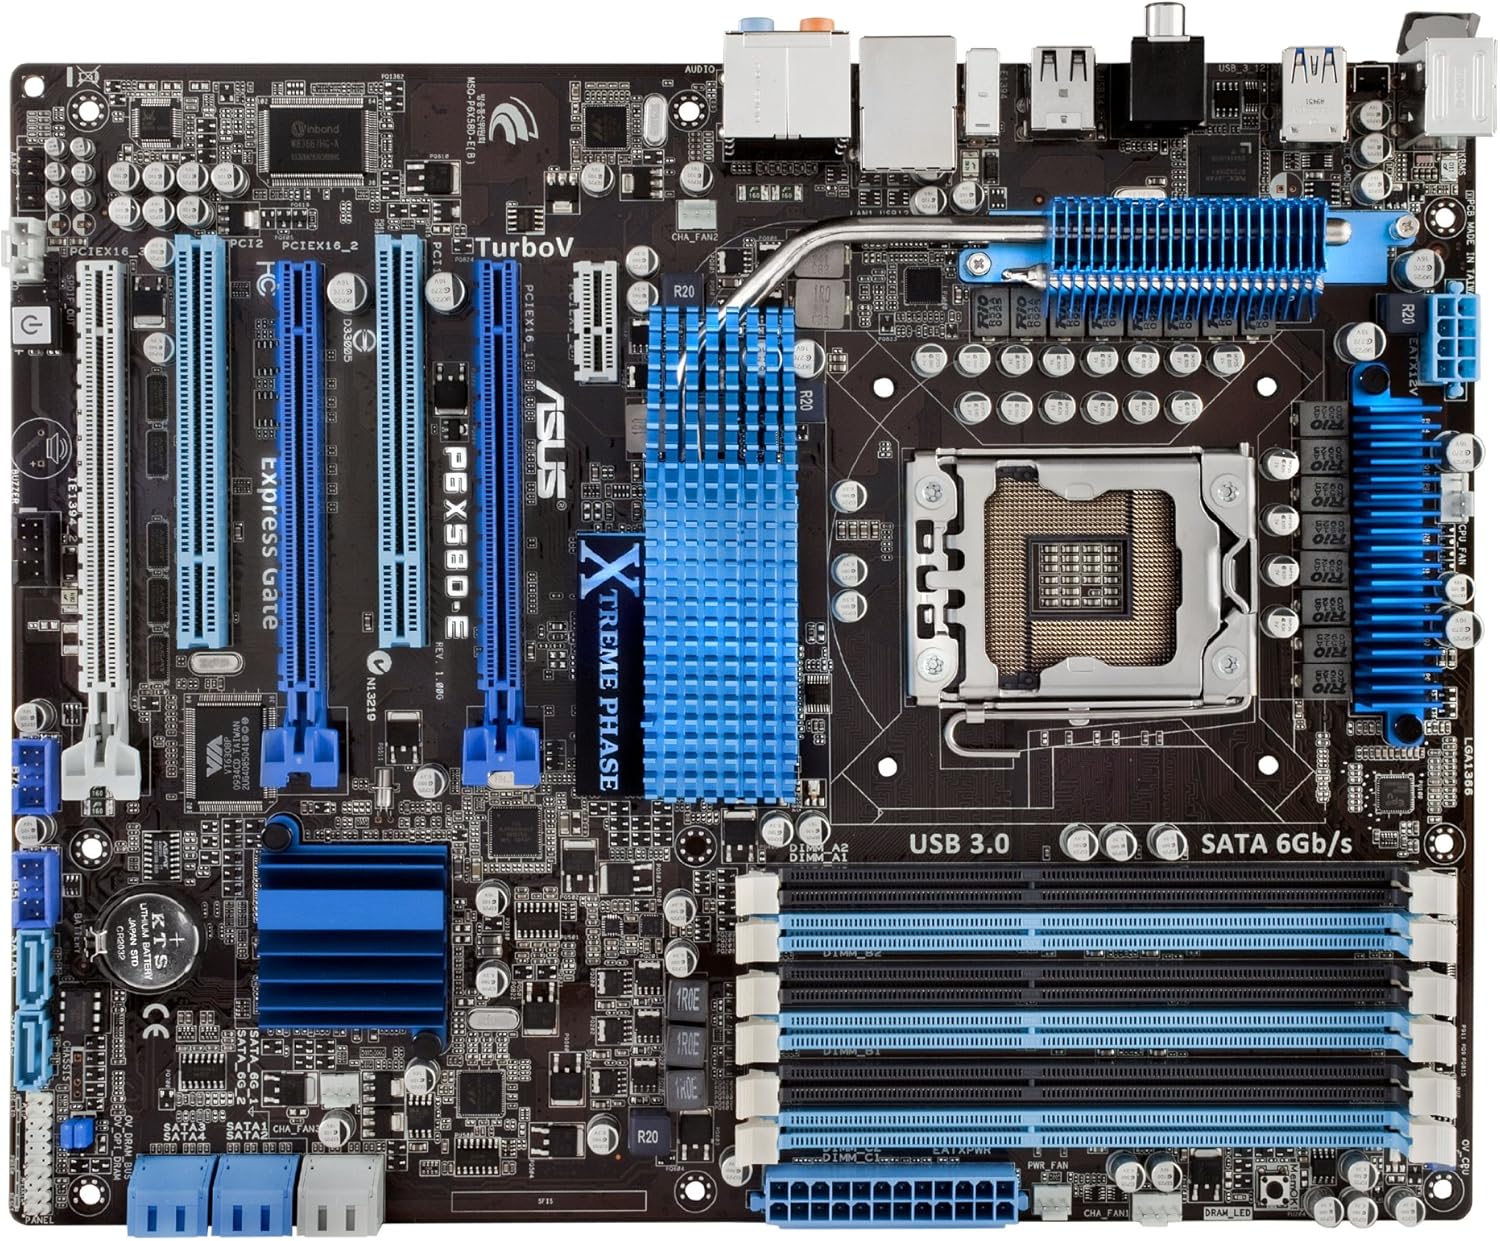
Figure 1.1: Top-down view of the ASUS P6X58D-E motherboard, highlighting key components like the CPU socket, RAM slots, and PCIe slots.
2. Key Features
- Intel LGA 1366 Socket: Supports Intel Core i7 series processors and is ready for next-generation 32nm 6-core Intel LGA 1366 processors.
- Intel X58 Chipset: Provides robust performance and compatibility.
- Triple Channel DDR3 Memory: Six DIMM slots support up to 24GB of DDR3 2000 (O.C.)/1600/1333/1066 MHz non-ECC, un-buffered memory.
- TRUE USB 3.0 Support: Offers data transfer rates up to 4.8Gbps, 10 times faster than USB 2.0, and is backward compatible.
- TRUE SATA 6 Gb/s Support: Delivers data transfer rates up to 6.0Gb/s, doubling the bandwidth of previous SATA standards.
- Multi-GPU Support: Features three PCIe 2.0 x16 slots for NVIDIA 3-Way SLI or ATI Quad-GPU CrossFireX configurations.
- ASUS Xtreme Phase Power Design (16+2 Phase): Provides efficient power delivery to the CPU and memory controller, enhancing overclocking capability and component longevity.
- Stack Cool 3+: A fanless cooling solution with embedded copper layers in the PCB to effectively dissipate heat, reducing temperatures by up to 20°C (36°F).
- TurboV Tool: Allows real-time, precise voltage and frequency adjustments for optimized overclocking with micro-interval (0.02v) tuning.
- Express Gate SSD: Provides a quick-booting operating system for instant internet access and basic tasks.
3. Package Contents
Verify that all items are present in your ASUS P6X58D-E motherboard package:
- ASUS P6X58D-E Motherboard
- User's Manual
- 4 x Serial ATA 3.0Gb/s Cables
- 2 x Serial ATA 6.0Gb/s Cables
- ASUS Q-Shield (I/O backplate)
- 2-in-1 Q-Connector (for front panel headers)
- 1 x ASUS 3-Way SLI Bridge Connector
- 1 x ASUS SLI Bridge Connector
- Support Disc (Drivers, Anti-virus software, ASUS Update, ASUS Utilities)
4. Setup and Installation
Before beginning installation, ensure your system is powered off and unplugged from the wall outlet. Wear an anti-static wrist strap to prevent electrostatic discharge (ESD) damage to components.
4.1. Motherboard Preparation
- Install CPU: Carefully open the CPU socket lever. Align the triangular mark on the Intel LGA 1366 processor with the mark on the socket. Gently place the CPU into the socket without forcing it. Close the lever to secure the CPU.
- Install CPU Cooler: Apply thermal paste to the CPU if not pre-applied on the cooler. Mount the CPU cooler according to its manufacturer's instructions, ensuring it is securely fastened and makes proper contact with the CPU.
- Install Memory (RAM): Open the clips on the DDR3 DIMM slots. Align the memory module's notch with the key in the slot. Press down firmly on both ends of the module until the clips snap into place. For triple-channel operation, refer to your manual for recommended slot population (typically slots A1, B1, C1 or similar).
- Install I/O Shield: Install the ASUS Q-Shield into the rear opening of your computer case.

Figure 4.1: Angled view of the motherboard, showing the CPU socket (LGA 1366) and six DDR3 memory slots.
4.2. Motherboard Installation into Case
- Mount Motherboard: Carefully place the motherboard into the computer case, aligning the screw holes with the standoffs. Secure the motherboard with screws.
- Connect Power Supply: Connect the 24-pin ATX main power connector and the 8-pin CPU power connector from your power supply to the corresponding ports on the motherboard.
- Install Expansion Cards: Insert graphics cards into the PCIe 2.0 x16 slots. Ensure they are seated firmly and secured with the case's retention mechanism. Install any other expansion cards (e.g., sound cards, network cards) into available PCIe x1 or PCI slots.
- Connect Storage Devices: Connect SATA data cables from your hard drives, solid-state drives, and optical drives to the SATA 6 Gb/s (Marvell) or SATA 3 Gb/s (Intel ICH10R) ports on the motherboard. Connect SATA power cables from your power supply to these devices.
- Connect Front Panel Cables: Use the 2-in-1 Q-Connector to simplify connecting the front panel headers (power button, reset button, HDD LED, power LED) to the motherboard. Connect front panel USB and audio cables.
- Connect Case Fans: Connect case fans to the available fan headers on the motherboard.
4.3. Rear I/O Panel Overview

Figure 4.2: Rear I/O panel connections. From left to right: PS/2 keyboard/mouse, USB 2.0, USB 3.0, Coaxial S/PDIF Out, Optical S/PDIF Out, LAN (RJ45), and 8-channel audio jacks.
- PS/2 Ports: For connecting legacy keyboard and mouse.
- USB 2.0 Ports: For connecting USB 2.0 devices.
- USB 3.0 Ports: For connecting high-speed USB 3.0 devices.
- LAN (RJ45) Port: For network connection.
- Audio Jacks: 8-channel audio output and input.
- S/PDIF Out (Coaxial & Optical): For digital audio output.
5. Operating Instructions
5.1. First Boot and BIOS Setup
- After assembling your system, connect a monitor, keyboard, and mouse.
- Power on your system. During the Power-On Self-Test (POST), press the DEL key repeatedly to enter the BIOS Setup Utility.
- In the BIOS, verify that all installed components (CPU, RAM, storage drives) are detected correctly.
- Configure boot order to install your operating system from a USB drive or optical disc.
- Save changes and exit the BIOS. The system will restart.
5.2. Driver Installation
After installing your operating system, install the necessary drivers from the provided support disc or download the latest versions from the ASUS official website. Key drivers include:
- Chipset Drivers
- Audio Drivers
- LAN Drivers
- USB 3.0 Drivers
- SATA 6 Gb/s Drivers
- Graphics Card Drivers (from GPU manufacturer)
5.3. Overclocking with TurboV
The ASUS P6X58D-E features the TurboV tool for real-time system performance tuning. This utility allows for precise adjustments of CPU PPL, NB, NB-PCIe, and DRAM voltages in 0.02v intervals. Refer to the software manual on the support disc or ASUS website for detailed instructions on using TurboV for overclocking.
6. Maintenance
- Keep Clean: Regularly clean dust from inside your computer case using compressed air. Dust accumulation can lead to overheating and component failure.
- Ensure Airflow: Ensure proper airflow within your case by managing cables and ensuring fans are unobstructed.
- BIOS Updates: Periodically check the ASUS support website for BIOS updates. BIOS updates can improve stability, compatibility, and performance. Follow update instructions carefully.
- Driver Updates: Keep your drivers updated to ensure optimal performance and compatibility with new software and hardware.
7. Troubleshooting
This section provides solutions to common issues you might encounter.
- System Does Not Power On:
- Check all power connections: 24-pin ATX, 8-pin CPU, and power cables to components.
- Ensure the power supply switch is in the ON position.
- Verify front panel power button connection to the motherboard.
- No Display Output:
- Ensure the monitor is connected to the graphics card (not the motherboard I/O if a dedicated GPU is installed).
- Reseat the graphics card and memory modules.
- Test with a different monitor or graphics card if available.
- System Freezes or Crashes:
- Check CPU and GPU temperatures. Overheating can cause instability.
- Run memory diagnostic tools to check for RAM errors.
- Ensure all drivers are correctly installed and up to date.
- Check for loose connections or improperly seated components.
- Storage Devices Not Detected:
- Verify SATA data and power cable connections.
- Check BIOS settings to ensure SATA ports are enabled and configured correctly (e.g., AHCI mode).
- Ensure drivers for SATA 6Gb/s controller are installed.
8. Specifications
| Component | Specification |
|---|---|
| CPU Socket | LGA 1366 for Intel Core i7 Processor Extreme Edition/Core i7 Processor |
| Chipset | Intel X58 / ICH10R |
| Memory | 6 x DIMM, Max. 24GB, DDR3 2000 (O.C.)/1600/1333/1066 MHz Non-ECC, Un-buffered Memory, Triple channel memory architecture |
| Power Phase | 16+2 Xtreme Phase |
| PCIe 2.0 x16 Slots | 3 (at x16/x8/x8 or x16/x16/x1 mode) |
| Multi-GPU Support | ATI Quad-GPU CrossFireX / NVIDIA 3-Way SLI |
| LAN | Marvell 88E8056 Gigabit LAN controller featuring AI NET2 |
| Audio | Realtek ALC889 8-Channel High Definition Audio CODEC, DTS support |
| Storage | 2x SATA 6 Gb/s (Marvell), 6x SATA 3Gb/s (Intel ICH10R, RAID 0,1,5,10 Support), 1x eSATA |
| USB Ports | 8x USB 2.0 (4 rear, 4 by headers), 2x USB 3.0 (rear) |
| Firewire (1394a) | 2 ports (1 rear, 1 at mid-board) |
| Form Factor | ATX (12 inch x 9.6 inch / 30.5 cm x 24.4 cm) |
| Dimensions | 13.5 x 11 x 3.1 inches |
| Item Weight | 3.8 pounds |
9. Warranty Information
The ASUS P6X58D-E motherboard carries a 3-year limited product warranty. The warranty is based on the serial number printed on the product box. For detailed terms and conditions, please refer to the warranty card included in your package or visit the official ASUS support website.
10. Support
For further assistance, technical support, driver downloads, or BIOS updates, please visit the official ASUS support website:
You can also refer to the comprehensive user manual provided on the support disc for more in-depth information.


