
1. Product Overview
The Leviton 86676-7I is an Architectural Slide Fluorescent Dimmer designed for precise control of 277 Vac fluorescent lighting applications. This dimmer features a classic architectural fin design and is compatible with Decora style wallplates. It provides smooth, full-range dimming capabilities for commercial environments.

Image 1.1: Front view of the Leviton 86676-7I Architectural Slide Fluorescent Dimmer in Ivory. The image shows the slide control for dimming and the rocker switch for on/off functionality.
2. Key Features
- Smooth-action, linear slide control for easy, precise operation.
- Decora brand styling coordinates with Leviton's extensive line of Decora devices.
- On/off rocker switch turns lights on at last selected brightness level.
- Large radio/TV interference filter to minimize electronic noise.
- Slim, compact housing easily fits in standard wallboxes.
3. Safety Information
WARNING: To avoid fire, shock, or death; turn off power at circuit breaker or fuse and test that power is off before wiring! This device is intended for installation in accordance with the National Electrical Code and local regulations.
- Always disconnect power at the circuit breaker or fuse before installing or servicing the dimmer.
- Use only with compatible 277 Vac fluorescent lighting loads as specified.
- If you are unsure about any part of these instructions, consult a qualified electrician.
- Do not use with incandescent, LED, or low-voltage lighting unless specifically rated for such applications.
- Ensure all wire connections are secure and properly insulated.
4. Installation and Setup
Proper installation is crucial for the safe and effective operation of your dimmer. Follow these steps carefully:
- Turn Off Power: Locate the circuit breaker or fuse that supplies power to the switch box. Turn it OFF. Verify power is off using a voltage tester.
- Remove Existing Switch: Carefully remove the wallplate and mounting screws from the existing switch. Gently pull the switch from the wallbox.
- Identify Wires: Note the wiring configuration of your existing switch. Typically, you will find line (hot), load, and ground wires. For a dimmer, you may also have a neutral wire depending on the specific wiring requirements.
- Wire the Dimmer: Connect the dimmer wires to the corresponding circuit wires. Refer to the wiring diagram provided with your product packaging for specific connections. Generally, the dimmer will have wires for Line (incoming power), Load (to the light fixture), and Ground. Ensure all connections are tight and secure using wire nuts.
- Mount the Dimmer: Carefully fold the wires into the wallbox. Insert the dimmer into the wallbox and secure it with the mounting screws.
- Install Wallplate: Attach the Decora wallplate over the dimmer.
- Restore Power: Turn the power back ON at the circuit breaker or fuse.
Note: A detailed wiring diagram is typically included in the product packaging. Always consult this diagram for precise wiring instructions for your specific installation.
5. Operation
The Leviton 86676-7I dimmer provides intuitive control over your fluorescent lighting.
- On/Off Control: Press the bottom rocker switch to turn the lights ON or OFF. When turned ON, the lights will return to the last selected brightness level.
- Dimming Control: Use the linear slide control to adjust the brightness level. Slide it up to increase brightness and down to decrease brightness.
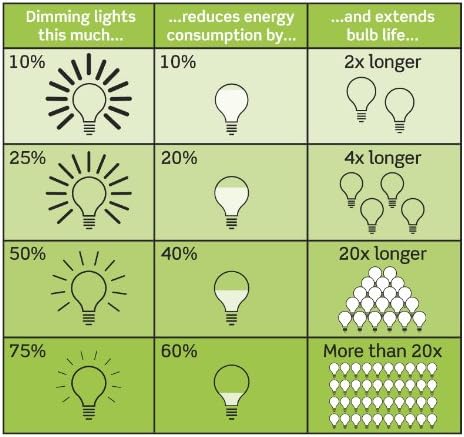
Image 5.1: This chart illustrates the benefits of dimming lights, showing how reducing brightness by a certain percentage can lead to greater energy consumption reduction and significantly extend bulb life.
6. Maintenance
The Leviton 86676-7I dimmer requires minimal maintenance.
- Cleaning: To clean the dimmer and wallplate, wipe with a soft, damp cloth. Do not use abrasive cleaners, solvents, or harsh chemicals, as these can damage the finish or internal components.
- Inspection: Periodically inspect the dimmer and wallplate for any signs of damage or loose connections. If any issues are found, turn off power at the circuit breaker and consult a qualified electrician.
7. Troubleshooting
If you experience issues with your dimmer, refer to the following common problems and solutions:
| Problem | Possible Cause | Solution |
|---|---|---|
| Lights do not turn ON. | No power to the dimmer. Loose wiring connection. Bulb(s) burned out. | Check circuit breaker/fuse. Verify all wiring connections are secure (turn off power first). Replace bulb(s). |
| Lights do not dim or flicker. | Incompatible load type. Loose wiring connection. Minimum load not met. | Ensure only compatible 277 Vac fluorescent loads are connected. Check wiring connections (turn off power first). Consult a qualified electrician if the issue persists. |
| Dimmer is warm to the touch. | Normal operation. | It is normal for dimmers to generate some heat during operation. If it is excessively hot or emits smoke/odor, turn off power immediately and consult an electrician. |
8. Specifications
| Specification | Detail |
|---|---|
| Model Number | 86676-7I |
| Brand | Leviton |
| Switch Type | Dimmer Switch |
| Actuator Type | Rocker / Slide |
| Operation Mode | Off |
| Voltage | 277 Vac |
| Color | Ivory |
| Connectivity Protocol | X-10 (Note: This may refer to compatibility or internal component, not necessarily a smart home protocol for this specific model) |
| International Protection Rating | IP00 |
| Item Weight | 10.4 ounces |
| Package Dimensions | 5 x 3.5 x 3.3 inches |
| Date First Available | February 26, 2009 |
9. Warranty and Support
This Leviton 86676-7I Architectural Slide Fluorescent Dimmer comes with a 2 Year Limited Warranty.
For warranty claims, technical assistance, or further information, please contact Leviton customer support. Details can typically be found on the product packaging or the official Leviton website.
Leviton Website: www.leviton.com


