
Introduction
This manual provides instructions for the installation, operation, and maintenance of the Intermatic T106R Mechanical Time Switch. The T106R is designed to control electrical loads up to 40 Amps, offering direct 24-hour control with up to 12 ON/OFF operations per day. It features a minimum ON/OFF time of 1 hour and includes a manual override function. This device is housed in a durable steel enclosure suitable for indoor and outdoor use.
Important Safety Instructions
- WARNING: Risk of electric shock. Disconnect power at the circuit breaker or fuse box before installation or servicing.
- Installation and servicing should be performed by a qualified electrician in accordance with all national and local electrical codes.
- Do not exceed the maximum electrical ratings of the device.
- Ensure all connections are secure and properly insulated.
- This device is intended for permanent installation.
Product Overview
The Intermatic T106R Mechanical Time Switch consists of a robust steel enclosure and an internal mechanical timer mechanism.
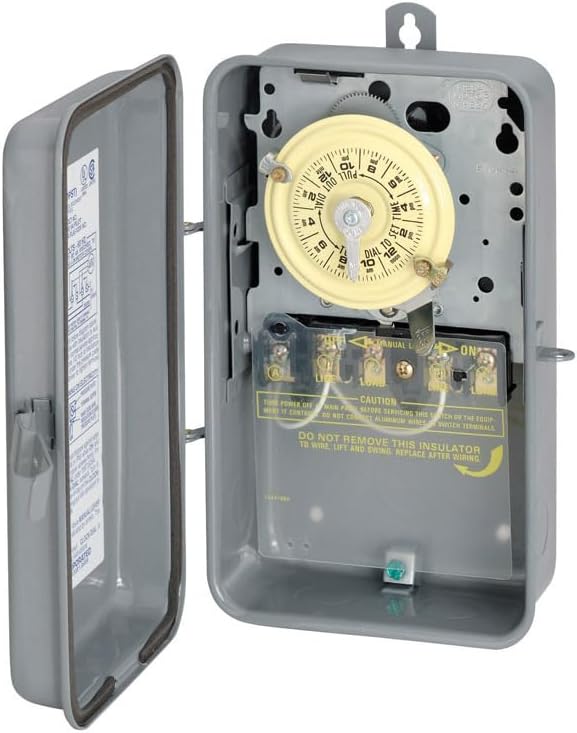
Image 1: Front view of the Intermatic T106R Mechanical Time Switch with the enclosure door open, revealing the timer dial and wiring terminals. The gray steel housing and yellow timer mechanism are visible.
Key Features
- 24-hour mechanical timer
- Up to 12 ON/OFF operations daily
- Minimum ON/OFF time: 1 hour
- Manual override switch
- 40 Amp load capacity
- Steel indoor/outdoor enclosure
Installation Instructions
WARNING: Ensure power is disconnected at the main circuit breaker before proceeding with installation.
- Mounting the Enclosure: Select a suitable location for mounting the timer. The steel enclosure is rated for indoor and outdoor use. Securely mount the enclosure to a flat, stable surface using appropriate hardware through the mounting holes provided.
- Wiring Connections:
- Open the enclosure door.
- Identify the input power terminals (LINE) and output load terminals (LOAD).
- Connect the incoming power supply wires to the LINE terminals.
- Connect the wires leading to the electrical load (e.g., pump, lighting) to the LOAD terminals.
- Ensure all connections are tight and follow the wiring diagram located inside the enclosure or in the separate instruction guide.
- The T106R is designed for 208-277 Volt applications. Verify your supply voltage matches the timer's rating.
- Close and Secure: Once wiring is complete and verified, close the enclosure door and secure it.

Image 2: Close-up view of the internal components of the Intermatic T106R Mechanical Time Switch, showing the timer dial, wiring terminals, and caution labels. This image highlights the electrical connection points.
Operating the Time Switch
Setting the Current Time
- Rotate the large yellow dial clockwise until the current time aligns with the small arrow or indicator mark on the timer mechanism.
- Ensure AM/PM is correctly set if applicable (this model operates on a 24-hour cycle).
Programming ON/OFF Cycles
The timer uses trippers (pins) on the dial to activate ON and OFF cycles.
- Locate the ON (green) and OFF (red) trippers. These are typically small pins that can be pushed in or out, or attached to the dial.
- Attach or position the ON tripper at the desired time for the load to turn on.
- Attach or position the OFF tripper at the desired time for the load to turn off.
- Multiple ON/OFF cycles can be set, up to 12 pairs per 24-hour period. Ensure a minimum of 1 hour between ON and OFF settings.
Manual Override
The T106R includes a manual override switch, typically a lever or button, that allows you to temporarily turn the load ON or OFF without affecting the programmed schedule.
To use: Move the manual override lever to the desired position (ON or OFF). The timer will resume its programmed schedule at the next scheduled ON or OFF event.
Maintenance Guidelines
- Cleaning: Periodically clean the exterior of the enclosure with a damp cloth. Do not use abrasive cleaners or solvents.
- Inspection: Annually inspect the wiring connections for tightness and signs of wear or corrosion. Ensure the enclosure door seal is intact.
- No User Serviceable Parts: The internal mechanical components are not user-serviceable. If the timer malfunctions, contact a qualified electrician or Intermatic support.
Troubleshooting Common Issues
| Problem | Possible Cause | Solution |
|---|---|---|
| Timer does not operate. | No power supply; Incorrect wiring; Trippers not set. | Check circuit breaker; Verify wiring connections; Ensure trippers are correctly positioned. |
| Load does not turn ON/OFF at programmed times. | Current time not set correctly; Trippers incorrectly placed; Manual override engaged. | Adjust current time; Reposition ON/OFF trippers; Check manual override switch. |
| Timer makes unusual noise. | Internal mechanical issue. | Discontinue use and contact a qualified electrician or Intermatic support. |
Technical Specifications
- Model: T106R
- Brand: Intermatic
- Voltage: 208-277 VAC
- Load Capacity: Up to 40 Amps
- Operations: 1-12 ON/OFF cycles per 24 hours
- Minimum ON/OFF Time: 1 hour
- Material: Steel enclosure
- Dimensions (H x W x D): 10.34" x 6.62" x 4"
- Weight: 3.4 Pounds
- Mounting: Surface Mount
- Switch Style: SPDT (Single Pole Double Throw)
- Certifications: CSA, UL
- UPC: 078275104280
Warranty and Support
The Intermatic T106R Mechanical Time Switch comes with a 1-year limited warranty. This warranty covers defects in materials and workmanship. In the event of a defect, the unit will be replaced. Labor costs are not covered.
For warranty claims or technical support, please contact Intermatic customer service. Refer to the official Intermatic website for current contact information.
Online Resources: For additional information, wiring diagrams, or FAQs, visit the official Intermatic website: www.intermatic.com


