
Introduction
This manual provides essential instructions for the setup, operation, maintenance, and troubleshooting of your Toshiba DR430 DVD Recorder. Please read this manual thoroughly before using the device to ensure proper functionality and to maximize your user experience.
The Toshiba DR430 allows you to convert and archive home videos to DVD, and experience your DVD collection with 1080p upconversion via HDMI. It features one-touch recording, multi-format recording and playback, and HDMI-CEC for simplified control.
Setup
Unpacking and Placement
Carefully remove the DVD recorder from its packaging. Place the unit on a stable, level surface with adequate ventilation. Avoid placing it near heat sources or in direct sunlight.
Connecting the DR430
The DR430 offers various connection options for video and audio. Choose the connection method that best suits your television and other audio/video equipment.
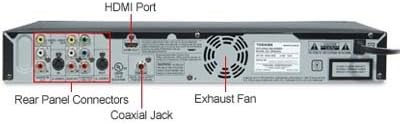
Image: Rear panel of the Toshiba DR430 DVD Recorder. This view displays the HDMI port, coaxial jack, and various rear panel connectors including composite video, S-video, and component video inputs and outputs.

Image: Detailed diagram of the rear panel connectors. This diagram highlights Audio In (L1), S-Video In/Out, Audio Out, Component Video Out, HDMI Out, and Coaxial Digital Audio Output ports.
HDMI Connection (Recommended for best quality)
Connect an HDMI cable from the HDMI OUT port on the DR430 to an HDMI IN port on your television or A/V receiver. This connection supports video upconversion up to 1080p resolution.
Component Video Connection
Connect component video cables (red, green, blue) from the COMPONENT VIDEO OUT ports on the DR430 to the corresponding component video IN ports on your television. Connect audio cables (red, white) from the AUDIO OUT ports on the DR430 to the audio IN ports on your television or A/V receiver.
S-Video Connection
Connect an S-Video cable from the S-VIDEO OUT port on the DR430 to an S-VIDEO IN port on your television. Connect audio cables (red, white) from the AUDIO OUT ports on the DR430 to the audio IN ports on your television or A/V receiver.
Composite Video Connection
Connect a composite video cable (yellow) from the VIDEO OUT port on the DR430 to the VIDEO IN port on your television. Connect audio cables (red, white) from the AUDIO OUT ports on the DR430 to the audio IN ports on your television or A/V receiver.
Digital Audio Connection
For digital audio output, connect a coaxial digital audio cable from the COAXIAL DIGITAL AUDIO OUTPUT port on the DR430 to a digital audio input on your A/V receiver.
Front Panel Inputs
The front panel includes a DV Input and composite video/audio inputs for convenient connection of camcorders or other portable devices.

Image: Front panel of the Toshiba DR430 DVD Recorder with the input flap open. This reveals the front-facing composite video (yellow) and audio (red, white) inputs, as well as a DV input.
Power Connection
After all audio/video connections are made, plug the power cord into an AC outlet.

Image: Connection diagram illustrating how to connect the DR430 to a television. It shows RCA video and audio cables connecting the DVD recorder's output to the TV's input for playback, and external source's output to the DVD recorder's input for recording.
Operating Instructions
Basic Playback
- Insert a DVD into the disc tray.
- Turn on the DR430 and your television.
- Select the correct input on your television (e.g., HDMI 1, Video 1) corresponding to the connection used.
- Playback should begin automatically or by pressing the PLAY button on the remote control.
One-Touch Recording
To record from an external source (e.g., cable box, satellite receiver, VCR):
- Connect the external source to the DR430's input (e.g., composite, S-Video).
- Insert a recordable DVD (DVD-R, DVD-RW, DVD+R, DVD+RW) into the DR430.
- Tune your external source to the desired program.
- Press the RECORD button on the DR430 or its remote control. Recording will begin immediately.
- Press the STOP button to end the recording.
Multi-Format Recording and Playback
The DR430 supports recording and playback on DVD-R, DVD-RW, DVD+R, and DVD+RW discs, offering flexibility for your recording needs.
Auto Finalize
The Auto Finalize feature simplifies the recording process by automatically finalizing your recorded disc. Finalizing a disc makes it playable on most standard DVD players. Refer to the on-screen menu for options to enable or disable this feature.
HDMI-CEC (Consumer Electronics Control)
If connected to other HDMI-CEC compatible devices via an HDMI cable, you can control multiple components using a single remote. This feature may require activation in the system settings.
Front DV Input Usage
Use the front DV input to easily transfer video from a digital camcorder to a DVD. Connect your camcorder to the DV input and follow the on-screen instructions for recording.
Simultaneous Playback and Recording
The DR430 allows you to play back a previously recorded title on the same disc while a new recording or timer recording is in progress.
Supported Media Playback
In addition to DVDs, the DR430 supports playback of MP3 audio files from CDs and DVDs. It does not support MP4 video files.
Maintenance
Cleaning the Unit
Wipe the exterior of the unit with a soft, dry cloth. Do not use liquid or aerosol cleaners, as they may damage the finish. Ensure the unit is unplugged before cleaning.
Disc Care
Handle discs by their edges to avoid fingerprints. Store discs in their cases away from direct sunlight and extreme temperatures. Clean dirty discs with a soft, lint-free cloth, wiping from the center outwards.
Ventilation
Ensure that the ventilation openings on the unit are not blocked to prevent overheating. Maintain adequate space around the unit for proper airflow.
Troubleshooting
No Power
- Ensure the power cord is securely plugged into both the unit and a working AC outlet.
- Check if the power outlet is functional by plugging in another device.
No Picture or Sound
- Verify that all audio and video cables are securely connected to the correct input/output ports on both the DR430 and your television/receiver.
- Ensure your television is set to the correct input source (e.g., HDMI 1, Video 1).
- Check the volume level on your television or A/V receiver.
Disc Not Playing/Recording
- Ensure the disc is inserted correctly with the label side facing up.
- Check if the disc is clean and free of scratches or smudges.
- Verify that the disc type is supported by the DR430 (DVD-R, DVD-RW, DVD+R, DVD+RW for recording; standard DVDs, MP3 CDs/DVDs for playback). Note that dual-layer blank discs and MP4 video files are not supported.
- For recording, ensure the disc has sufficient free space.
Remote Control Issues
- Replace the batteries in the remote control (requires 2 AA batteries).
- Ensure there are no obstructions between the remote control and the DR430's remote sensor.
- Point the remote directly at the unit.
Difficulty with Disc Titling/Menu
- Refer to the on-screen menu and the detailed instructions in the full product manual for specific steps on editing titles and navigating disc menus. The titling interface may require character-by-character selection rather than a full keyboard.
Specifications
| Feature | Detail |
|---|---|
| Model Number | DR430 |
| Brand | TOSHIBA |
| Dimensions (W x D x H) | 16.5 x 9.7 x 2.3 inches (approx.) |
| Weight | 5.28 pounds |
| Video Resolution | Up to 1080p (via HDMI upconversion) |
| Video Progressive Scan | 3:2 Pulldown |
| Audio Playback | MP3 Only (from CD/DVD) |
| Inputs | 2x Audio Input (RCA), 2x Composite Video (RCA), 2x S-Video, 1x Component Video, 1x DV Input, 1x USB Port |
| Outputs | 1x HDMI, 1x Digital Coaxial Audio, 1x S-Video, 1x RCA Video (Composite), 1x RCA Audio |
| Playable Disc Types | DVD+R, DVD+RW, DVD-R, DVD-RW, DVD-Video, Audio CD, MP3 CD/DVD |
| Recording Disc Types | DVD+R, DVD+RW, DVD-R, DVD-RW |
| HDMI CEC | Yes |
| Special Features | One Touch Recording, Auto Finalize, Simultaneous Playback and Recording |
| Power Consumption | Energy Star compliant |
Warranty Information
The Toshiba DR430 DVD Recorder comes with a 1-year parts and 90-day labor warranty. Please retain your proof of purchase for warranty claims. For detailed terms and conditions, refer to the warranty card included with your product or contact Toshiba customer support.
Support
If you encounter issues not covered in the troubleshooting section or require further assistance, please contact Toshiba customer support. You can typically find contact information on the Toshiba official website or in the documentation provided with your product.
When contacting support, please have your model number (DR430) and serial number ready.