Introduction
This manual provides comprehensive instructions for the setup, operation, maintenance, and troubleshooting of your HiTi P510K Dye-Sublimation Mini Photo Kiosk. The P510K is an integrated roll-type dye-sublimation mini photo station designed for efficient photo printing. It features a 10.2-inch TFT LCD touch screen, an industrial computer system, media card slots, and a 6-inch roll-type printer, all within a compact unit.
Setup
1. Unboxing and Placement
Carefully remove the P510K kiosk from its packaging. Ensure all packing materials are removed. Place the kiosk on a stable, flat surface with adequate ventilation. The unit weighs approximately 44 pounds (20 kg), so ensure the surface can support its weight. Allow sufficient space around the unit for air circulation and access to ports and compartments.

Figure 1: Front view of the HiTi P510K Mini Photo Kiosk, showing the open LCD touch screen and print output tray.
2. Power Connection
Connect the provided power cable to the power input port on the rear of the kiosk. Plug the other end into a grounded electrical outlet. Ensure the power supply meets the kiosk's voltage requirements (US/CA version).
3. Loading Consumables (Paper and Ribbon)
Open the front access panel of the kiosk to reveal the media compartments. Insert the dye-sublimation paper roll and ribbon cassette according to the diagrams inside the compartment. Ensure they are securely seated to prevent printing errors. The P510K supports various print sizes including 4"x6", 5"x7", 6"x8", and 6"x9".
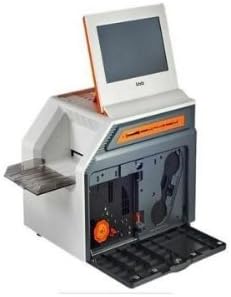
Figure 2: Internal view of the HiTi P510K, illustrating the compartments for paper and ribbon loading.
4. Initial Power On and System Boot
Press the power button, typically located on the side or front of the unit. The kiosk will initiate its boot sequence. The 10.2-inch TFT LCD touch screen will display the system's loading progress. Once booted, the main menu will appear, ready for operation.
Operating Instructions
1. Navigating the Touch Screen Interface
The P510K features an intuitive 10.2-inch TFT LCD touch screen (16:9 aspect ratio). Use your finger to select options, browse photos, and adjust settings. The user-friendly workflow menu guides you through the printing process.
2. Importing Photos
The kiosk supports various media inputs:
- Memory Card Slots: Insert CF, Micro Drive, SD (SDHC), Mini SD, Micro SD, MS, or MS Pro cards into the designated slots.
- USB Pen Drive: Connect a USB flash drive to the available USB port.
- DVD or CD Reader: Connect an external DVD or CD reader via USB.
- Bluetooth: Connect compatible devices wirelessly via Bluetooth for photo transfer.
Once media is inserted, the kiosk will automatically detect it and display the available photos for selection.
3. Photo Editing and Selection
After importing, you can select individual photos or multiple photos for printing. The kiosk offers basic photo editing functions, including:
- Cropping and Rotation
- Brightness and Contrast adjustments
- Applying customized photo e-frames
4. Printing Photos
The P510K offers a variety of photofinishing layouts:
- Standard Photos
- Passport/ID Photos
- E-frame Photos
- Collage Prints
- Photo Index Prints
Select your desired layout and print size. Confirm the number of copies. The kiosk will then begin the printing process. Typical print speeds are:
- 4" x 6" prints: approximately 12 seconds
- 5" x 7" prints: approximately 18 seconds
- 6" x 8" prints: approximately 19 seconds
- 6" x 9" prints: approximately 21 seconds
5. External Printer Connectivity
The P510K can connect to an external printer via a USB cable, functioning as a slave printer. This allows for printing photos in various sizes without frequently changing consumables. Compatible models include HiTi P510S, P510Si, and P720L. This function can be enabled through the kiosk's backstage management system.
Maintenance
1. Cleaning the Kiosk
Regular cleaning helps maintain optimal performance and print quality. Use a soft, lint-free cloth to wipe the exterior surfaces, including the touch screen. For stubborn marks, dampen the cloth slightly with water or a mild, non-abrasive cleaner. Avoid spraying liquids directly onto the kiosk.
Periodically inspect the internal print path for dust or paper debris. Refer to the backstage management system for any recommended internal cleaning procedures or alerts.
2. Consumable Replacement
The kiosk will alert you when the paper roll or ribbon cassette is low or empty. To replace:
- Open the front access panel.
- Remove the used paper roll and ribbon cassette.
- Insert new, genuine HiTi consumables, ensuring they are correctly aligned and seated.
- Close the access panel. The kiosk will automatically detect the new consumables.
Expected print yields per consumable set:
- 4" x 6" (102 x 152 mm): 330 prints
- 5" x 7" (127 x 177 mm): 190 prints
- 6" x 8" (152 x 203 mm): 150 prints
- 6" x 9" (152 x 229 mm): 150 prints
Troubleshooting
This section addresses common issues you might encounter with your P510K kiosk.
No Power
- Ensure the power cable is securely connected to both the kiosk and a working electrical outlet.
- Check if the power outlet is functional by plugging in another device.
Print Quality Issues (Streaks, Fading, Incorrect Colors)
- Verify that the paper and ribbon are correctly installed and not depleted.
- Ensure you are using genuine HiTi consumables.
- Clean the print head and internal components as described in the Maintenance section.
- Check the image resolution. The kiosk prints at 300 x 300 dpi. Low-resolution source images may result in poor print quality.
Media Card/USB Drive Not Detected
- Ensure the media card or USB drive is fully inserted into the correct slot/port.
- Check if the media is formatted correctly and contains supported image file types.
- Try a different media card or USB drive to rule out a faulty storage device.
Touch Screen Unresponsive
- Restart the kiosk by powering it off and on again.
- Ensure the screen is clean and free of debris that might interfere with touch detection.
For issues not covered here, please refer to the official HiTi Digital support resources or contact customer service.
Specifications
| Feature | Detail |
|---|---|
| Model Name | P510K |
| Product Dimensions | 24 x 19 x 18 inches (61 x 48.3 x 45.7 cm) |
| Item Weight | 44 pounds (20 kg) |
| Printing Technology | Dye-Sublimation |
| Resolution | 300 x 300 dpi |
| Supported Print Sizes | 4" x 6" (102 x 152 mm), 5" x 7" (127 x 177 mm), 6" x 8" (152 x 203 mm), 6" x 9" (152 x 229 mm) |
| Print Speed (4"x6") | Approx. 12 seconds |
| Display | 10.2-inch TFT LCD touch screen (16:9) |
| Connectivity | USB Interface, Wireless (Bluetooth), Memory Card Slots (CF / Micro Drive / SD / Mini SD / Micro SD / MS / MS Pro), USB Pen Drive, External DVD/CD Reader support |
| Features | Standalone Operation, External Printer Connectivity, Variety of Photofinishing Layouts (Standard, Passport/ID, E-frame, Collage, Photo Index), Customized Photo E-Frame, Complete Backstage Management |
Warranty and Support
For detailed warranty information, please refer to the warranty card included with your product or visit the official HiTi Digital website. Warranty terms and conditions may vary by region.
For technical support, service, or to inquire about replacement parts and consumables, please contact HiTi Digital customer support through their official website or the contact information provided in your product documentation.
Manufacturer: HiTi Digital


