Introduction
The KODAK Zx1 Pocket Video Camera is designed for capturing high-definition video in a compact, weather-resistant form factor. This manual provides essential information for the proper setup, operation, and maintenance of your device, ensuring optimal performance and longevity.
Please read this manual thoroughly before using your camera and retain it for future reference.
Setup
1. Battery Installation
The KODAK Zx1 camera operates on two Ni-MH rechargeable AA batteries. Ensure batteries are fully charged before first use.
- Locate the battery compartment door on the side or bottom of the camera.
- Slide the latch to open the compartment.
- Insert two AA Ni-MH batteries, observing the polarity indicators (+/-) inside the compartment.
- Close the battery compartment door securely until it clicks into place.
2. SD Card Installation
The camera requires an SD (Secure Digital) memory card for storing videos. A 2GB SD card is typically included with the bundle.
- Locate the SD card slot, usually adjacent to the battery compartment.
- Insert the SD card with the metal contacts facing the camera, pushing gently until it clicks into place.
- To remove, push the card in again until it springs out slightly, then pull it out.
3. Charging the Batteries
Use the provided charger to recharge the Ni-MH AA batteries.
- Remove the rechargeable AA batteries from the camera.
- Place the batteries into the designated slots on the charger.
- Plug the charger into a standard electrical outlet.
- Refer to the charger's indicator lights for charging status. Charging time may vary.
4. Initial Power On
After installing batteries and an SD card, press and hold the power button until the camera turns on. Follow any on-screen prompts for initial setup, such as setting the date and time.
Operating the Camera
1. Recording Video
The KODAK Zx1 records video in 720p HD resolution, utilizing digital blur reduction technology for clearer footage.
- Turn on the camera.
- Point the lens towards your subject.
- Press the Record button (usually marked with a red circle) to start recording. A red indicator light or on-screen icon will confirm recording is active.
- Press the Record button again to stop recording.
2. Playback
To review your recorded videos:
- Enter playback mode (usually by pressing a dedicated playback button or navigating through the menu).
- Use the navigation buttons to select the desired video.
- Press the Play button to start playback.
3. Connecting to a Television
You can view your videos on a larger screen using the provided A/V or HDMI cables.
- Using A/V Cable: Connect the A/V cable from the camera's A/V output port to the corresponding A/V input ports (yellow for video, white/red for audio) on your television. Select the correct input source on your TV.
- Using HDMI Cable: Connect the HDMI cable from the camera's HDMI output port to an available HDMI input port on your television. Select the correct HDMI input source on your TV.
4. Connecting to a Computer
Transfer videos to your computer using the supplied USB cable.
- Turn on the camera.
- Connect one end of the USB cable to the camera's USB port and the other end to an available USB port on your computer.
- The camera should appear as a removable drive or device on your computer.
- Access the video files from the camera's storage. The camera may also prompt you to install or launch built-in video software for editing and sharing.
Maintenance
1. Cleaning the Camera
Regular cleaning helps maintain the camera's performance and appearance.
- Use a soft, lint-free cloth to wipe the camera body. For stubborn dirt, slightly dampen the cloth with water.
- For the lens, use a specialized lens cleaning cloth and solution. Avoid touching the lens with your fingers.
- Do not use harsh chemicals, solvents, or abrasive cleaners.
2. Battery Care
- Always use Ni-MH rechargeable AA batteries.
- Remove batteries if the camera will not be used for an extended period to prevent leakage.
- Store batteries in a cool, dry place.
3. Storage
When not in use, store the camera in a protective bag or case to prevent scratches and damage. Avoid extreme temperatures and high humidity.
Troubleshooting
This section addresses common issues you might encounter with your KODAK Zx1 camera.
| Problem | Possible Cause | Solution |
|---|---|---|
| Camera does not turn on. | Dead or incorrectly inserted batteries. | Ensure batteries are fully charged and inserted with correct polarity. |
| Cannot record video. | SD card full, not inserted, or corrupted. | Check SD card. Delete old files, insert correctly, or try a different card. |
| No image on TV when connected. | Incorrect cable connection or TV input. | Verify cables are securely connected. Select the correct A/V or HDMI input on your TV. |
| Computer does not recognize camera. | USB cable issue or camera not in correct mode. | Try a different USB port or cable. Ensure camera is powered on. |
Specifications
Below are the technical specifications for the KODAK Zx1 Pocket Video Camera:
- Product Dimensions: 5 x 2 x 4 inches
- Item Weight: 1.4 pounds
- Video Capture Resolution: 720p
- Flash Memory Type: SD
- Video Capture Format: H.264
- Connectivity Technology: HDMI, USB
- Color: Blue
- Special Feature: Low Light capability
- Optical Zoom: 2x
- Camcorder Type: Video Camera
- Included Components: Battery, USB Cable (Note: Bundle may include additional items like SD Card, Bag, Charger)
- Manufacturer: Kodak
- Date First Available: October 22, 2009
Product Images
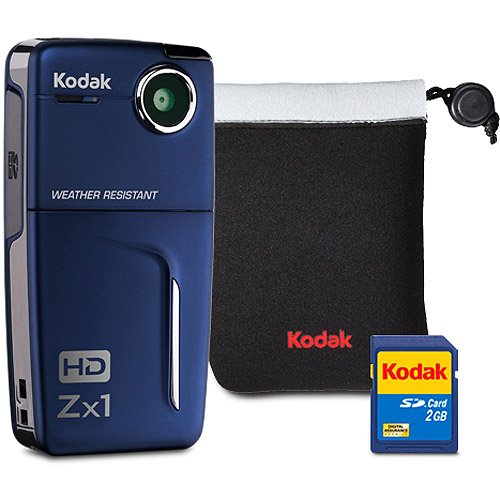
Image: The KODAK Zx1 Pocket Video Camera, shown in blue. This compact device features a lens on the front, a screen on the back, and control buttons for recording and navigation. It is designed for portability and ease of use.
Product Videos
No official seller videos were found for this product that meet the criteria for inclusion in this manual.
Warranty and Support
For information regarding warranty coverage, technical support, or service for your KODAK Zx1 Pocket Video Camera, please refer to the documentation provided at the time of purchase or visit the official KODAK support website. Keep your purchase receipt as proof of purchase for warranty claims.


