
1. Introduction
This manual provides essential information for the proper installation, operation, and maintenance of your SilverStone Strider Plus SST-ST75F-P v 1.1 750W 80 Plus Silver ATX Power Supply Unit (PSU). Designed for high performance and reliability, this PSU is ideal for powering modern personal computer systems, especially those requiring stable and efficient power delivery for gaming or demanding applications.
Key features of this power supply include its 750W output, 80 Plus Silver efficiency certification, fully modular cabling for improved cable management, and a quiet 135mm fan for optimal cooling with reduced noise.

Figure 1.1: SilverStone Strider Plus SST-ST75F-P v 1.1 PSU and packaging.
2. Safety Information
WARNING: High Voltage! Do not open the power supply unit casing. There are no user-serviceable parts inside. Opening the casing will void the warranty and poses a risk of electric shock.
- Always disconnect the AC power cord from the wall outlet before installing, removing, or cleaning the PSU or any other computer components.
- Ensure the power supply is installed in a well-ventilated area. Do not block the fan vents.
- This product is designed for use with personal computers. Do not use it for any other purpose.
- If you experience any issues, refer to the troubleshooting section or contact qualified technical support.

Figure 2.1: Product label with safety warnings and electrical specifications.
3. Package Contents
Please verify that all items listed below are included in your package. If any items are missing or damaged, contact your retailer or SilverStone support immediately.
- SilverStone Strider Plus SST-ST75F-P v 1.1 750W Power Supply Unit
- Modular Cable Set (including 24-pin ATX, 8-pin EPS/CPU, 6+2 pin PCIe, SATA, and 4-pin Peripheral connectors)
- AC Power Cord
- Mounting Screws
- User Manual (this document)

Figure 3.1: SilverStone Strider Plus PSU with modular cables.
4. Setup
4.1 Pre-installation Checklist
Before beginning the installation, ensure you have the following:
- A compatible PC case with an ATX PSU mounting bay.
- All necessary computer components (motherboard, CPU, GPU, storage drives, etc.).
- A Phillips head screwdriver.
- Anti-static wrist strap (recommended).
4.2 Physical Installation
- Prepare the PC Case: Open your PC case and locate the power supply mounting bay, typically at the bottom or top rear.
- Mount the PSU: Gently slide the SilverStone PSU into the mounting bay. Ensure the fan is oriented correctly for optimal airflow (usually facing downwards if there's a bottom vent, or upwards if not). Secure the PSU to the case using the provided mounting screws.

Figure 4.1: SilverStone Strider Plus PSU, ready for installation.
4.3 Cable Connections
The SST-ST75F-P v 1.1 features a fully modular design, allowing you to connect only the cables you need, reducing clutter and improving airflow within your PC case.
- Connect Essential Cables to PSU: Identify the necessary cables for your system components. Connect them to the corresponding modular ports on the PSU. Refer to the labels on the PSU and cables for correct orientation.
- 24-pin ATX Motherboard Power: Connect the large 24-pin cable to the motherboard's main power connector. Ensure it clicks into place securely.
- 8-pin EPS/CPU Power: Connect the 8-pin (or 4+4 pin) EPS/CPU cable to the motherboard's CPU power connector, usually located near the CPU socket.
- PCIe Power for Graphics Cards: If your graphics card requires external power, connect the appropriate 6-pin or 6+2 pin PCIe cables from the PSU to the graphics card. Modern high-performance cards may require multiple PCIe connectors.
- SATA Power for Storage Drives: Connect SATA power cables to your SSDs, HDDs, and optical drives.
- 4-pin Peripheral (Molex) Power: Use these connectors for older components or case fans that require Molex power.
- Cable Management: Route cables neatly to improve airflow and aesthetics. Use cable ties or Velcro straps if available.
- Connect AC Power: Once all internal connections are made, connect the provided AC power cord to the PSU's input socket and then to a wall outlet or surge protector.

Figure 4.2: Modular cable ports on the PSU.
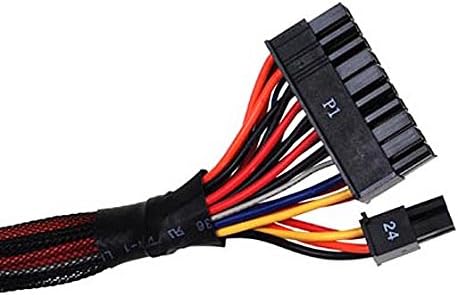
Figure 4.3: 24-pin ATX connector.

Figure 4.4: PCIe 6+2 pin connector.

Figure 4.5: SATA power connector.

Figure 4.6: 4-pin Peripheral (Molex) connector.
5. Operating Instructions
After completing the installation and connecting all necessary cables:
- Power Switch: Locate the power switch on the rear of the PSU (next to the AC input). Ensure it is in the 'O' (off) position before connecting the AC power cord.
- Initial Power On: Once the AC power cord is connected, flip the PSU power switch to the 'I' (on) position.
- System Boot: Press the power button on your computer case to boot the system. The PSU fan should begin to spin, and your system should power on.
- Fan Operation: The 135mm fan is designed for silent running and efficient cooling. Its speed will adjust automatically based on the PSU's load and temperature to maintain optimal performance and acoustics.
6. Maintenance
Proper maintenance ensures the longevity and optimal performance of your PSU.
- Dust Removal: Periodically clean dust from the PSU's fan grill and vents using compressed air. Ensure the system is powered off and unplugged from the wall outlet before cleaning.
- Airflow: Ensure that the PSU's intake and exhaust vents are not obstructed by cables, case components, or external objects. Good airflow is crucial for efficient cooling.
- Environment: Operate the PSU in a clean, dry, and well-ventilated environment. Avoid extreme temperatures and humidity.
7. Troubleshooting
If you encounter issues with your SilverStone PSU, try the following troubleshooting steps:
7.1 No Power / System Not Turning On
- Check AC Power Cord: Ensure the AC power cord is securely plugged into both the PSU and the wall outlet/surge protector.
- PSU Power Switch: Verify that the PSU's power switch on the rear is in the 'I' (on) position.
- Wall Outlet: Test the wall outlet with another device to ensure it is functioning.
- Internal Connections: Double-check all modular cable connections at both the PSU and component ends (motherboard, CPU, GPU, drives). Ensure they are fully seated.
- Motherboard Stand-offs: Ensure your motherboard is properly installed with stand-offs to prevent short circuits.
7.2 System Instability / Random Shutdowns
- Overload: Ensure your system's power requirements do not exceed the PSU's 750W capacity. Use a PSU calculator if unsure.
- Overheating: Check for proper airflow within the case. Ensure the PSU fan is spinning and not obstructed. Clean any dust buildup.
- Loose Connections: Re-seat all power cables to ensure a stable connection.
- Component Issues: Rule out other components (RAM, GPU, CPU) by testing them if possible.
If the problem persists after performing these checks, it is recommended to consult a qualified computer technician or contact SilverStone customer support.
8. Specifications
The following table details the technical specifications of the SilverStone Strider Plus SST-ST75F-P v 1.1 Power Supply Unit.

Figure 8.1: Detailed specifications and cable configuration.
| Feature | Specification |
|---|---|
| Model Name | SST-ST75F-P v 1.1 |
| Brand | SilverStone |
| Type | ATX Power Supply Unit |
| Max. Output Power | 750 Watts |
| Efficiency Certification | 80 Plus Silver |
| Cooling Method | Air (135mm silent fan) |
| Form Factor | ATX |
| Dimensions (L x W x H) | 160mm x 150mm x 86mm (approx.) |
| Weight | 3 Kilograms |
| Connectors | 100% Modular (24-pin ATX, 8-pin EPS/CPU, 6+2 pin PCIe, SATA, 4-pin Peripheral) |
| Operating Temperature | 0 ~ 40°C |

Figure 8.2: 80 Plus Silver Efficiency Curve.
9. Warranty and Support
The SilverStone Strider Plus SST-ST75F-P v 1.1 Power Supply Unit comes with a manufacturer's warranty. Please refer to your product packaging or the official SilverStone website for the most current and detailed warranty information. Typically, a 2-year manufacturer's warranty covers defects in materials and workmanship.
For technical support, troubleshooting assistance beyond this manual, or warranty claims, please contact SilverStone customer service through their official website or the contact information provided with your product documentation.
SilverStone Technology Co., Ltd.
Website: www.silverstonetek.com


