Introduction
This manual provides essential information for the proper setup, operation, and maintenance of your HOKCO Weather Station Stainless Steel. Please read these instructions carefully before using the device to ensure accurate readings and long-term performance. This weather station is designed to provide precise measurements of temperature, humidity, and barometric pressure.
Product Overview
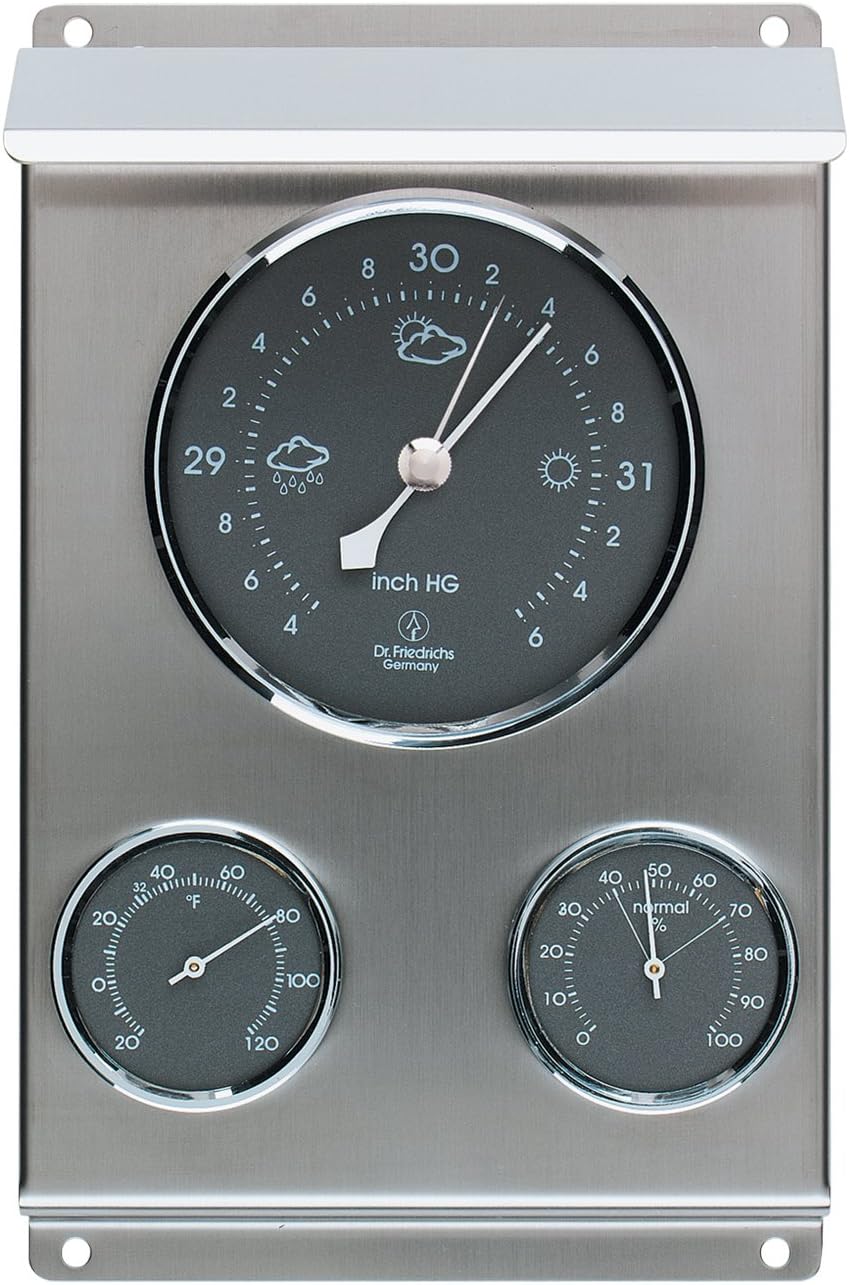
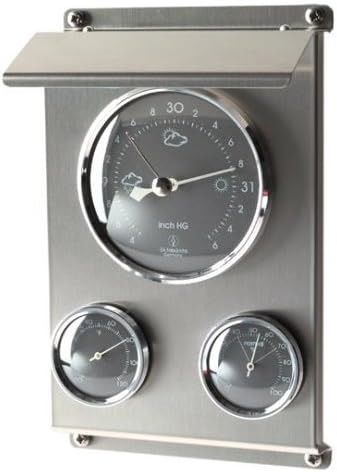
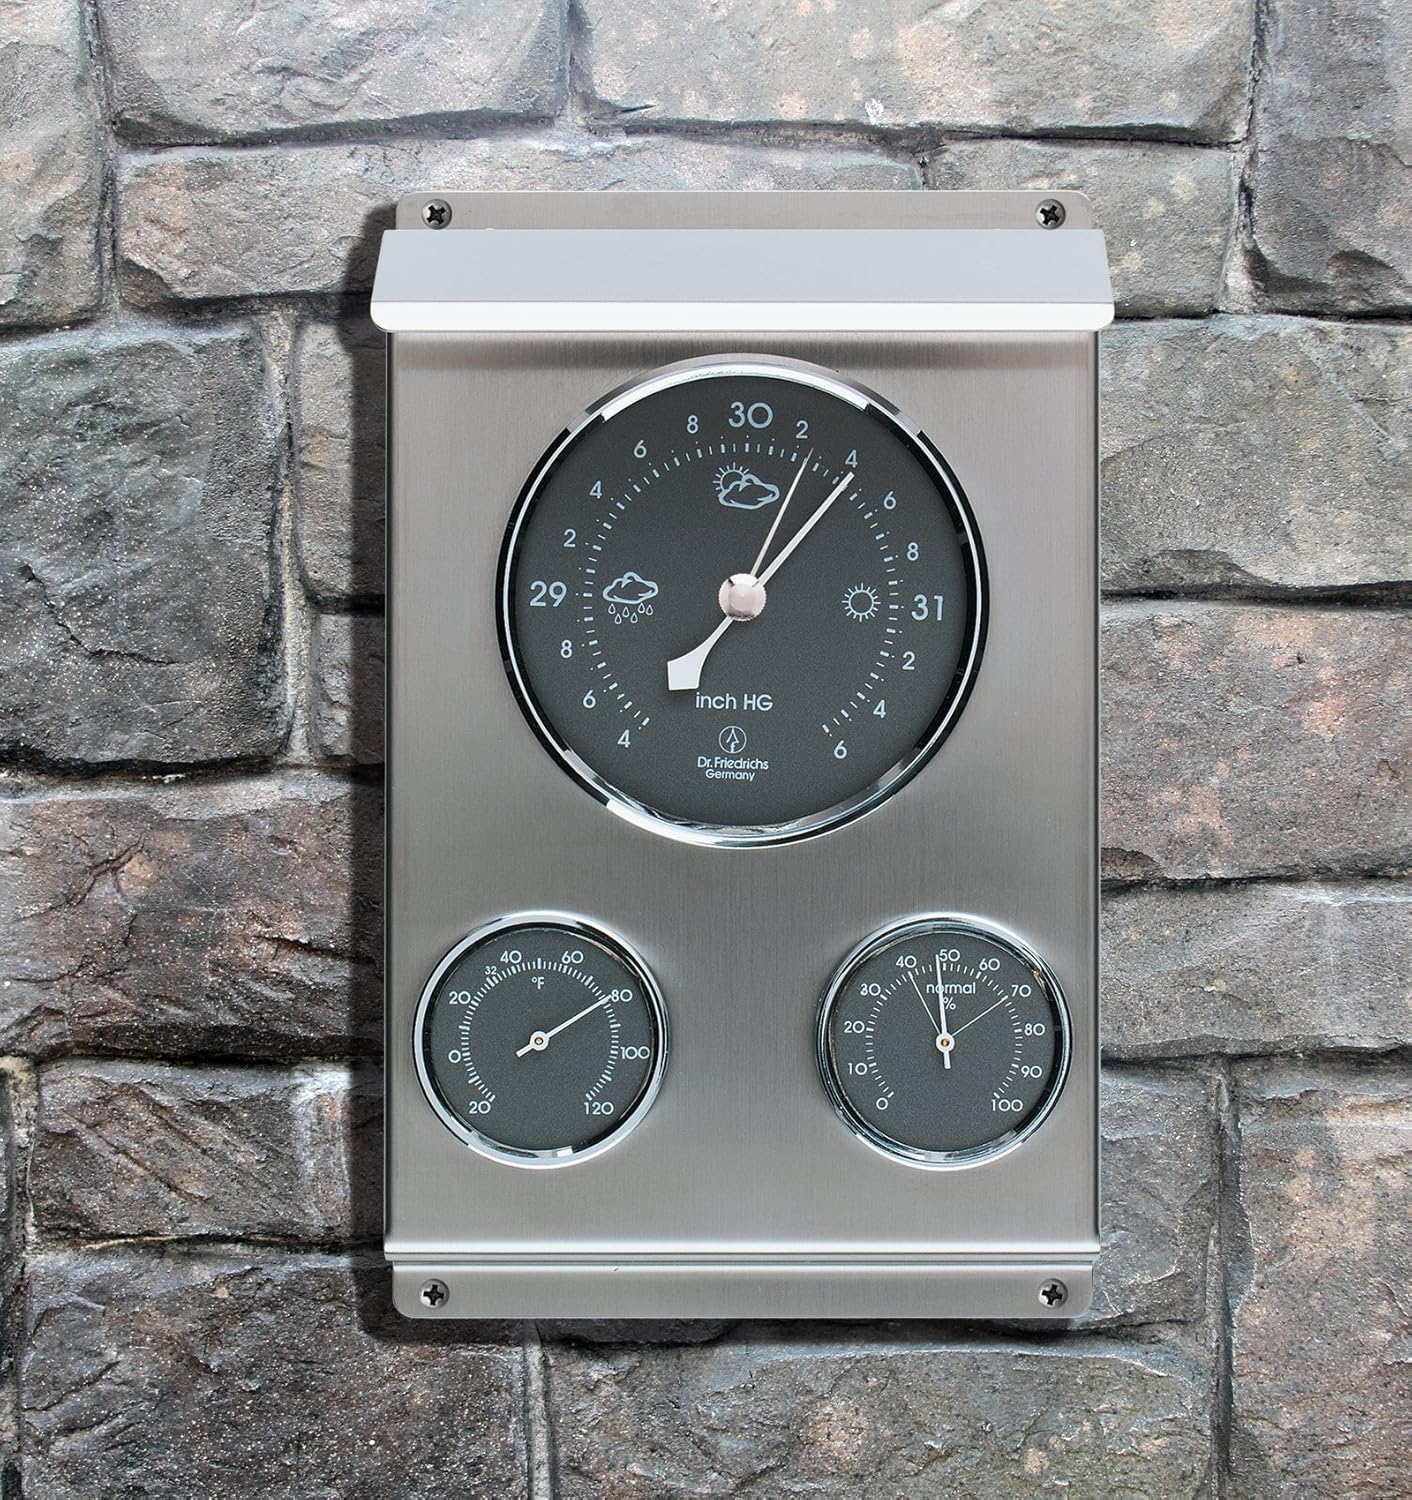
The HOKCO Weather Station features a durable stainless steel housing and integrates three analog instruments: a thermometer, a hygrometer, and an aneroid barometer. These instruments work together to provide comprehensive weather data.
- Barometer: Measures atmospheric pressure and includes an adjustable pointer to track pressure changes, aiding in short-term weather forecasting.
- Thermometer: Displays ambient air temperature.
- Hygrometer: Measures relative humidity.

Safety Information
Observe the following safety guidelines to prevent damage to the device or injury:
- Do not expose the device to extreme physical shock or vibration.
- Avoid direct exposure to corrosive substances.
- Ensure the mounting location is stable and secure to prevent the unit from falling.
- While designed for outdoor use, extreme weather conditions (e.g., severe storms, prolonged heavy rain) may affect accuracy or longevity.
Package Contents
- 1 x HOKCO Weather Station Stainless Steel Unit
Setup and Installation
The weather station can be wall-mounted both indoors and outdoors. Choose a location that provides accurate readings and is protected from direct sunlight and extreme weather if possible.
- Choose a Location: Select a stable vertical surface for mounting. For outdoor use, consider a location that is representative of the general weather conditions and offers some protection from direct rain or sun, such as under an overhang or porch.
- Mark Mounting Points: Hold the weather station against the desired mounting surface and mark the positions for the mounting screws through the pre-drilled holes.
- Install Screws: Drill pilot holes if necessary and insert appropriate screws (not included) into the marked points, leaving them slightly extended.
- Mount the Unit: Align the weather station's mounting holes with the screws and slide the unit into place. Tighten the screws until the unit is securely fastened to the wall.
Operating Instructions
Once mounted, the weather station operates continuously. Readings are displayed on the analog dials.
- Reading the Barometer: The large top dial indicates barometric pressure in inches of Mercury (inch HG). The main needle shows the current pressure. A second, adjustable pointer can be manually set to the current pressure. By observing the movement of the main needle relative to the adjustable pointer over time, you can track pressure changes, which are indicative of upcoming weather changes. Rising pressure often suggests improving weather, while falling pressure may indicate worsening conditions.
- Reading the Thermometer: The lower-left dial displays the temperature in degrees Fahrenheit (°F).
- Reading the Hygrometer: The lower-right dial shows the relative humidity as a percentage (%).
Calibration
For optimal accuracy, initial calibration may be required, especially for the barometer and hygrometer.
- Barometer Calibration: The barometer is factory-calibrated for sea level. If you are located above sea level, you may need to adjust it. Obtain the current local barometric pressure from a reliable source (e.g., local weather service, airport). On the back of the unit, there is typically a small screw or adjustment mechanism. Carefully turn this screw with a small screwdriver until the barometer needle matches the reported local pressure. Allow a few hours for the instrument to stabilize after adjustment. Note: The maximum altitude for barometer operation is 3,800 ft. above sea level.
- Hygrometer Calibration: If the hygrometer appears inaccurate, it can often be calibrated. A common method involves wrapping the unit in a damp cloth for about 30-60 minutes. After this period, the hygrometer should read approximately 95% relative humidity. If it does not, locate the adjustment screw on the back of the unit and carefully turn it until the needle points to 95%.
- Thermometer: Thermometers are generally factory-calibrated and do not require user adjustment.
Maintenance
Regular maintenance ensures the longevity and accuracy of your weather station.
- Cleaning: Wipe the stainless steel housing and glass dials with a soft, damp cloth. Avoid abrasive cleaners or solvents that could damage the finish or dials.
- Inspection: Periodically check the mounting screws to ensure the unit remains securely attached to the wall.
- Protection: While durable, consider bringing the unit indoors during severe weather events or prolonged periods of extreme cold/heat to extend its lifespan.
Troubleshooting
If you encounter issues with your weather station, try the following solutions:
- Inaccurate Readings: Re-calibrate the barometer and hygrometer as described in the Calibration section. Ensure the unit is not exposed to direct sunlight or heat sources that could skew temperature readings.
- Sticky Needles: If a needle appears stuck or moves erratically, gently tap the glass face of the instrument. If the issue persists, the internal mechanism may be obstructed or damaged.
- No Movement: Ensure the unit is properly mounted and not obstructed. If an instrument shows no movement over an extended period despite known weather changes, it may indicate a malfunction.
Specifications
| Feature | Detail |
|---|---|
| Model | B002YYE18M |
| Material | Stainless Steel |
| Color | Silver |
| Product Dimensions (Overall) | 8 in. (Length) x 5 in. (Width) x 2.5 in. (Depth) / 2.5"D x 5"W x 2.5"H |
| Barometer Diameter | 3.25 in. (8.3 cm) |
| Thermometer Diameter | 1.75 in. (4.5 cm) |
| Hygrometer Diameter | 1.75 in. (4.5 cm) |
| Temperature Range | -20°F to 120°F |
| Humidity Range | 0 to 100% RH |
| Barometric Pressure Range | 28.4" to 31.6" Hg |
| Maximum Barometer Altitude | 3,800 ft. above sea level |
| Display Type | Analog |
| Power Source | Mechanical (No batteries required) |
Warranty and Support
For information regarding warranty coverage or technical support, please refer to the product packaging or contact HOKCO customer service directly. Contact details are typically available on the manufacturer's official website or through your point of purchase.