Introduction
This manual provides essential instructions for the safe and efficient operation, maintenance, and troubleshooting of your Benchmark 11068 Hollywood Premiere Popcorn Machine. Please read this manual thoroughly before initial use and retain it for future reference. This commercial-grade popcorn popper is designed for preparing popcorn in various settings.
Important Safety Information
- Always connect the machine to a grounded electrical outlet with the correct voltage (120V) and amperage (9.4A).
- Do not immerse the machine or its electrical components in water or other liquids.
- Keep hands and utensils away from the hot kettle during operation.
- Ensure the machine is placed on a stable, level surface.
- Unplug the machine before cleaning or servicing.
- This appliance is intended for commercial use.
Setup
- Unpacking: Carefully remove all packaging materials. Inspect the machine for any damage incurred during shipping. Report any damage to the carrier immediately.
- Initial Cleaning: Before first use, wipe down all interior and exterior surfaces with a damp cloth. Clean the kettle thoroughly according to the "Maintenance and Cleaning" section.
- Placement: Position the popcorn machine on a sturdy, level, and heat-resistant surface. Ensure adequate ventilation around the unit. Keep it away from walls or other equipment to allow for proper airflow.
- Electrical Connection: Plug the machine into a dedicated 120V, 9.4A grounded electrical outlet. Do not use extension cords or adapters.

This image shows the Benchmark 11068 Hollywood Premiere Popcorn Machine from the front, filled with freshly popped popcorn. The gold-colored top and base, clear side panels, and the internal kettle mechanism are visible.
Operating Instructions
Follow these steps to prepare popcorn using your Benchmark 11068 machine:
- Preheat Kettle: Turn on the kettle heat switch. Allow the kettle to preheat for approximately 3-5 minutes. A small amount of smoke may appear during initial preheating; this is normal.
- Add Ingredients: Once preheated, add the recommended amount of popcorn oil to the kettle. Immediately add the popcorn kernels (6 oz capacity) and any desired seasoning. Close the kettle lid.
- Popping Process: The kernels will begin to pop. The popping cycle typically takes 2-3 minutes. Once the popping slows significantly (about 2-3 seconds between pops), turn off the kettle heat switch.
- Empty Kettle: Carefully tilt the kettle to empty the popped corn into the warming deck below. Use the kettle handle to avoid direct contact with hot surfaces.
- Serve: The warming deck will keep the popcorn warm. Use a scoop to serve the popcorn.
- Repeat: For subsequent batches, ensure the kettle is clean of any unpopped kernels or debris before adding new ingredients.
Note: For optimal results, use high-quality popcorn kernels and oil specifically designed for popcorn machines.
Maintenance and Cleaning
Regular cleaning and maintenance ensure the longevity and performance of your popcorn machine. Always unplug the machine and allow it to cool completely before cleaning.
Daily Cleaning
- Exterior: Wipe down all exterior surfaces with a soft, damp cloth. Avoid abrasive cleaners.
- Interior: Remove any unpopped kernels or debris from the warming deck. Wipe the interior glass panels with a glass cleaner.
- Kettle: After each use, wipe the inside and outside of the kettle with a clean cloth. For stubborn residue, a mild detergent solution can be used, ensuring thorough rinsing. Do not immerse the kettle in water.
Periodic Deep Cleaning
- Kettle Removal: For thorough cleaning, the kettle can be carefully detached from its mounting brackets. Refer to the manufacturer's instructions for specific kettle removal procedures.
- Kettle Cleaning: Fill the kettle with water and a small amount of popcorn machine cleaner or mild detergent. Heat the solution for a few minutes (do not boil dry). Scrub with a non-abrasive brush, then rinse thoroughly. Ensure the kettle is completely dry before reattaching.
- Glass Panels: For heavy grease buildup, use a commercial degreaser safe for food contact surfaces. Rinse thoroughly with water.
- Crumb Tray: Remove and clean the crumb tray located at the bottom of the machine.
Caution: Always ensure all cleaning solutions are completely rinsed off and the machine is dry before reconnecting to power.
Troubleshooting
This section addresses common issues you might encounter with your popcorn machine. For problems not listed here, contact customer support.
| Problem | Possible Cause | Solution |
|---|---|---|
| Machine does not turn on. | Not plugged in; power switch off; circuit breaker tripped. | Ensure power cord is securely plugged in. Check power switch. Reset circuit breaker if tripped. |
| Kettle not heating. | Kettle heat switch off; faulty heating element. | Verify kettle heat switch is on. If problem persists, contact customer support. |
| Popcorn not popping or poor yield. | Insufficient preheating; old kernels; incorrect oil/kernel ratio; kettle too dirty. | Allow kettle to preheat fully. Use fresh kernels. Adjust oil/kernel ratio. Clean kettle thoroughly. |
| Excessive smoke during popping. | Too much oil; old oil; kettle not cleaned properly. | Reduce oil quantity. Use fresh popcorn oil. Clean kettle to remove burnt residue. |
Specifications
| Feature | Detail |
|---|---|
| Brand | Benchmark |
| Model Number | 11068 |
| Capacity | 6 ounces (kettle) |
| Electrical Requirements | 120V, 1130W, 9.4A |
| Product Dimensions (L x W x H) | 19" x 14" x 26" |
| Item Weight | 48 Pounds |
| Material | Aluminum |
| Special Feature | Chip Resistant |
| Included Components | Kettle |
| Color | Gold |
| Manufacturer | Benchmark USA |
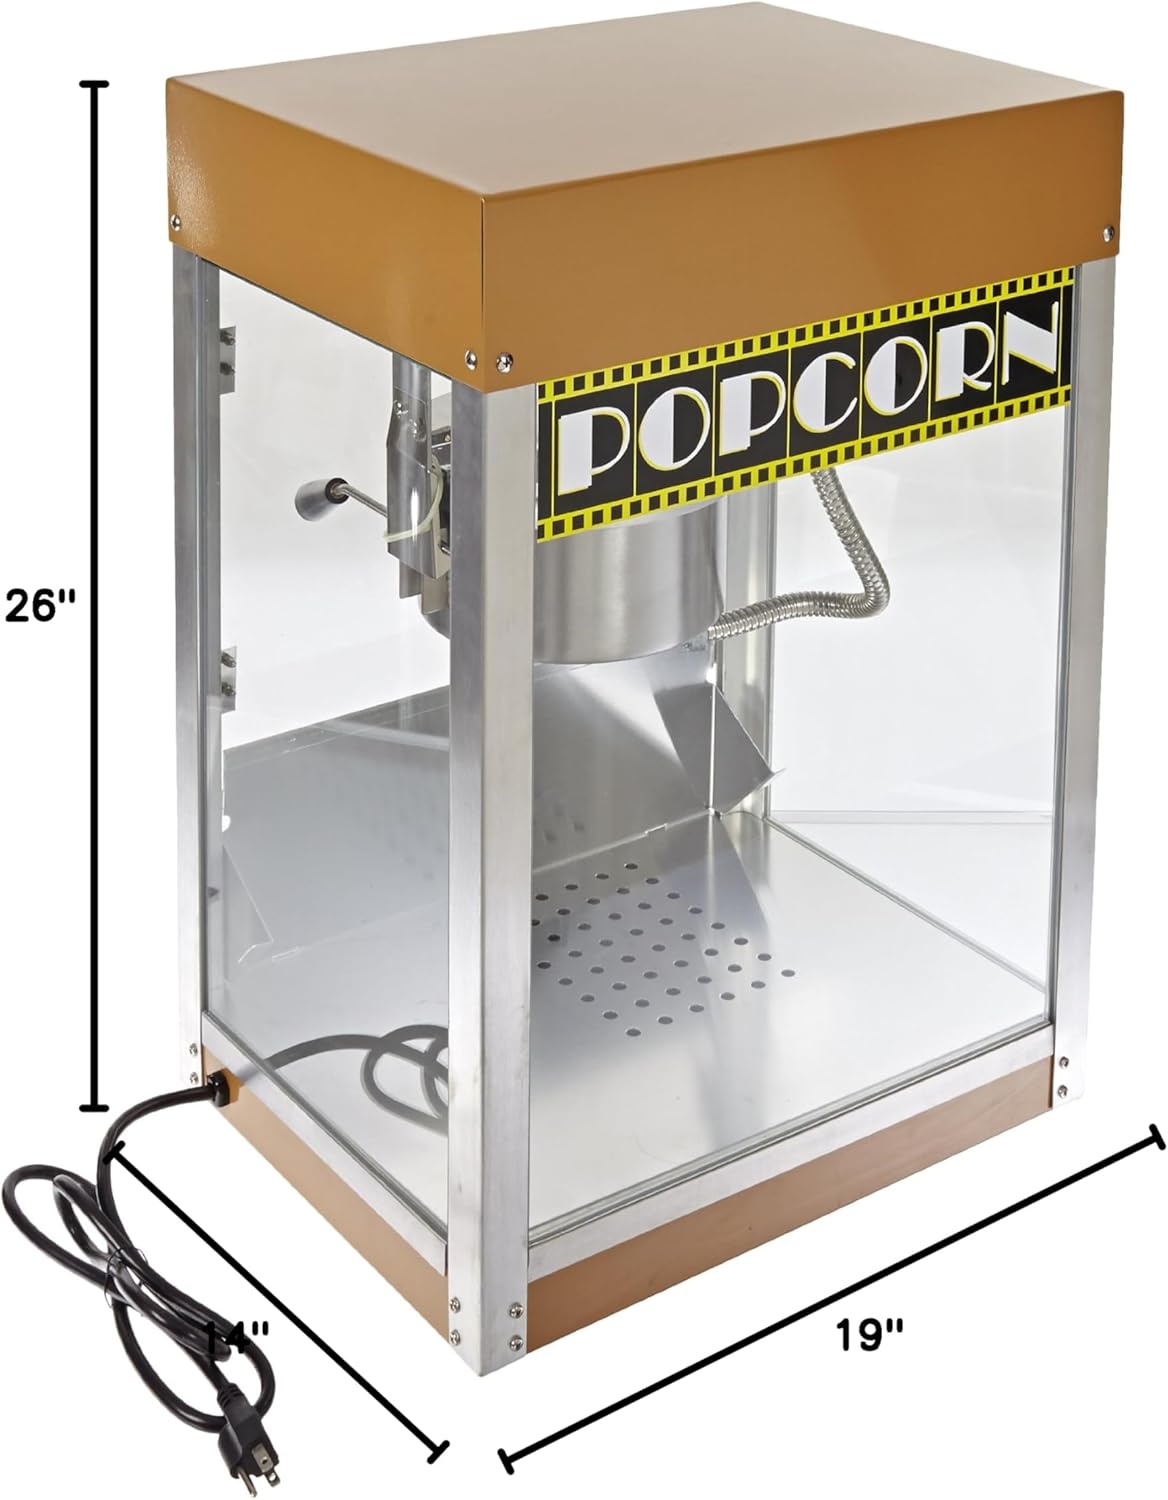
This image illustrates the physical dimensions of the Benchmark 11068 Popcorn Machine, showing its length (19 inches), width (14 inches), and height (26 inches) for proper placement and space planning.
Warranty and Support
For warranty information, technical support, or to order replacement parts, please contact Benchmark USA directly. Refer to the product packaging or the manufacturer's official website for the most current contact details.
Manufacturer: Benchmark USA
Please have your model number (11068) and purchase date available when contacting support.


