Important Safety Instructions
Read and understand all safety instructions before operating this wet/dry vacuum. Failure to follow these instructions may result in electric shock, fire, or serious injury.
- Always wear safety glasses when operating the vacuum.
- Do not vacuum toxic, carcinogenic, combustible, or other hazardous materials.
- Do not vacuum hot ashes, coals, or any flammable liquids or vapors.
- Keep children and unauthorized persons away from the operating area.
- Always unplug the power cord from the electrical outlet before performing any maintenance or cleaning.
- Do not operate the vacuum with a damaged cord or plug.
- This product contains chemicals known to the State of California to cause cancer and birth defects or other reproductive harm. Wash hands after handling.
Product Overview
The Channellock 16 Gallon 6.5 HP Wet/Dry Vac is a high-performance cleaning tool designed for both indoor and outdoor applications. It features a powerful motor, a large capacity tank, and a detachable blower for versatile use.
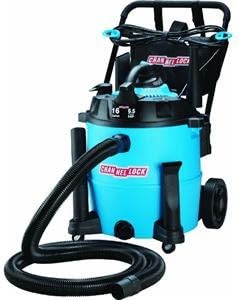
This image displays the Channellock 16 Gallon 6.5 HP Wet/Dry Vac in its assembled state, featuring its blue tank, black motor head, handle, wheels, and the attached hose with a utility nozzle.
Included Accessories:
- 10-foot, 2 1/2-inch diameter hose
- Two extension wands
- Utility nozzle
- Concentrator nozzle
- Crevice tool
- Cartridge filter (for dry use)
- Foam sleeve (for wet use)
- Blower adapter and nozzle
- Noise diffuser
- 18-foot power cord
Setup
1. Unpacking and Assembly:
- Remove all contents from the packaging.
- Attach the four easy-roll casters to the bottom of the tank by inserting them into the designated slots until they click into place.
- Ensure the motor head is securely latched onto the tank.
2. Filter Installation:
The type of filter required depends on whether you are performing wet or dry vacuuming.
- For Dry Vacuuming: Install the cartridge filter over the filter cage, securing it with the filter nut. Ensure a tight seal.
- For Wet Vacuuming: Remove the cartridge filter. Install the foam sleeve over the filter cage. The foam sleeve is designed to protect the motor during wet pickup.
3. Attaching the Hose and Accessories:
- Insert the large end of the hose into the vacuum port on the tank and twist to lock it securely.
- Attach desired accessories (extension wands, utility nozzle, crevice tool, concentrator nozzle) to the working end of the hose.
Operating Instructions
1. Dry Vacuuming:
- Ensure the cartridge filter is correctly installed.
- Plug the power cord into a grounded electrical outlet.
- Turn the vacuum ON using the large rocker switch.
- Begin vacuuming dry debris.
- When finished, turn the vacuum OFF and unplug it.
2. Wet Vacuuming:
- Remove the cartridge filter and install the foam sleeve.
- Plug the power cord into a grounded electrical outlet.
- Turn the vacuum ON using the large rocker switch.
- Begin vacuuming liquids. The vacuum will automatically shut off when the tank is full.
- When finished, turn the vacuum OFF and unplug it. Empty the tank immediately after wet pickup.
3. Blower Function:
The Channellock Wet/Dry Vac features a detachable blower for clearing debris.
- Ensure the vacuum is unplugged.
- Press the 1-button release mechanism to detach the motor head from the tank.
- Locate the blower port on the motor head.
- Insert the hose into the blower port and twist to lock.
- Attach the blower adapter and nozzle to the end of the hose for concentrated airflow.
- Plug the power cord into a grounded electrical outlet and turn the unit ON.
- When finished, turn the unit OFF and unplug it.
Maintenance
1. Cleaning the Tank:
After each use, especially wet pickup, empty the tank and rinse it with water. Allow it to air dry completely before storage.
2. Filter Care:
- Cartridge Filter: For dry use, tap off excess dust or brush clean. Replace the filter when suction power decreases significantly or if the filter is damaged.
- Foam Sleeve: For wet use, rinse the foam sleeve with water and allow it to air dry completely before reinstalling or storing.
3. Hose and Accessory Care:
Inspect the hose and accessories for blockages or damage. Clear any obstructions and clean as needed. Store accessories in the onboard storage compartments.
4. Cord Storage:
Wrap the power cord neatly around the cord organizer on the top handle for convenient storage.
Troubleshooting
| Problem | Possible Cause | Solution |
|---|---|---|
| Vacuum does not start | No power to outlet; Power cord damaged; Rocker switch faulty | Check power supply; Inspect cord/plug for damage; Contact service for switch replacement |
| Loss of suction | Clogged filter; Full tank; Hose or accessory blockage; Loose hose connection | Clean or replace filter; Empty tank; Clear blockages; Secure hose connections |
| Water coming from exhaust | Tank is full during wet pickup; Foam sleeve not installed or damaged | Empty tank; Install or replace foam sleeve |
| Blower not working | Hose not securely attached to blower port; Motor head not properly seated | Ensure hose is locked into blower port; Re-seat motor head onto tank |
Specifications
- Model: VBV1612
- Capacity: 16 Gallons
- Motor Horsepower: 6.5 Peak HP
- Hose Length: 10 feet (3.04 meters)
- Hose Diameter: 2 1/2 inches
- Power Cord Length: 18 feet
- Blower Speed: 265 mph (detachable)
- Filter Type (Dry): Cartridge
- Filter Type (Wet): Foam Sleeve
- Item Weight: Approximately 34.8 pounds
- Special Features: Wheels, On-board storage, Noise diffuser, Contour air control handle


