
1. Introduction
This manual provides detailed instructions for the setup, operation, and maintenance of your Technoline WS 9120 Weather Station. Please read this manual thoroughly before using the device to ensure correct operation and to prevent damage.
The Technoline WS 9120 is a compact weather station featuring a quartz clock, indoor temperature and humidity display, weather forecast, and an alarm function with snooze.
2. Safety Information
- Do not expose the device to extreme temperatures, direct sunlight, or high humidity.
- Avoid dropping the device or subjecting it to strong impacts.
- Do not attempt to disassemble or repair the unit yourself. Refer all servicing to qualified personnel.
- Keep batteries out of reach of children. If swallowed, seek medical attention immediately.
- Dispose of used batteries according to local regulations.
3. Package Contents
Upon unpacking, please ensure all items are present and in good condition:
- Technoline WS 9120 Weather Station Unit
- User Manual (this document)
Note: Batteries are not included and must be purchased separately.
4. Device Overview
Familiarize yourself with the main components and controls of your WS 9120 Weather Station.
4.1 Front View (Display and Buttons)

Figure 1: Front view of the Technoline WS 9120, displaying time, weekday, forecast, humidity, and temperature. Control buttons are visible at the bottom.
- LCD Display: Shows time, date, weekday, indoor temperature, indoor humidity, weather forecast symbols, and temperature trend.
- MODE Button: Used to switch between display modes and enter setting modes.
- MAX/MIN Button: Displays maximum and minimum recorded temperature and humidity.
- SNZ (Snooze) Button: Activates the snooze function for the alarm.
- UP Button: Adjusts values upwards in setting modes.
- DOWN Button: Adjusts values downwards in setting modes.
- LIGHT Button: Activates the blue backlight for a few seconds.
4.2 Rear View (Battery Compartment)
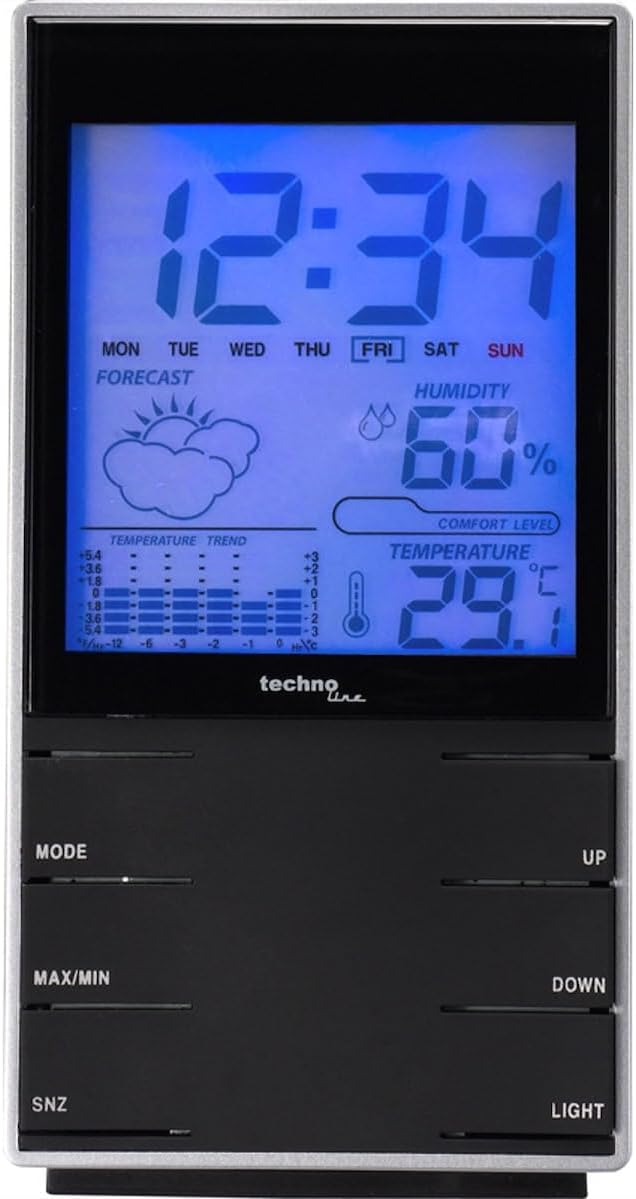
Figure 2: Rear view of the Technoline WS 9120, showing the battery compartment cover.
- Battery Compartment: Located on the rear, holds 2 x AAA batteries.
- Table Stand: Integrated stand for desktop placement.
5. Setup
5.1 Battery Installation
- Open the battery compartment cover on the rear of the unit.
- Insert 2 new AAA batteries, observing the correct polarity (+ and - markings).
- Close the battery compartment cover securely.
- The unit will power on and display default settings.
5.2 Initial Settings
After battery installation, the device will typically start in time display mode. You may need to set the time, date, and other preferences.
- Setting Time and Date:
- Press and hold the MODE button for approximately 3 seconds to enter time setting mode. The hour digit will flash.
- Use the UP or DOWN buttons to adjust the hour.
- Press MODE again to confirm the hour and move to setting the minute.
- Repeat this process for minutes, year, month, and day.
- Press MODE one last time to exit setting mode.
- 12/24 Hour Format: While in normal time display mode, press the UP button to toggle between 12-hour and 24-hour formats.
- Celsius/Fahrenheit: While in normal time display mode, press the DOWN button to toggle between Celsius (°C) and Fahrenheit (°F) temperature units.
6. Operating Instructions
6.1 Time and Date Display
The main display shows the current time, weekday, and date. The weekday automatically adjusts after setting the date.
6.2 Indoor Temperature and Humidity
The device continuously measures and displays the indoor temperature and relative humidity. The temperature trend indicator shows if the temperature is rising, falling, or stable.
6.3 Weather Forecast
The weather station provides a forecast using graphical symbols (e.g., sunny, cloudy, rainy). This forecast is based on changes in atmospheric pressure detected by the internal sensor and is an estimation for the next 12-24 hours.
6.4 Alarm Clock Function
- Setting the Alarm:
- From normal time display, press the MODE button once to display the alarm time.
- Press and hold the MODE button for approximately 3 seconds. The alarm hour will flash.
- Use the UP or DOWN buttons to adjust the alarm hour.
- Press MODE again to confirm the hour and move to setting the alarm minute.
- Use the UP or DOWN buttons to adjust the alarm minute.
- Press MODE one last time to exit alarm setting mode.
- Activating/Deactivating the Alarm: While the alarm time is displayed (after pressing MODE once), press the UP button to toggle the alarm ON or OFF. An alarm icon will appear on the display when activated.
- Snooze Function: When the alarm sounds, press the SNZ button to activate the snooze function. The alarm will sound again after approximately 5 minutes. To stop the alarm completely, press any other button.
6.5 Maximum and Minimum Readings
The device records the maximum and minimum indoor temperature and humidity values since the last reset.
- Press the MAX/MIN button once to display the maximum recorded temperature and humidity.
- Press the MAX/MIN button again to display the minimum recorded temperature and humidity.
- Press the MAX/MIN button a third time to return to the current readings.
- To clear the MAX/MIN records, press and hold the MAX/MIN button while the maximum or minimum values are displayed.
6.6 Backlight
Press the LIGHT button to activate the blue backlight for a few seconds, improving visibility in low-light conditions.
7. Maintenance
- Cleaning: Wipe the device with a soft, damp cloth. Do not use abrasive cleaners or solvents.
- Battery Replacement: When the display becomes dim or functions are erratic, replace the batteries. Always replace both batteries at the same time with new AAA batteries.
- Storage: If the device will not be used for an extended period, remove the batteries to prevent leakage.
8. Troubleshooting
| Problem | Possible Cause | Solution |
|---|---|---|
| No display or dim display | Low or dead batteries; incorrect battery polarity. | Replace batteries with new AAA batteries, ensuring correct polarity. |
| Incorrect time/date | Time/date not set correctly after battery installation or reset. | Refer to Section 5.2 "Initial Settings" to set the time and date. |
| Weather forecast seems inaccurate | Weather forecast is an estimation based on local pressure changes, not a professional forecast. | The forecast is a general indicator. For precise local weather, consult official weather services. |
| Buttons unresponsive | Temporary software glitch; low batteries. | Remove batteries for 1 minute, then reinsert. Replace batteries if issue persists. |
9. Specifications
- Model: WS 9120
- Brand: Technoline
- Display Type: LCD with blue backlight
- Functions: Quartz clock, Weekday display, Indoor temperature, Indoor humidity, Temperature trend, Weather forecast symbols, Alarm with snooze.
- Temperature Range (Indoor): Typically 0°C to +50°C (32°F to 122°F)
- Humidity Range (Indoor): Typically 20% to 95% RH
- Power Source: 2 x AAA 1.5V batteries (not included)
- Dimensions (approx.): 2.95 x 1.54 x 5.63 inches (7.5 x 3.9 x 14.3 cm)
- Weight (approx.): 0.11 Kilograms / 3.87 ounces (without batteries)
10. Warranty and Support
Technoline products are manufactured to high-quality standards. For warranty information or technical support, please refer to the warranty card included with your purchase or contact your local retailer or Technoline customer service. Please retain your proof of purchase for any warranty claims.
For further assistance, you may visit the official Technoline website or contact their support channels.


