1. Introduction
This manual provides essential information for the safe and efficient operation, installation, and maintenance of your Raypak 266,000 BTU Digital Electronic Ignition Natural Gas Pool Heater. This heater is designed for residential swimming pool and spa applications, featuring a digital thermostat, electronic ignition, and durable construction.
2. Safety Information
WARNING: Improper installation, adjustment, alteration, service, or maintenance can cause property damage, injury, or death. Read the installation, operating, and maintenance instructions thoroughly before installing or servicing this equipment.
- Always ensure the heater is installed by a qualified professional in accordance with all local codes and regulations.
- Do not store or use gasoline or other flammable vapors and liquids in the vicinity of this or any other appliance.
- Ensure adequate ventilation around the heater.
- Keep the area around the heater clear of combustible materials, debris, and obstructions.
- Before performing any maintenance or service, disconnect all electrical power to the unit.
- Never operate the heater if any part has been submerged in water. Immediately call a qualified service technician to inspect the heater and replace any part of the control system and any gas control that has been submerged in water.
3. Product Overview
The Raypak 266,000 BTU Digital Electronic Ignition Natural Gas Pool Heater is engineered for durability and efficiency. It features a digital thermostat for precise temperature control and an electronic ignition system for reliable startup. The unit is constructed with polymer headers and a wind-resistant design, ensuring longevity and performance in various weather conditions.
Key features include:
- Digital Thermostat: Provides accurate and easy temperature setting.
- Electronic Ignition: Ensures consistent and safe ignition without a standing pilot light.
- Polymer Headers: Designed for durability and resistance to corrosion.
- Space-Age Material Heat Exchanger: Prevents residual heat retention, allowing for installation without costly metal heat sinks.
- Wind-Resistant Design: Built to withstand various weather conditions, enhancing outdoor performance.
- Condensation Protection: Integrated features to protect against condensation, extending the heater's lifespan.

Figure 3.1: Exterior view of the Raypak 266,000 BTU Pool Heater. This image shows the compact, rectangular design with a dark grey body and light grey side panels, featuring the Raypak logo on the front.
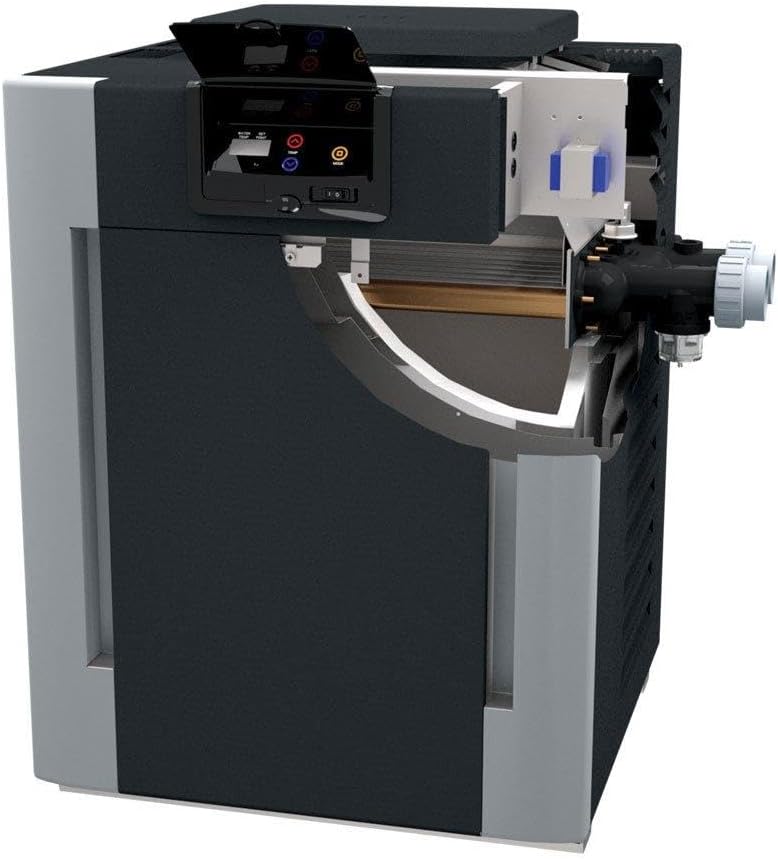
Figure 3.2: Internal view of the Raypak 266,000 BTU Pool Heater. This cutaway view illustrates the heat exchanger, burner assembly, and control panel, highlighting the internal components responsible for heating the pool water.
4. Setup and Installation
Installation of the Raypak pool heater requires professional expertise. It is highly recommended that a qualified and licensed installer perform all setup procedures, including gas, water, and electrical connections, to ensure safety and compliance with local codes.
4.1 Placement Considerations
The heater must be installed outdoors on a level, non-combustible surface. Ensure adequate clearance from walls, fences, and other structures for proper ventilation and service access. Refer to the dimension diagram for specific clearance requirements.
4.2 Connections
- Gas Connection: Connect the natural gas supply line to the heater's gas inlet. Ensure all gas connections are leak-tested.
- Water Connection: Connect the pool's plumbing to the heater's inlet and outlet ports. Ensure proper water flow direction.
- Electrical Connection: Connect the heater to a dedicated electrical circuit as per local electrical codes. The heater features electronic ignition and requires a stable power supply.

Figure 4.1: Dimensional diagram for Raypak Pool Heaters. This diagram provides detailed measurements for various aspects of the heater, including height, width, depth, and connection points, crucial for proper installation planning.
5. Operating Instructions
Your Raypak pool heater is designed for user-friendly operation via its digital control panel.
5.1 Initial Startup
- Ensure all gas, water, and electrical connections are secure and properly installed.
- Verify that the pool pump is running and water is flowing through the heater. The heater requires adequate water flow to operate safely.
- Turn on the electrical power supply to the heater.
- Turn on the gas supply to the heater.
5.2 Setting Temperature
- Use the digital control panel to set your desired water temperature. Refer to the heater's display for current temperature and settings.
- The electronic ignition system will automatically initiate the burner when there is a call for heat and sufficient water flow is detected. The pilot only comes on when there is a call for heat.
5.3 Shutting Down the Heater
- To turn off the heater, lower the set temperature below the current water temperature or turn off the heater via the control panel.
- For extended periods of non-use or maintenance, turn off the gas supply and electrical power to the unit.
6. Maintenance
Regular maintenance is crucial for the longevity and efficient operation of your Raypak pool heater. It is recommended to have the heater inspected and serviced annually by a qualified service technician.
- Keep Area Clear: Ensure the area around the heater is free from leaves, debris, and any obstructions that could block airflow or pose a fire hazard.
- Inspect for Leaks: Periodically check for any signs of water or gas leaks. Address any leaks immediately by contacting a professional.
- Clean Burner and Heat Exchanger: Over time, dust and debris can accumulate. A qualified technician can clean these components to maintain efficiency.
- Check Water Chemistry: Proper pool water chemistry helps prevent scaling and corrosion within the heater.
- Winterization: In colder climates, proper winterization procedures are essential to prevent freeze damage. Consult your installer or the manufacturer's guidelines for specific instructions.
7. Troubleshooting
Before calling for service, review the following common issues and their potential solutions. For complex problems, always contact a qualified service technician.
| Problem | Possible Cause | Solution |
|---|---|---|
| Heater not turning on. | No power, no gas, low water flow, thermostat set too low. | Check electrical breaker, ensure gas valve is open, verify pool pump is running and filter is clean, increase set temperature. |
| Heater cycles on and off frequently. | Insufficient water flow, dirty filter, air in system, oversized heater. | Check water flow, clean filter, bleed air from plumbing, consult professional for sizing issues. |
| Pilot light not igniting. | No gas supply, ignition module fault, dirty pilot assembly. | Ensure gas supply is on. If problem persists, contact a qualified technician. |
| Error code displayed. | Specific system fault. | Note the error code and consult the full service manual or contact Raypak customer support with the code. |
8. Specifications
The following specifications apply to the Raypak 266,000 BTU Digital Electronic Ignition Natural Gas Pool Heater (Model: P-R266A-EN-C).
- Brand: Raypak
- Model Number: P-R266A-EN-C
- BTU Input: 266,000 BTU
- Fuel Type: Natural Gas
- Ignition Type: Electronic Ignition
- Special Feature: Programmable Thermostat
- Indoor/Outdoor Usage: Outdoor
- Product Dimensions (Approx.): 28"D x 28"W x 40"H
- Item Weight: 210 pounds
- Recommended Uses: Pool, Spa
- Mounting Type: Floor Mount
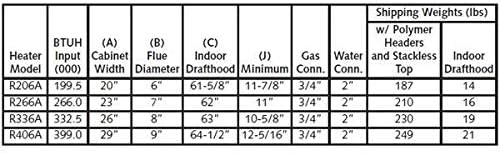
Figure 8.1: Raypak Pool Heater Model Specifications Table. This table provides detailed specifications for various Raypak heater models, including BTU input, cabinet width, flue diameter, and shipping weights, allowing for comparison and precise planning.
9. Warranty and Support
Specific warranty terms and conditions for your Raypak pool heater are typically provided with the product at the time of purchase or can be obtained directly from the manufacturer. It is important to register your product to ensure full warranty coverage.
For technical support, service, or to inquire about warranty claims, please contact Raypak customer service or visit their official website. Ensure you have your model number (P-R266A-EN-C) and serial number ready when contacting support.
Note: Unauthorized service or modifications may void your warranty.


