
1. Introduction
Thank you for purchasing the Karcher KA 350 Compact Stereo System. This versatile audio system combines modern design with a wide range of playback options, including a 3-disc CD changer, dual cassette deck, turntable, USB port, SD card reader, and an integrated radio. This manual provides essential information for safe operation, setup, and maintenance of your device. Please read it thoroughly before use and retain it for future reference.
2. Important Safety Instructions
- Power Source: Ensure the power supply voltage matches the rating label on the unit.
- Ventilation: Do not block any ventilation openings. Allow adequate space around the unit for proper airflow.
- Water and Moisture: Do not expose the unit to rain, moisture, dripping, or splashing. Do not place objects filled with liquids, such as vases, on the apparatus.
- Heat: Keep the unit away from heat sources such as radiators, heat registers, stoves, or other apparatus (including amplifiers) that produce heat.
- Cleaning: Unplug the unit from the wall outlet before cleaning. Use a soft, dry cloth only.
- Servicing: Do not attempt to service this product yourself. Refer all servicing to qualified service personnel.
- Children: Keep the unit and its accessories out of reach of children.
- Laser Safety: This product uses a laser. Use of controls or adjustments or performance of procedures other than those specified herein may result in hazardous radiation exposure.
3. Package Contents
Please check that all items are present and in good condition:
- Karcher KA 350 Compact Stereo System (Main Unit)
- Remote Control
- Instruction Manual
- Stereo Speakers (2 units)
- Power Cable
- FM Antenna (wire type)
4. Product Overview
4.1 Front Panel Controls
The front panel provides access to all primary functions and controls for the KA 350 system.

Figure 4.1: Front Panel Controls
- ON/STANDBY Button: Powers the unit on or off.
- FUNCTION Button: Selects between CD, Tuner (Radio), Phono (Turntable), Tape (Cassette), and USB/SD modes.
- VOLUME Knob: Adjusts the master volume level.
- CD Controls: Play/Pause, Stop, Skip/Search (Forward/Backward), Open/Close CD tray.
- Cassette Deck Controls: Play, Record, Fast Forward, Rewind, Stop/Eject for Deck 1 and Deck 2.
- USB/SD Controls: Play/Pause, Stop, Skip/Search (Forward/Backward).
- Tuner Controls: Band selection (AM/FM), Tuning Up/Down, Memory presets.
- Display: Shows current mode, track information, radio frequency, and time.
4.2 Rear Panel Connections
The rear panel houses all necessary input and output connections for the system.
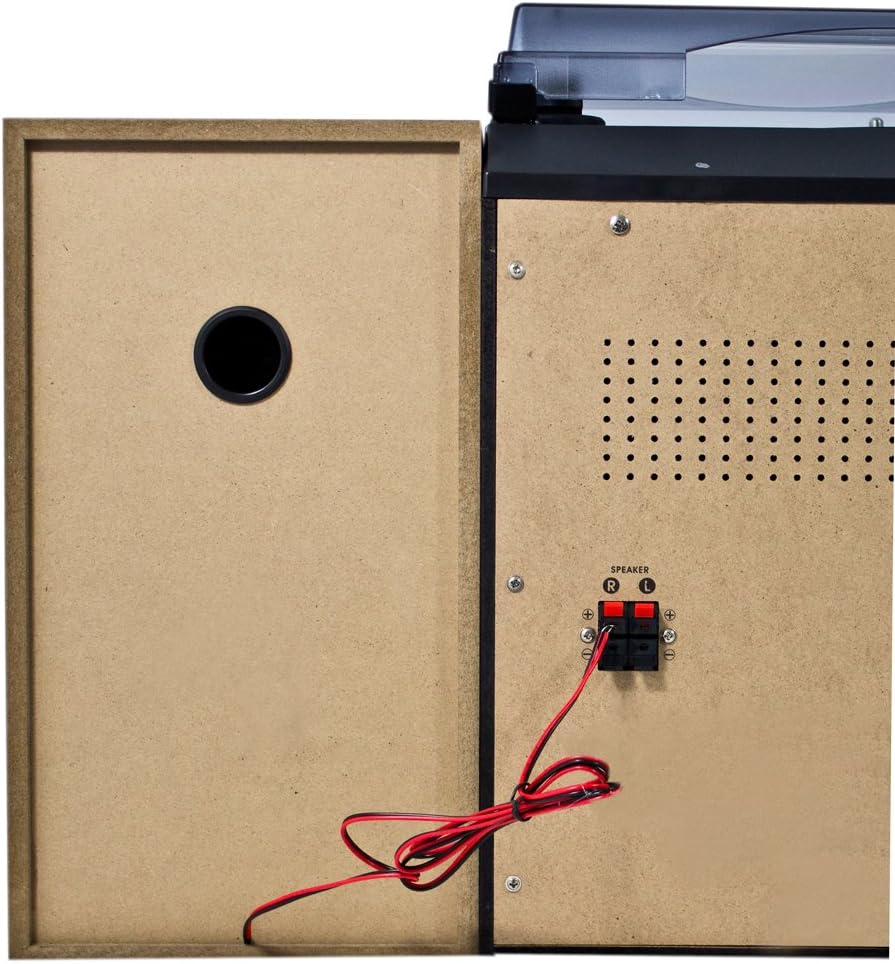
Figure 4.2: Rear Panel Connections
- Speaker Terminals (R/L): Connect the included stereo speakers. Ensure correct polarity (+ to + and - to -).
- AC Power Input: Connect the power cable here.
- FM Antenna Terminal: Connect the supplied FM wire antenna for radio reception.
4.3 Main Components

Figure 4.3: Karcher KA 350 Main Components
- Turntable: Located on top, for playing vinyl records.
- 3-Disc CD Changer: Front-loading tray for multiple CDs.
- Dual Cassette Deck: Two cassette compartments for playback and recording.
- USB Port: For connecting USB flash drives.
- SD Card Slot: For inserting SD memory cards.
- Stereo Speakers: Two external speakers for audio output.
5. Setup
5.1 Unpacking and Placement
- Carefully remove all components from the packaging.
- Place the main unit on a stable, flat surface.
- Position the speakers on either side of the main unit, ensuring they are at an equal distance for optimal stereo sound.
- Ensure there is adequate ventilation around the unit.
5.2 Connecting the Speakers
Connect the supplied speakers to the speaker terminals on the rear of the main unit.

Figure 5.1: Speaker Unit
- Identify the speaker wires. Each wire typically has two strands, one marked for positive (+) and one for negative (-).
- Connect the positive (+) terminal of the left speaker to the 'L+' terminal on the main unit's rear panel.
- Connect the negative (-) terminal of the left speaker to the 'L-' terminal on the main unit's rear panel.
- Repeat the process for the right speaker, connecting it to the 'R+' and 'R-' terminals.
- Ensure all connections are secure to prevent sound distortion or damage.
5.3 Connecting the FM Antenna
For optimal radio reception, connect the supplied FM wire antenna.
- Insert the FM antenna plug into the FM antenna jack on the rear panel.
- Extend the wire antenna fully and position it for the best possible reception. You may need to experiment with its placement.
5.4 Power Connection
- Plug the AC power cable into the AC power input on the rear of the main unit.
- Plug the other end of the power cable into a standard wall outlet.
6. Operating Instructions
6.1 Power On/Off
Press the ON/STANDBY button on the front panel or remote control to turn the unit on or off.
6.2 Mode Selection
Press the FUNCTION button repeatedly to cycle through the available modes: CD, Tuner (Radio), Phono (Turntable), Tape (Cassette), and USB/SD.
6.3 CD Player Operation

Figure 6.1: CD Changer Tray
- Press the FUNCTION button to select CD mode.
- Press the OPEN/CLOSE button to open the CD tray.
- Place up to three CDs onto the disc trays, label side up.
- Press the OPEN/CLOSE button again to close the tray.
- Press the PLAY/PAUSE button to start playback.
- Use the SKIP/SEARCH buttons to navigate between tracks or fast forward/rewind.
6.4 Cassette Player/Recorder Operation
- Press the FUNCTION button to select TAPE mode.
- Press the STOP/EJECT button on either Deck 1 or Deck 2 to open the cassette compartment.
- Insert a cassette tape and close the compartment.
- Press the PLAY button to start playback.
- To record, insert a blank tape into Deck 2 (for recording from Deck 1 or other sources) or Deck 1 (for recording from external sources if applicable). Press the RECORD button.
6.5 Turntable Operation
- Press the FUNCTION button to select PHONO mode.
- Open the dust cover.
- Place a vinyl record on the platter.
- Select the appropriate speed (33, 45, or 78 RPM) using the speed selector switch.
- Carefully lift the tone arm and place the stylus onto the desired groove of the record.
- At the end of the record, manually return the tone arm to its rest.
6.6 USB/SD Playback
- Press the FUNCTION button to select USB/SD mode.
- Insert a USB flash drive into the USB port or an SD card into the SD card slot.
- The unit will automatically detect and begin playing compatible audio files (MP3, WMA, AAC).
- Use the PLAY/PAUSE and SKIP/SEARCH buttons to control playback.
6.7 Radio Operation
- Press the FUNCTION button to select TUNER mode.
- Press the BAND button to select between FM and AM bands.
- Use the TUNING buttons to manually tune to a station or press and hold for automatic scanning.
- To save a station, press the MEMORY button, then use the SKIP/SEARCH buttons to select a preset number, and press MEMORY again to confirm.
6.8 Remote Control
The included remote control allows convenient operation of all functions from a distance. Ensure batteries are correctly inserted.
7. Maintenance
7.1 Cleaning the Unit
- Always unplug the unit from the power outlet before cleaning.
- Use a soft, dry cloth to wipe the exterior surfaces.
- Do not use abrasive cleaners, waxes, or solvents as they may damage the finish.
7.2 Turntable Stylus Care
- Handle the stylus with extreme care. Only touch the tone arm, not the stylus itself.
- Clean the stylus periodically with a soft brush, brushing from back to front.
- Replace the stylus when it shows signs of wear (e.g., distorted sound, skipping).
7.3 Cassette Deck Care
- Regularly clean the tape heads, capstan, and pinch roller with a cotton swab lightly dampened with isopropyl alcohol.
- Demagnetize the tape heads periodically to maintain sound quality.
8. Troubleshooting
| Problem | Possible Cause | Solution |
|---|---|---|
| No power | Power cable not connected; Power outlet not active | Check power cable connection; Try a different outlet |
| No sound | Volume too low; Speakers not connected correctly; Incorrect function mode selected | Increase volume; Check speaker connections and polarity; Select correct function mode |
| CD skipping or not playing | CD is dirty or scratched; CD inserted incorrectly | Clean or replace CD; Insert CD label side up |
| Poor radio reception | Antenna not connected or poorly positioned; Weak signal | Connect and adjust FM antenna; Try repositioning the unit |
| Turntable speed incorrect | Wrong speed selected | Adjust the speed selector switch (33/45/78 RPM) |
| USB/SD playback issues | Incompatible file format; USB/SD card not inserted correctly; Corrupted files | Ensure files are MP3, WMA, or AAC; Reinsert USB/SD card; Try a different USB/SD card |
9. Specifications
| Feature | Specification |
|---|---|
| Brand | Karcher |
| Model Number | KA 350 |
| Connectivity Technology | FM/MW Tuner, USB, SD |
| Color | Black |
| Speaker Type | Stereo (2 speakers included) |
| Item Dimensions (L x W x H) | 70.5 x 41 x 37.3 cm |
| Power Source | Corded Electric |
| Compatible Devices | Smartphone, Tablet, MP3 Player, Personal Computer |
| Item Weight | 10.8 Kilograms |
| Power Output (RMS) | 2 x 5 W (Total 50 W) |
| Supported Media Standards | MP3, CD, Cassette, USB, SD |
| Supported Audio Formats | CD-DA, MP3, WMA, AAC |
| Bluetooth Support | No |
| Number of Speakers | 2 |
| Audio Output Mode | Stereo |
| Surround Sound Configuration | 2.0 |
| Included Components | Compact system, Remote control, Instruction manual |
10. Warranty and Support
For warranty information and technical support, please refer to the warranty card included with your product or visit the official Karcher website. Keep your proof of purchase for any warranty claims.
Manufacturer: Karcher


